|
Something Completely Different (8/2/08) A tip for would be WebYep users; a return to websites for writers; Flash-encpsulated DVD for a client's website; and down to the sea in (very small) ships. WebYep is a dream of an idea: a suite of PHP recipes that will allow clients to update their own websites without recourse to a db or a full content management system, and once you get it working, it seems to be just the ticket. When I first installed it, nothing I did would keep it from protesting
and, worse, and surprising, is that no amount of Googling would find just those strings and the solution. Hence this page. The fix is: in Dreamweaver, open a page, anypage. Select Modify, then Page Properties, then Title/Encoding. Then select Unicode UTF8, and insure that the checkbox to set a Byte Order Marker (BOM) is NOT checked. There may be other combinations of these settings that will work for you and your pages, but those are the ones that finally turned the trick for me. Evidently, FTP clients can also append a BOM, so I set mine to always upload PHP as ASCII (it should do that anyway, but let's be sure) so it will not be tempted to add a BOM of its own. Voila. You're welcome.
Websites for writers. Once upon a time this was a real specialty of mine. We're about to try them again, under slightly different rules of engagement. This time I'm keeping a credit line for my website development business, so that I don't disappear from view and thus have no clients, cred, or folio when and if the team effort gets distracted, takes up other enthusiasms, or otherwise steps off the playing field. Stay tuned.
Got a DVD and need to put a clip from it on the web? Here's how I just did it for a client in San Diego. www.kaestnereyecare.com/video I don't do this very often, so I am scribbling down the rough recipe here for my reference (and yours). There must be 50 ways to do this, and some are surely more elegant and convenient than mine. But this works. Use AVS Video Converter to rip the DVD to MPEG, changing size and bitrates for video and audio to something appropriate. Then I used Microsoft's Movie Maker to trim out just the section of the video needed, to add fade-in and fade-out effects, and output a new file. Import it into Flash as usual: "import video," specify progressive download, choose a useful control skin. Save, publish, pull the resulting .SWF into Dreamweaver like any other Flash object and you're done. Exact format details for each step omitted so I won't feel compelled to rewrite this advice every time I try a new flavor of video at each step along the way.
Not different enough for you?
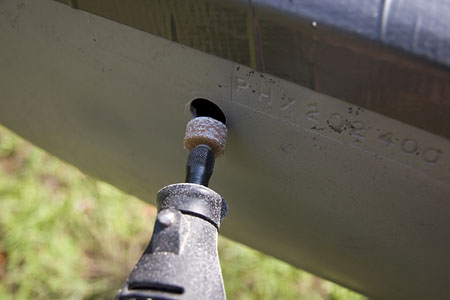
Kayaking, at last! People, I live on a wetland on a gorgeous river. Have for six years. Have had the kayak in the water, twice in all that time. Stupid. Last time, I used a nice little portage cart to tow the kayak behind the Honda (slowly!) to the community access lot and then used it to walk the boat down to the water's edge. Tedious: boat kept coming off on the very rough terrain. That's quite a hike, with a 150 foot (or more) change in elevation. Then I spent half an hour getting the boat out of the water and ready to come home. Trip up the hill was much worse than the trip down. Took longer than the two mile cruise home from Nolan Creek's infall. This will not do. So I plotted and planned a better solution during nightly drop-off spells (in bed, not quite asleep, no point in thinking more about work, so think about this instead). Today all the parts came together (13.75-inch wheels from a lawn mower from eBay, assorted tubes and rods etc from a hardware store in Black Mountain, NC). Set the boat on pavement. Measure 10-1/4 inches from the stern, 6-1/2 inches up from the ground. Drill two holes with a 5/8-inch Forstner bit. Naturally, they go through normal to the fiberglass and need to be camfered to be at right angles to the keel line. Use a Dremel tool to ream them out slightly while holding the tool so the edges of the holes line up with each other straight across the boat. Set a piece of tubing in the holes (I used a 1/2 -inch ID copper scrap I bought at the Hardware and General Store in downtown Black Mountain --classier than the PVC I intended to use and a nice tight fit). Push the tubing through to be sure the holes align. Mark how long the tube needs to be. Take it out and back to the shop. Cut it with a miter or chop saw. Rough up the parts that will be near the fiberglass so they'll take adhesive better. Push a 1/2-inch steel axle rod through the copper tube. Put wheels on it; adjust the spacing until they clear the hull and are wide enough apart to provide a stable track. Cut the axle just a bit longer, leaving room for hitch pins to retain the wheels. Drill holes for the hitch pins in the last quarter inch at each end. Cut 1/2-inch I.D. PVC to act as spacers between the copper tube in the kayak hull and the wheels. Dry fit it all; adjust as needed; promenade with it around the yard some to grow accustomed to its spectral majesty. Make sure things really work before setting them permanently. Then glue the copper tube in place. I was ready to use J.B.Weld epoxy putty for that but at the last minute (at the very last minute: I had the putty in my hands) I decided to use silicon adhesive instead. Not as messy, possible to undo if need be, and it just seemed righter. Except for curing time, this took about as long as it took me to get the boat out of the water and back to the car during my most recent kayaking adventure. With any luck at all, there's a sea trial to come this week (see below). I'll walk the boat down to the shore from the parking area; remove the wheels and axle and stash everything behind the seat. I think I can rig up a retractable skeg that will share this bracketry after the wheels are removed. Next: accomodate the GPS (antenna, display, and a power source -- either a small storage battery or a solar panel or both) so I can turn kayaking on the Catawba into a data mine (or a red light district for a data whore -- choose your metaphor and come out paddling).
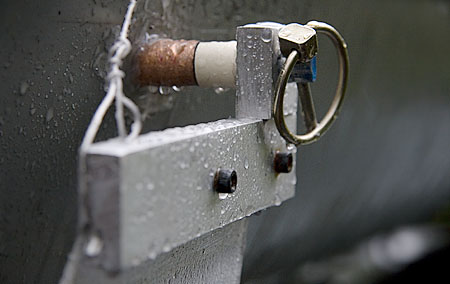
The GPS works great. Its first sea trials were with just AA alkalines using an external antenna. Add some software tossed off in PowerBASIC to convert lats, longs and timestamps into distance and speed using Haversine conversions, and we're in business. See GPS track log. August 8. Built version 0.0 of the skeg and took a first cut at mounting it using the same apparatus that holds the portage wheels. Fitting version zero to the boat exposed some wrong-headedness. August 9. I got up this morning and iterated. Version 1.0 is shaped more like a traditional rudder. Why second-guess so many centuries of marine architecture now? The skeg is made from an acrylic sheet of the sort that might form a really cheap shower stall (from a lot I bought to make a really nice flash diffuser). I've reinforced it with an aluminum bar to which it is both bolted (10-24, hex socket) and silicon glued. I turned a PVC bushing on the lathe to makes a tight fit between the aluminum bar and the steel axle and si-glued that to the bar. It turns freely on the axle. Or the axle can turn, too. Doesn't matter. The skeg mounts quickly and without wobble. For the record, it's 7.25 inches through the copper pass-thru in the hull; any axles or attachments made using the copper tube must be outside that dimension. A piece of plastic coated wire of the sort used for picture hanging connects the skeg to a carabiner which, in turn, attaches to the front deck webbing. Clip the 'biner to the second strand of the webbing to deploy the skeg. Clip it to the third strand to retract. Route the wire through the aft grabloop and you cannot pull the skeg so far forward that its c.g. causes it to tumble forward of the axle. Retaining clips are removed for clarity in these pictures. Also, note that with a skeg, we don't need the notched, v-shaped bit that held the rudder fixed in place when retracted on the Necky sea kayak: that was to let the rudder pedals act as foot braces. The foot braces have nothing to do with the skeg, and it has no controls other than deployed and retracted (no side to side yaw adjustments). Ergo, much, much simpler. Sea trials soon! Or soon-ish. August 25.
Not so soon as I might have wished, but here are the first tests of the skeg. What I thought was a very minor misalignment of the skeg wore me out! v2.0 incorporates a change in the way it attaches to the kayak so I can dial in the proper alignment. I've added one degree of freedom to the mounting bracket. It's shown in the lower photo with (too much) angle in the mount. A 10-24 socket-head bolt passes through the upper aluminum block into a tapped hole in the lower block to which is bolted and silicon-glued the acrylic skeg. Note to self: add a couple of hex keys to the kit for tightening and fine-tuning. Water in these two photos courtesy of tropical storm Fay.
:: back to the slow blog ::
|


© 2010, David Cortner