A Computer Lab in
a Box
8/22/2010: I've
been getting some decent results by capturing full-res data with a
Canon 50D, then discarding all the pixels except the red ones in Maxim
DL5, then using Registax 5 to stack 20-100 of those still-massive 16-bit
.TIFF files, then using Photoshop and FocusMagic to fine tune the finished
image.
Looking back over the previous entries, it's easy to
see that incremental improvements in hardware and technique have paid
off nicely. But three fundamental problems remain with my DSLR-based
workflow. First, it takes approximately all afternoon
to go from snap snap snap to an image you might see here. Second,
the 50D needs exposures of about 0.4s to get decent signal when barlowed
to a generous image scale. That's due to three factors: it has an an
infrared cutoff filter that trims too much of the deep red H-a signal
along with nearby IR noise; it has a Bayer filter which means that
three pixels out of four are blinded behind green or blue filters;
and the telescope is operating at something like F30 rather than its
native F10 because I have to use barlow lenses to get a large enough
image on the on the Canon's relatively huge sensor. Third,
with the Canon making such long exposures, and operating in LiveView
mode, too, it cannot make several exposures per second to beat atmospheric
seeing using techniques pioneered by planetary astrophotographers.
I'm using a remote release and a timer to trip one frame every two
seconds. The effective frame rate of 1/2 fps is at least an order of
magnitude slower than the minimum rates used by successful solar /
lunar / planetary imagers. You're not going to beat the seeing with
such leisurely exposures spaced so far apart, not soundly anyway.
There are better, cheaper cameras around that address
all these concerns. A pure monochrome camera would not have a Bayer
matrix; those touted for astronomical use do not have an IR cut-off
filter either. As a result, they are sensitive enough to allow shorter
exposures and they have plenty of pixels because all are in play.
The smaller sensors on these cameras would allow me
to record the same detail in a much smaller solar image. That means
I could use the Lunt at it's native focal length (F10, not F30), and
that alone provides a factor of nine in reduced exposure time. Put
it all together and we have at least a four stop advantage in light
intensity. And that's before considering improved quantum efficiency
and possibly better A/D circuitry.
The smaller chips can be read out faster, so rates of
15-60 frames per second are not unusual (with enough light and enough
computer power to receive them).
Exposures can be much shorter; there can be many more
of them; and the individual exposures will be smaller and more manageable.
Here are the constraints. It can't cost a fortune. It
needs to have a large enough sensor to record a field of view sufficient
to get about a third of the Sun in the frame behind a 600mm EFL focal
length. As a bonus, larger chips are ideal for lunar photos behind
the A-P. It needs to have small pixels because all my instruments are
short-focus, and I want to oversample lunar, solar, and planetary images
for aggressive post-processing. Pixels can be 5 or 6 microns, tops.
As for bit depth, 12-bits would be better than 8-bits based on my experience
with Canon's RAW frames, but I could live with 8-bit pixels since we're
going to be averaging many, many stacked frames anyway. A USB connection is
required (rather than Firewire) because that's what my notebook
computer has, and I'm not planning on buying another of those anytime
soon.
The DMK-series of cameras made by my neighbors in Charlotte,
The Imaging Source, are popular and have been used for years by solar
system photographers around the world. If there is a standard, they're
it. But it's an aging standard. They were contenders, but their cameras
with larger chips are not particularly affordable nor particularly
sensitive, and they're limited to 8-bit output. A couple of current
masters (Christopher Go and Anthony
Wesley) use cameras from Point Grey Research. Lumenera cameras are
too pricey to consider seriously. I thought about some high-end webcam-like
variations from Meade, Orion and Celestron, but I really want a larger
array and more precise control than those offer.
8/24/2010: I picked the Point Grey Research
Chameleon.
PGR's Chameleon is available as a monochrome camera
with a 1/3-inch CCD comprised of an array of 3.75 micron pixels. It
will output up to 18 frames per second at 1296x980 pixels and offers
ROI (Region Of Interest) capability for subframe capture (at higher
rates?) when appropriate (planets anyone?). The Chameleon uses a USB
2.0 connection. And it's priced near the bottom of the range; less
than half the price of similar-sized Imaging Source cameras and only
about twice that of many glorified webcams. Planetary imaging gurus
Anthony Wesley and Christopher Go both use PGR cameras. They firewire
models (Go uses the Flea3) behind larger telescopes.
The combination lets them grab far more frames per second than
the Chameleon can deliver through the USB port of my netbook behind
a 5-inch refractor. Even so, the Chameleon has big advantages
over what I've used previously (the Canon 50D at one extreme, a Philips
Toucam at
the other).
So what's the catch? Not much software in the PC universe
supports Point Grey Research's cameras. There's the "demo program"
included with the camera and precious little else. Or so I gather from
the web. The demo program may suffice. It appears to offer all the
options I know that I want now. The camera ships with a SDK which is
said to allow the control software to be modified using C++. If the
demo code doesn't get the job done, then I want to be able to use the
SDK and provided libraries to be sure it does. That means it's (finally)
time to learn some C++, and that is why this post is titled, "A
computer lab in a box."
8/27/2010: Here's the box:

It's small! And it's light! No,I
mean it's really small and light. No shutter, no mechanical
controls, no Peltier cooling, no mirror, and no viewfinder. It's a
Sony CCD, an A/D converter, supporting electronics, and a USB connection.
Period. I actually think a significant amount of its weight is in the
included tripod adapter which I attached to the camera just to keep
from losing it. How small? This small:

An adapter from Agena Astro Products mates the camera's
C/CS lens mount to a T-ring. 1.25- and 2-inch adapters already on hand
take it from there. There are enough rings and adapters lying around
to put it behind the solar telescope, the A-P, and the 200mm Nikkor
(although that may require a little measuring and a little machining).
It might also make sense just to watch eBay for a used Nikon F / C-mount
adapter.
The software installed easily under WinXP SP2, although
there are a few rough edges because PGR doesn't cater to end users
so much as to machine vision labs, industry, and other places where
IT support is readily available. Their get-started documentation calls
for users to run "Setup.exe," but it doesn't exist. I selected
a likely candidate and ran that instead. A few questions about an IEEE
port (Firewire) required me to ignore those options since I don't use
one (most PGR cameras use Firewire rather than USB). That said, the
camera was autodetected nicely, the proper driver selected, and FlyCap
displayed a realtime stream with no fuss or drama. The options to capture
an AVI were neither particularly idiosyncratic nor especially handy
(but the more I use the interface, the better I like it). I had to
define the default capture directory and argue with the computer a
little about its availability (FlyCap prompts for a directory but actually
wants you to specify a directory and a filename for capture -- in fairness,
I discovered after the fact that the help system explains that). There
are plenty of options to try and many capture modes with which to experiment.
My initial impression was that the software was offering me little
feedback about what it was doing. In fact, there are cues and telltales
on-screen, but they are easily overlooked. The situation is exacerbated
by my netbook's widescreen mode; some of the controls and status indicators
can are below the bottom of the page. Scroll down. I just need to
play around with it.
8/28/2010. First light.
After practicing on the desktop, I installed the s/w
on the Aspire One netbook, verified that it worked there, then carried
the kit out to the solar telescope. I set the netbook's screen size to
1280x768 which is a little cumbersome (it insures that I can see everything,
but it also means there are two levels of scrolling to deal with; one
for the video adapter, one for the app). There may be a better way
to live with the little screen. The camera was very easy to focus on
the Sun (focus for the eye with an eyepiece in the extender, then remove
the eyepiece and extension and replace them with the camera; proper
focus is not far away). I focused on the limb of the Sun, then on surface
detail using the FeatherTouch focuser. A box to provide a shaded work
area will be very useful. I tweaked the telescope's aim, then captured
two, 30 second AVI's at 15 fps at 8-bit pixel depth. The camera was
set for 15 fps and that's what the little Aspire One computer captured via buffering in memory.
Good deal. Thirty second runs may be excessive, as the results are
half a gigabyte each and take a while to transfer over the home wifi
network to the desktop for processing. It will be worth trying some
ten second runs to see just how much difference it makes. There may
be a dependence between the stillness of the air and the length of run
required for top-shelf results.
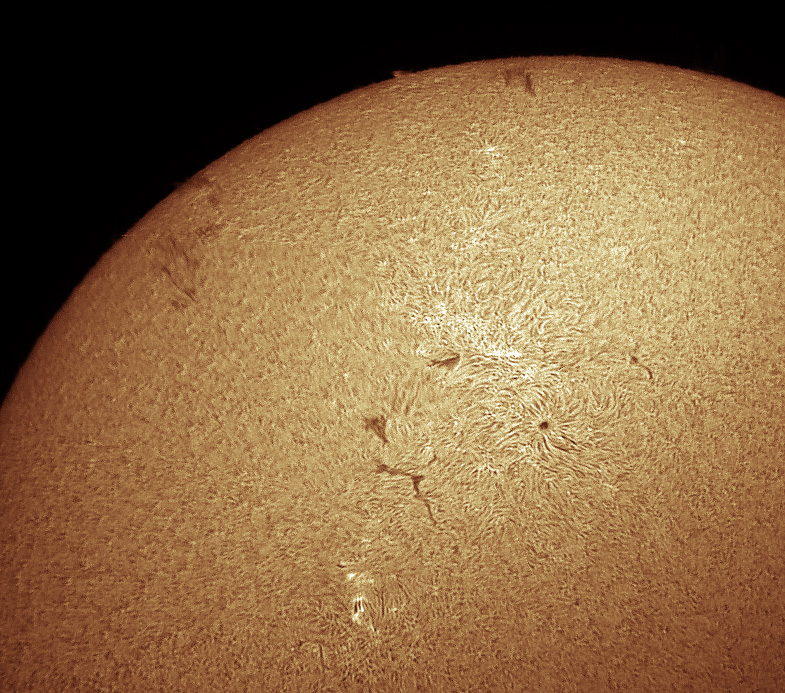
Here's Registax 5.1 at work on my first Point Grey Research
AVI capture:
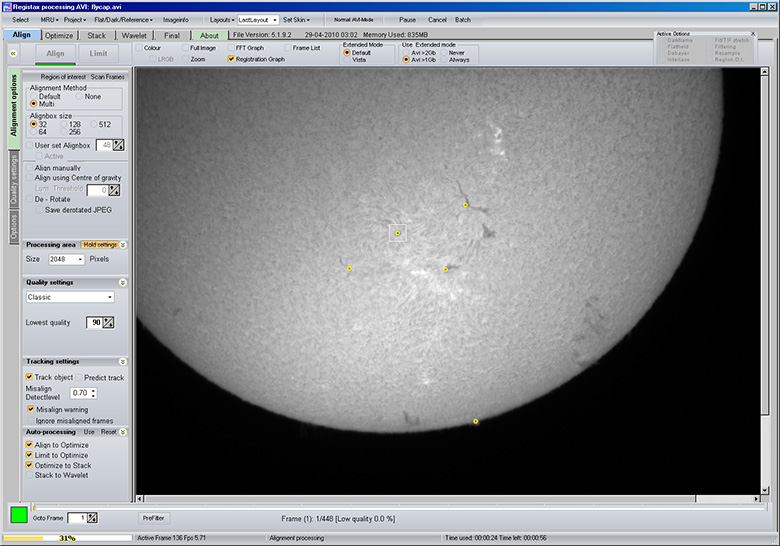
And boy, does it work! I've aligned
my very first AVI capture in Registax 5.1 on several points (but not,
as you can see, on the area of dusky filaments in the upper left. This
image was made from the best 10% of 450 frames, aligned, stacked, and
wavelet processed in Registax 5.1. To the finished .TIFF, I applied
FocusMagic in PhotoShop CS4, and I rotated the image for a more "comfortable" view:

Registax's default behavior (select and stack the best
10% from an AVI) was well chosen, at least in this instance. An image
made from the best 5% was better than an image made from the best 50%,
but this image made from the best 10% was better than either. The 50%
test ran for a comparatively long time. When imaging an extended subject like the Sun's intricate surface or the Moon, it would probably be a good
idea to choose more than five alignment points. Here's a colorized
version of today's best result:
I stretched the same frame without mercy to reveal limb
detail. It would probably be much better if I began with 12-bit data
or at least with 8-bit data collected using a more appropriate exposure.
Aligning on the prominences in Registax would make a world of difference.
Still, just to see what's not lost down in the noise, it's not a bad
start:

I don't know what the exact exposure time per frame was. And I don't
know how to find out in retrospect. This effort was just plug it
in, let the camera select gain and exposure, auto-everything, capture
the data for 30 seconds and then bring it inside to work it over.
It's real first light, proof of concept, unrefined stuff. The air
was not particularly steady. Watching the AVI and watching Registax
do its thing, the Sun's image was moving all over the place. It's
hard to believe this much detail could be extracted. This is very promising!
There's webwork to finish by the end of the month, then
clear weather predicted for the middle of this week.
Among other solar experiments to be tried: see what
happens with a single etalon. Try manually controlling gain and exposure
to see how they're related to noise. Try 12-bit captures. Is it possible
to use a telecompressor to get a full-disk image with the Chameleon?
What happens if I increase EFL?
|