2/25/2012. So this time it clouded up when I didn't expect it to, and I went out to turn off the telescope. I put the mount in A-P Park 3 (OTA on top of the mount, aimed north) and thought, well, let's double check the focus (I don't recall why I thought there was a problem; it was hours ago) which I could do with the 'scope parked. So I did. And then I wondered where exactly the telescope was pointing. So I did a plate solve with the Pinpoint Astrometry utility in Maxim. It was aimed at 20h 03m, +89°24' and then SHAZAMM! came the dawn, and the dope slap: I can polar align by just putting the mount in Park 3, repeatedly plate-solving and twisting the altitude and azimuth adjusters until the result is as close as I'd like to 90°N.
Yes, I know: if the OTA is not aligned perfectly wth the tube and the tube is not perfectly aligned with the mounting hardware, this method will lock in a polar misalignment by that amount. Still. Let's give it a try. So I did. In six or seven tweaks of altitude and azimuth, I got the OTA aimed to 89°56'. Of course I had to test the new alignment. So I recalibrated on Procyon. And slewed to Capella (dead center!) and then to NGC 2244 (centered again). I tried a 60s unguided exposure. Worked well. I tried 300s. Didn't. That was asking a lot. I calibrated the guider. Got 0.25 and 0.4 arcsecond corrections in X and Y using 4 second integrations. I thought maybe I was chasing seeing, so I doubled the integration time. If the errors increased, it wasn't seeing. Errors in one direction increased, not in the other... I don't know what to make of that. Anyway, I slewed to NGC 4565 which landed solidly on the chip (not dead center, but pretty close).
I had the camera collect 900s sub-exposures until dawn. During the first exposure, RMS errors were no better than during my less systematic alignments, but this is repeatable. Star elongations in the subs run from less than one percent to three percent. That's very good.

NGC 4565, a galaxy in Coma Berenices
18x900s L
The eccentric composition is because guide stars were not exactly where I expected them and were relatively few and far between. I wanted to call it a night rather than spend half an hour hunting for a more aestherically serviceable guide star. There was some haze. And the processing is only slapdash because I need to shoot a new flat (I rotated the camera 180 degrees trying to anticipate guide star positions). The technique needs some work, and the image needs some RGB.
2/27/2012. Last night I went after the most distant and most exotic target yet. Ssshhhh. Not saying what until I have a presentable image. Last night's was a plausibility check. In 3.5 hours of 900s L frames, I got a smudge with precious little detail. PSF's were too big. The subject is only about 15 seconds of arc across. I'll need the Ritchey's native FL to get decent image scale, but I am encouraged that at least part of the subject was within fairly casual reach. More when I know more.
[I revisitted these images on 2/7/2014: I need to tune the AT10 since PSFs are almost always much larger than the 2.8 arc seconds in these. The stack's limiting magnitude is at least 20.8-21.3 -- I know the frame goes deeper than that because a couple of anonymous galaxy clusters show fainter members than the faintest ones Maxim is willing to measure. I'd say we're close to 22 in this one. Another thing: those frames were shot at -40 degrees and the CCD simply won't operate there without terrible frosting issues. I'm thinking that this spring, a few dark nights should be devoted to piling up 3-4x as much exposure using shorter, optimized, exposures and seeing once and for all if I can get that target with a 10-inch telescope.]
Notes on Spacing and Focus: to achieve F4.8, I've got the A-P CCD67 mounted 104mm from the CCD (this with reference to SBIG's diagrams and with recourse to an engineer's scale; the measured distance is from the front of the CCD chip to the shoulder of the telecompressor, where the threads end and the smooth body begins). That's achieved with an A-P tapered nosepiece and two 14mm Hyperion fine tuning rings mounted on the Mandel Muscle Plate on the front of the CFW8a which is mounted to the ST body without its faceplate. Focus is within a hundred or so RoboFocus units of full-in (with the Teleskop-Service's collimating ring in place).
2/28/2012. To revert to F8 without dismounting the focuser and inserting the big AT spacing rings, rack out the focuser to around the 2.4cm mark (a scale is silk-screened to the drawtube) and use the body of the GSO 2-inch Barlow as an extension (another 2.0 inches) for a total extension of 49-50mm. That'll put you in the ballpark. I confirmed this with some Moon shots:
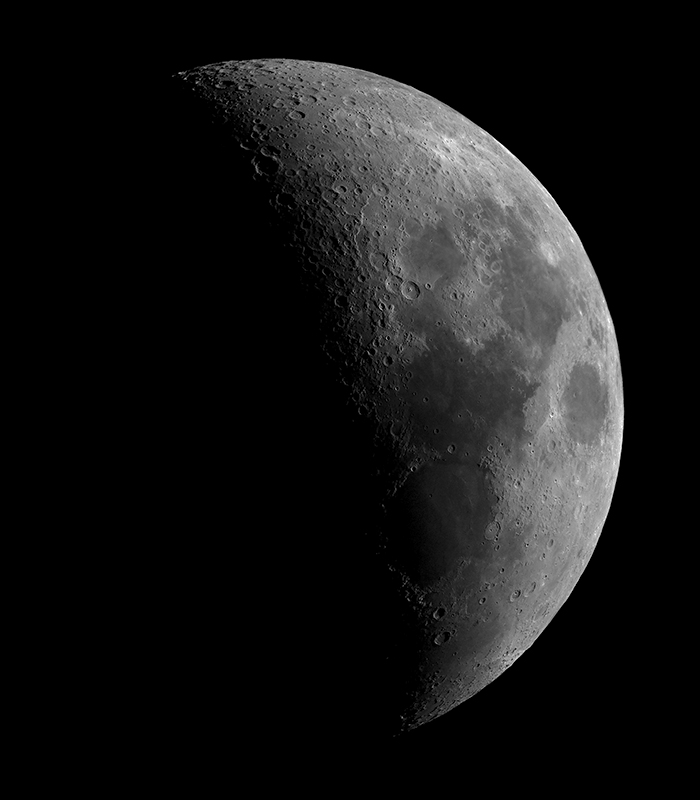
4-frame Moon Mosaic
20ms, F8, 7nm H-a
in bright twilight.
I also got a nice image of slightly gibbous Venus in the light blue sky which was bereft of any detail worth saving. The Moon frame uses 1/500 the bandwidth, a 2 stop slower optical system, and an exposure 0.02 / 16,200 as long as the one for NGC 4565 above. The difference amounts to about 25 photographic stops, a factor of 32 million. It's the difference between 1/1000s at F16 on a sunny beach and 2 minutes at F1.4 when shooting by starlight.
The most recent time I used the Ritchey at F8, I also used the Orion OAG which uses quite a lot of backfocus. The moderately extended focuser and the GSO Barlow body-turned-spacer make up for its absence. Note: you might want to remove some of the Teflon shims from the focusing body; in-travel against gravity was reluctant tonight when the telescope was aimed near the zenith.
3/3/2012. I finally mounted the Lunt solar telescope and its RoboFocus motor on top of the Ritchey and ran some sky trials after noting in Guide 9 that the Sun had reached a declination of -6°, the same as M42. So I knew it would clear the treetops for at least a little while this afternoon.
A comedy of errors ensued. You do this under marginal skies in order not to waste good ones when they come along. I did waste a long clear spell trying to focus on one of the secondary solar images. I didn't know that was what I was doing until I tried tuning the internal echelon for better contrast and the image moved. After recentering on the properly trimmed image, I found focus much more readily. Note that the high-density stream coming from the Chameleon slows the remote desktop app to a crawl. I'm thinking that instead of 15fps, the office computer is showing less than 1fps, and commands are seriously lagged. I had the desktop set to 1280x1024 which is big enough to see almost the entire frame at once. All that probably gives the graphics chipset in the Aspire One more than it wants to handle. Still. Everything works. I had some doubts because FlyCap relies heavily on function keys and interupts; just how well they would be passed through, I wasn't sure. It's not an issue. I used Maxim and the ST2000XM (OTA capped, chip uncooled) just for the "move" commands in the guiding dialog. I panned across the Sun in both axes just to be sure I could. Robofocus never skipped a beat, though I had to reset its limits once. Clouds and encroaching pines made life tough, but all this will work fine when the Sun is higher and the sky clearer. I think I got about a quarter of a second of actual video for 90 minutes of messing around and nothing at all to show here. Think about whether a tolerable balance can be found without the bronze counterweight. It's a bear to switch on and off, but that, too, is manageable. This is going to be great for staring at the Sun. Sitting at my desk is so much more pleasant than standing outside under the black observer's cloak (think of a secular burka) while trying to manage a keypad in one hand and the netbook in the other.
3/04/2012: There are three gaps in the trees that permit the Sun to shine through. The Sun reached the first gap around 8:00 AM, the other two in early afternoon. I needed them all to iron out most of the wrinkles in remote solar imaging. The best tips of the day:
- The two stainless weights suffice if moved all the way out at the end of the extended bar, but I think it's asking a lot of the servos. A-P says, keep the clutches tight and imbalance is not so important,
- There is a [pause] button on the data stream from RemotePC -- it appears that I can send to the remote while pause is selected; check that out and if so, use it to reduce bandwidth while adjusting this and that,
- Focus roughly out by the 'scope, then use Robofocus moves of around 40, 20, and 10 units to dial in,
- Remember that the image shown on the desktop indoors is a compressed and otherwise compromised version of what the netbook really sees (be sure RemotePC is configured for best image quality) and that camera will capture a substantially better stream,
- When focussing and framing, drop the frame rate at the camera to one that the computer and network can handle, but remember to run it back up to take data,
- See if you can use PHD Guide rather than Maxim to nudge the 'scope around because Maxim makes substantial memory and processing demands on the netbook and requires that a pricey CCD camera be connected (but makes no use of it in this application),
- You might also finally hook an RS232 line to the mount and get the computer and the keypad play nicely together, but for some reason or for none at all I find that prospect daunting.
Anyway: we've got it working; now see about making it work elegantly.
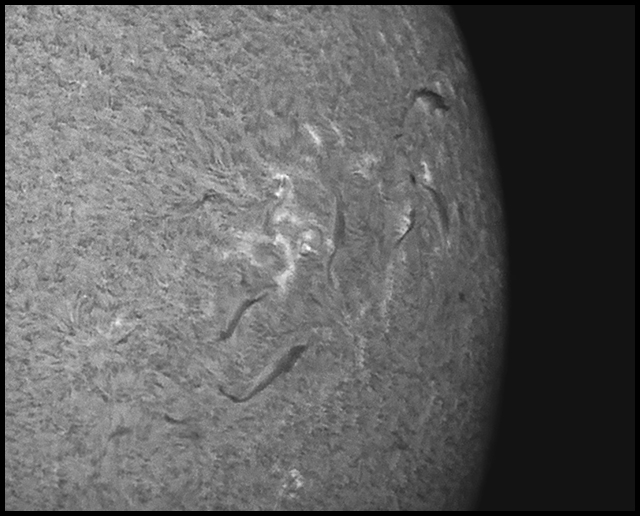
Magnetic canopy above sunspot 1429
20s @ 15fps (300 x 12ms)
Dreadful seeing, but technologically OK. Remote solar imaging works.
Clouds, pine boughs, and dreadful seeing plagued every attempt; also a dead computer battery; a RoboFocus mutiny; and another adventure trying to use one of the extraneous solar images rather than the trimmed, on-band image. In mid-afternoon, I finally got a relatively clean capture with only seeing to fuzz the result. That's AR 1429 rotating into view. It's been throwing M-class flares. Even when quiescent, it lofts a complex plasma canopy.
3/05/2012: AR 1429 launched an X1-flare this morning when it was out of view, and an M2-flare this afternoon. Here it is fifteen minutes after that second blast, still cooling:

AR 1429 a few minutes after an M1-flare
20s @ 15fps (300 x 4ms)
I'll duplicate these notes over in "Staring at the Sun" and resume keeping notes on solar observing there. Here's the Lunt mounted on the AT10RC with its own RoboFocus motor, and a view of the backyard by early morning light:
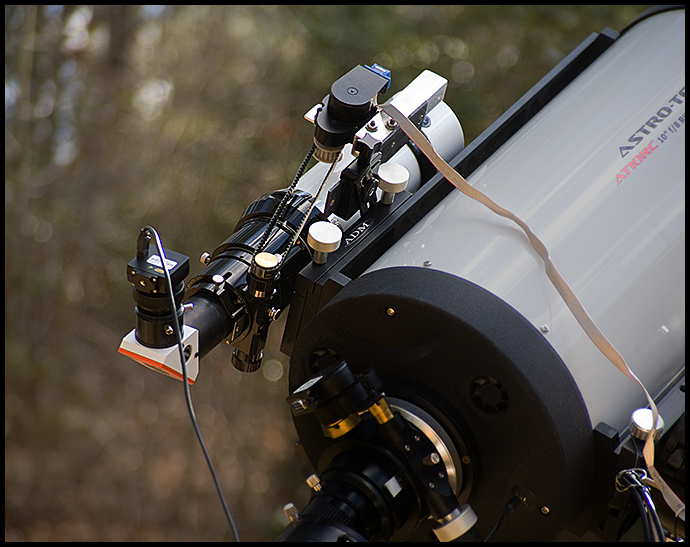
Robofocus-equipped Lunt Solar Telescope on top of AT10RC
Robofocus motor with "Mandel" pulley and timing belt held by tension
against the fine-focus knob of a Feathertouch 2-inch adapter. Kirk, RSS,
some Arca knockoff dovetail clamp and a few bits of strap steel and hardware-
store aluminum stock hold all the pieces in place. The same motor assembly swaps without
tools to a 200mm Nikkor for widefield photography using DSLRs or the CCD.

The Nineteenth Fairway — waiting for the Sun to reach
its first gap of the day.
Except where noted, deep-sky photos are made with an SBIG ST2000XM CCD behind a 10-inch Astro-Tech Ritchey-Chretien carried on an Astro-Physics Mach1GTO. The CCD is equipped with Baader LRGB and 7nm H-a filters. The internal guide chip of the CCD most often keeps the OTA pointed in the right direction (I'll let you know when a Meade DSI and a separate OAG or guidescope takes its place). Camera control and guiding are handled by Maxim DL 5.12. The stock focuser on the AT10RC has been augmented with Robofocus 3.0.9 using adapters turned on the lathe downstairs. Maxim performs image calibration, alignment, and stacking; Photoshop CS4 and FocusMagic 3.0.2 take it from there. Gradient Xterminator by Russell Croman and Astronomy Tools by Noel Carboni see their share of work, too. Beginning in May 2013, PixInsight has taken over some of the heavy lifting for transfer function modification and deconvolution.
:: top ::