09/13/2013. I removed the O-III filter in preparation for taking matching LRGB data of M27 and
remounted the CCD using the degree scale (almost perfect!). Best focus is something like 140 Robofocus steps in from the O-III filtered focal point. The weather forecast and the evening sky suggested sparkling conditions all night long, but the night did not start out that way. I managed seven good luminance frames and got four times through the RGB sequence before starting over two or three times under changing conditions. Eventually, I just set up long guiding integrations (the better to see through occasional high clouds) and then let it roll unattended while I got some sleep. In the morning, I found 33 useful L frames and 9 RGB sequences. Here you go. A breath of fresh air:
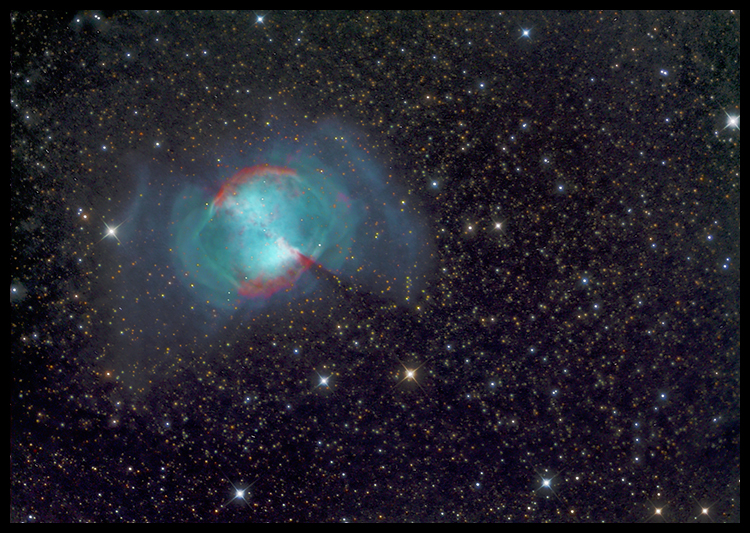
M27
27x900s O-III + 33x150s L + 9x150s RGB
I mixed the O-III data into the blue channel and adjusted its hue to approximate the almost perfect cyan of the O-III wavelength. I'll fold in a cup or two of H-a data when I get a good, clear night. It's a good project just now with the waxing Moon sharing the sky with M27.
09/14/2013. A clearer night, at least in the beginning, let me add 2h45m of H-a in 15 minute subs. The outer hydrogen shell is much fainter than the outer oxygen shell, and eleven 900s subs isn't enough to do more than add a tint to bits of the outer structure. The inner details are very bright in H-a, however, and the new dataset modifies them considerably, for better or for worse. I reverted to pure LRGB stars since the field stars were getting a little out of control with all the narrowband channel substitutions. This image adds emphasis on hydrogen being expelled into the cosmos. Put that together with the oxygen being distributed in the first photo and you've got one of the springs of the sea:
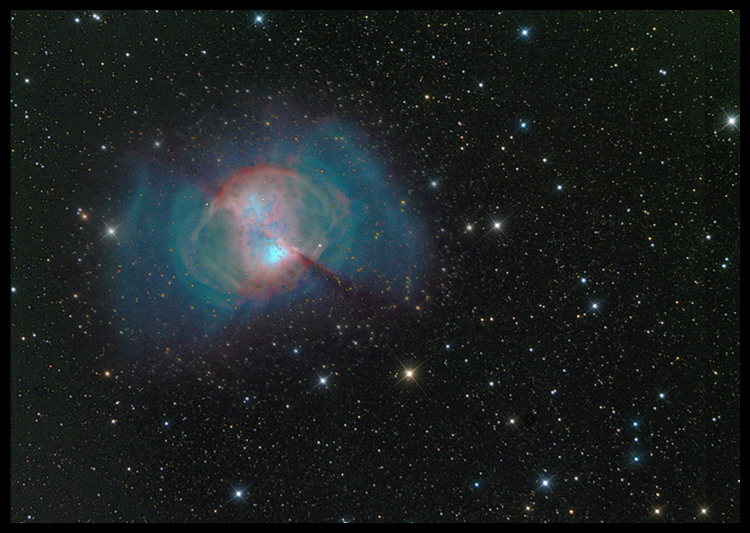
M27
Same, plus 11x900s H-a
(Total exposure: 11h15m)
9/22/2013. Fun with DSLRs, redux: I inaugurated the 6D behind a telescope by putting the A-P refractor back on the mount, fitting the 2.7-inch 0.75x telecompressor, and taking a quick shot of the Sun. That verified that it comes to focus at a reasonable extension (couple of inches out, plus the GSO barlow barrel as an extension tube) and allows me to measure the effective focal length. The solar image was 816 pixels in diameter, which corresponds to 2.34 seconds of arc per pixel and that, given the 6D's 6.55 micron pixels, works out to an EFL of 578mm, or F4.55. This is going to be lovely for big targets (M45, M31, NGC 7000, etc).
I am giving serious thought to having the 50D modified. I think its live view will make it far more useful for astrophotography than the 20D ever was; as a bonus, Magic Lantern software allows it to do self-contained sequences. The extra pixels in the 50D compared to the 20D would allow the extraction of the red Bayer plane into a reasonably large image. I'm encouraged that the modded 20D works very well with a custom white balance so the only downside is a modest expense. Think of the 200mm Nikkor, properly focused, with clip-in filters in place. Likewise the 14 and 24mm Rokinons. Hap Griffin has a fan in me.
Another happy outcome from today's daylight experiments: the two step-down rings I combined to mate 2-inch filters to the 70-200mm F4L have no effect on its practical F-ratio. I'm surprised! But aiming at a uniformly illuminated computer screen, I measure exactly the same exposure with and without the filter holder. The 2-inch filters themselves are slightly smaller still, but even so, 200mm / 48mm is F4.17 rather than F4 -- a trivial difference. That means I can use the narrower 2-inch Baader H-a (7nm bandpass) rather than the clip-in Astronomic (12nm bandpass); more importantly, it means I can use the O-III filter for widefields with the 6D. Bicolor anyone? Think about how to keep colors reasonable while accentuating H-a and O-III features.
Next: nightwork for the 6D and experiments with the O-III filter on an unmodified body, either threaded onto the front of the 70-200mm Canon or onto the 2-inch threads in the prime focus adapter behind the telescope. Tonight or tomorrow, weather willing.
These quick notes are based on casual tests under cloudy skies. I shot Vega, M57, and M13 using 60s exposures at ISO 1600, without guiding, behind the telecompressed A-P. 1) Nail the focus. If you don't, all manner of alarming aberations appear, not just blurring but apparent tilt and smearing that looks like rotation. Just sayin'. 2) Use a rubber band to constrain rotation (and possibly tilt). The T-adapter has a certain amount of play at the camera body's locking pin. The least strain induces rotation. So if you hold the remote control, stand still and don't wave it around. Arranging the rubber band to pull the right side of the camera body toward the telescope may contribute to flattening the field (loop the rubber band around the shutter side and attach it to the focuser assembly).
YMMV of course.
09/23/2013. Blah, blah, blah. Here's a picture:
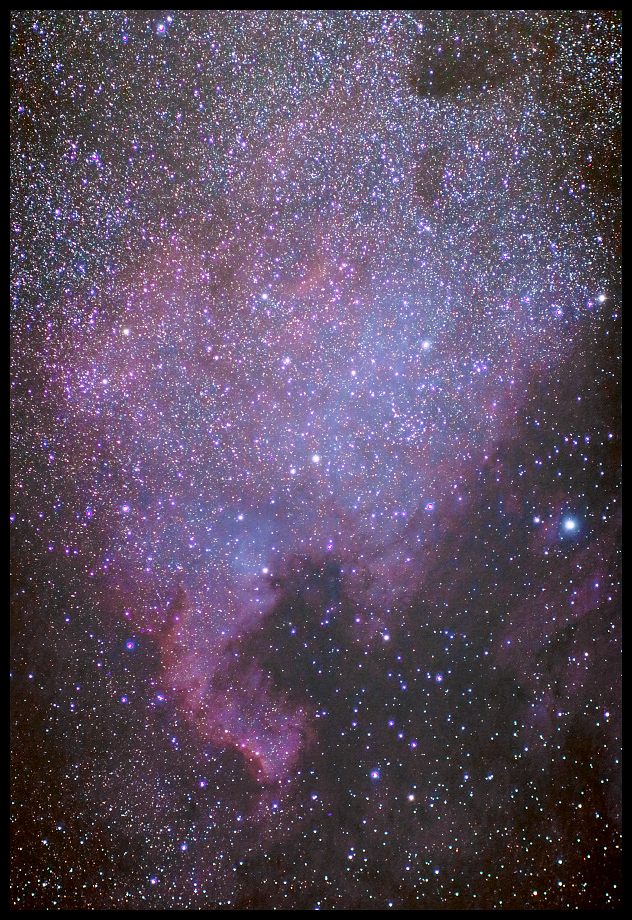
NGC 7000
18x60s, A-P 5" @ F4.5
Canon 6D, iso 1600
no filters, no guiding
I started a 60 frame sequence with the target still in bird feeder tree (some lovely diffraction through the pine needles) and it ended with the sky overcast. I need to rebalance the mount since there were otherwise unnacountable glitches in RA (about one in four or five frames). Despite trees, clouds, and rough tracking, somewhere in the middle were 18 clean frames. I used BreezeBrowser to convert them to 16 bit TIFFs and downsize them to 3800 pixels, then stacked them in MaximDL with a diffused twilight flat made earlier this evening.
Not a bad start. I focused on Vega using LiveView through a Bahtinov mask with a compact mirror held behind the LCD. Stars are ringed with excess magenta. Next time, desaturate the flat and remember to set the color temperature to daylight (rather than auto). Think about using a blue trim filter when doing "unfiltered" images. The frame shown here is slightly cropped. And after all that, the battery shows 75% power remaining. That's good news if it can be believed.
9/26/2013. ISO 6400 works, too, but... but I'm not sure what the advantage is when I am as sky limited as I am here. I tried some darks and some new flats but neither seemed to do much good and may have done some harm. I reshot NGC 7000 and both sides of the Veil at the higher ISO and will have plenty of pixels to play with. But I was really waiting for M31. When it cleared the trees, I dropped back to ISO 1600 and started gathering light. A brief cloudy spell kept the total to 61, 1-minute exposures. Color is all to hell for unknown reasons, but by desaturating the images and treating them as pure luminance, the result is decent.
Post mortem: my dark frames were "too dark" perhaps because I took them early on a cooling evening -- the absence of temperature control really makes this DSLR stuff interesting. I lost a handful of frames to unknown mount excursions despite rebalancing it before tonight's session. This will be solved sooner or later. The extra real estate, decent sensitivity, manageable noise and casual setup with the DSLR all have their charms. By and by, I bet I re-introduce guiding and longer subs, but for now... practice, mister, practice.
10/04/2013. More data is better than less. Here are 110, 90-second exposures through a Baader Fringe-Killer. The remote control only allows a maximum of 99 exposures, so I wanted them to be longer than 60s. But I didn't want to burn out the core or bump up against the sky limit too hard, so I only increased the exposure time by 50%. And I restarted the sequence once just before calling it a night. High, thin clouds moved in late reducing the contrast, so I discarded some late frames. All in all, I shot 150, 90-second frames and had about half a battery charge left (!) so that's promising.
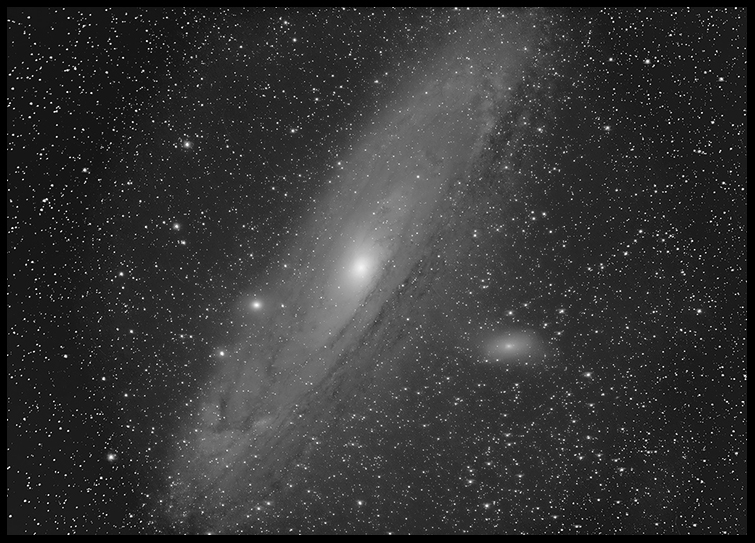
M31, 110x90s (2h45m)
Canon 6D iso 1600
Baader Fringe-Killer filter
A-P 5" F6 @ F4.5
From the fact that you see a B/W image above, you may infer that I am not happy with the color version. I don't know how to retreive decent saturation after correcting the strong yellow cast. And I need to compare the Noel Carboni "reduce small violet haloes" action with the action of this filter.
You may not infer that M31 overflows the generous field of the 6D behind the telecompressed refractor. Rather, I failed to recalibrate the goto function on the mount after focusing on Vega (and noting at the time a slight pointing error, d'oh!), so the target was not centered. Also, I missed the N/S E/W alignment on the camera body which meant I didn't have the full diagonal to fit all the fuzzy bits in. To make matters still worse, when I cropped the stacked file to save time and memory in post proc, I clipped it a little too closely, but by the time I noticed that, I was way too far along to start over.
90s did work better than 60s (details in the outer whorls are less "speculative" and definition of the dark features is much better out there in the dim). The stars are cleaner in the filtered image. It would be worth trying that filter behind the AT 6" F5.9. I originally intended that OTA to be a just-looking glass to park out west, but maybe it and a DSLR would be a useful deepsky outfit on the G11 Out Yonder too.
10/5/2013. The plan is to take 120s subs through a good bit of the night. 99x120 would be 3h18m, so if I restart the sequence just before hitting the sack and the sky stays clear, I ought to get over 4 hours of exposure. I've topped off the battery with that in mind. I'll need to need to tweak the polar alignment just a bit if this gets to be a habit.
I restarted the sequence last night twice, as the spirit moved me, and got 145 frames totalling ~312 minutes of total exposure (5h12m) from a freshly charged OEM battery (which was fully depleted when I brought the camera in the morning after). I accidentally set the exposure to 2m59s (intending 2m00s) for one series, a mistake which proved instructive: three minutes doesn't look bad at all, so keep that in your pocket. But adjust polar alignment before using it routinely. Tweak the focal plane tilt, too. Definitely off quite a bit, enough that it matters, and needs to be fixed, eventually, when I know exactly how to fit things together (it's not as simple as using the same sort of device to tilt the ASM120 to remove Newton's rings over on the solar section of the slowblog). This will yield.
Here's a quick look at last night's data. I used the best 92 for light frames, some 120-seconds, some 179-seconds, and selected a cloudy frame to use as a flat. I used Breezebrowser to convert everything to 2048-pixel, downsampled 16-bit tiffs and stacked the results. I did a dynamic mask in Photoshop to be sure to catch the faintest outer bits. There's a bit of amp-glow in the lower left which I hid with local curves (and will try to minimize with longer pauses between frames, 15s rather than 5s). Note the dreadful sodium-vapor cast to the individual frames and to the stacked frame:
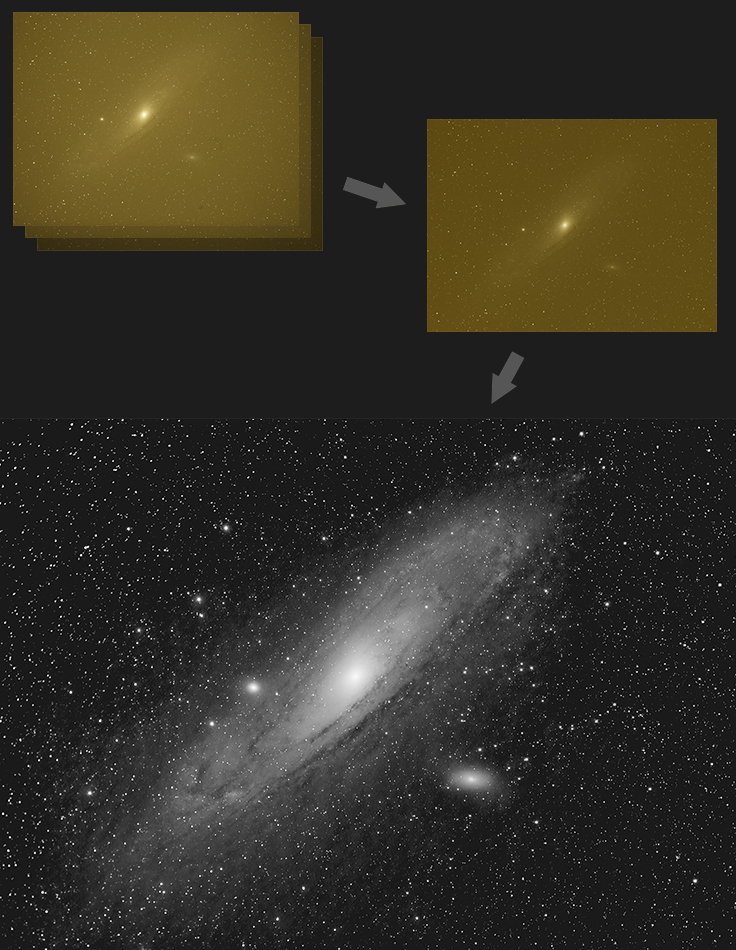
M31, 3h15m
Canon 6D iso 1600
AP 5" F6 @ F4.5 w/Fringe-Killer filter
"That's the way you do it."
I took the best 92 out of 145 individual photos (upper left), lined them up with respect to the stars they contain and averaged the photos together (upper right). The stacked image has about 10x less noise than any single frame. The overall effect is to allow the photo's dynamic range to be stretched gracefully to make fainter details more easily visible. Rather than try to correct the color for the yellow glow of Hickory's and Charlotte's lights, I desaturated the color in the stacked image, and worked the transfer curve to produce a black and white image that shows faint and bright details simultaneously.
The result looks good (maybe even better) at higher resolution, and you'd never believe how bad the sky was.
10/07/2013. I was spec'ing out parts to control the tilt of the sensor (some combination of Teleskop Services tilt adjuster, 48mm/T2 adapter, and T2 Rotator-Quick Change adapter -- OptCorp has them all if and when) when I took a good look at the current 2-inch adapter to verify the diameters of some threads. In the process, I noticed that when the set screw is cinched down, the adapter tilts. Aha! I rebuilt the offending bits using better components already on hand. I bet the tilt issue is vastly improved. Between the weather and Amy's plans for fall break, it may be a week or so before we find out.
10/08/2013. Or not... the clear sky clock for tonight said I should have a few hours after sunset that are not completely hopeless. I thought they might be good for engineering trials if not for pretty photos. So it was. First, I checked polar alignment using the A-P RAPAS attachment and saw a) that Polar Pine was encroaching on my view of Polaris and b) that Polaris was far from where it belonged on the reticle. I adjusted the mount to put it much closer to its proper place. Most of the error was in elevation. And then I focused on Vega, slewed to M57, and made a series of 30-second exposures to check the tilt of the sensor. I see none! So I dropped the ISO to 400 (the better to see through low, broken, well-lit clouds) and set the timer for 150-second exposures. I took aim at Vega and let it run. Not only do I see no trailing in each frame, but frame after frame places the stars right on top of one another!
For good measure, I found and fixed the fuel leak in the BMW K75s earlier -- a constricted fuel return line let pressure exceed all reason in the rail that supplies the injectors; maybe that also contributed to flooding issues -- and took it for a very successful spin around the neighborhood.
Progress made plane err, plain:

Right-click and examine these full-scale crops from two frames made 16 days apart. They're centered on the same stars not far from M57, but the later (top) sample was focused with a Bahtinov mask, was shot through a Baader Fringe-Killer filter, and the mount's polar alignment was tweaked. One significant improvement is apparent only if you look at the image full-size: focus is not only better throughout the image, it is also far more consistent from side to side. Yeah, I know the angle is not identical, but there are plenty of stars of similar brightness for direct comparisons. The image scale is slightly different; the adapter used for the top frame is not quite as long as the one used for the bottom frame. As a result, the telecompressor is slightly closer to the camera in the top frame so it is not quite as severely reduced. The "plate scales" are similar but not identical.
Except where noted, deep-sky photos are made with an SBIG ST2000XM CCD behind a 10-inch Astro-Tech Ritchey-Chretien carried on an Astro-Physics Mach1GTO. The CCD is equipped with Baader LRGB and 7nm H-a filters. The internal guide chip of the CCD most often keeps the OTA pointed in the right direction (I'll let you know when a Meade DSI and a separate OAG or guidescope takes its place). Camera control and guiding are handled by Maxim DL 5.12. The stock focuser on the AT10RC has been augmented with Robofocus 3.0.9 using adapters turned on the lathe downstairs. Maxim performs image calibration, alignment, and stacking; Photoshop CS4 and FocusMagic 3.0.2 take it from there. Gradient Xterminator by Russell Croman and Astronomy Tools by Noel Carboni see their share of work, too. Beginning in May 2013, PixInsight has taken over some of the heavy lifting for transfer function modification and deconvolution.
:: top ::