1/27/2015. Asteroid 2004BL86 buzzes the Beehive. The sky cleared just in time and I took 60s subs until I was sure the asteroid was clear of the field.
I uncovered the telescope early then waited through a couple of lengthy
overcast spells. I spent as much time listening for rain or sleet as I
did thinking about shooting astrophotos. When I went outside at midnight
expecting to call it a night, there were a few stars. Enough, I thought,
to try for the asteroid passing near the Beehive. And while I composed
and verified focus, a real clear spot came through. Voila! I took the run of a dozen images with the least sky fog from clouds blowing through and stacked them.
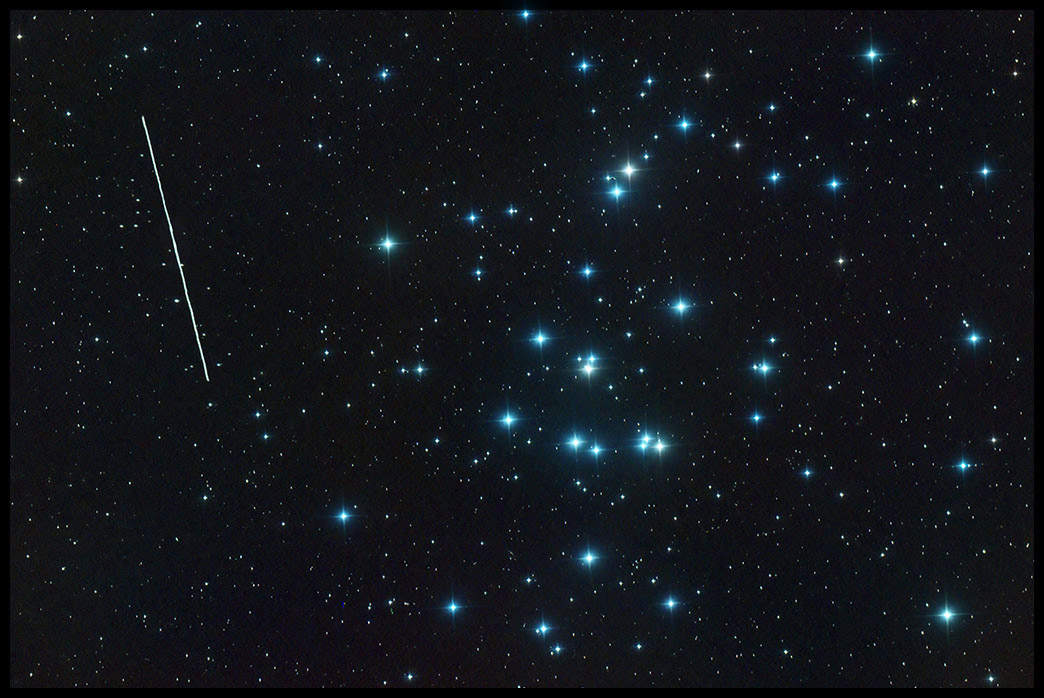
Asteroid 2004 BL86
10" F4 Newtonian, Baader MPCC-III
Canon 6D @ ISO 3200
12x60s (12 min total)
(Click the image for a bigger version.)
I almost missed this while I futzed around for five or ten minutes with the hardware. As it happens, the asteroid shows up very clearly in several of the 3-second exposures I made to verify composition and confirm focus.
The sky stayed good for an hour or so after the asteroid moved on, but I didn't do much but stand and stare at it. The sky put me in mind of another close pass, Hyakutake's -- the sight of some high, intricate, thin cirrus bands stretched across the sky last night was pretty close to the view from Charlie's place on the night of closest approach.
In the afternoon, I reworked last night's quick look. The biggest difference is that instead of averaging twelve images together to stack them (and reduce noise), I stacked them using a "brightest pixel" scheme and then reduced noise in a second step. The asteroid trail is much brighter this way and the sky only slightly grainier. There was just a tidge of drift owing to polar misalignment which I fixed with a deconvolution pass. That messed up the stars, which I fixed with a defocused overlay. That softened the diffraction pattern which... well, you get the idea. Fix one thing, then fix the half-dozen things the fix tears up. In the end, it's a better photo, but it's anything but a "quick look."
1/28/2015. A comet awash in moonlight. Right after twilight yesterday evening, I grabbed a series of one minute exposures of Comet Lovejoy. The waxing gibbous moon, 58% full, was only 22 degrees away. There were lovely colors in the unprocessed images, but this quickly became an exercise in extracting signal from the blue of the moonlit sky:

Comet Lovejoy
34x60s (inset, single sub: 1x60s)
Canon 6D, ISO 3200
10" F4 Newtonian, MPCC-III
As usual, click here for a closer look.
The faint spot of deep-sky fuzz at about 8 o'clock from the comet's head is 12th magnitude NGC 959. I calibrated the subs in PixInsight using a flat from a few days ago, then used Maxim to align them manually on the comet's inner coma and returned to PixInsight for heavy lifting.
1/30/2015. I took a second cut at data from 1/24 trying to get more detail in Comet Lovejoy's tail while showcasing the mix of stars and galaxies in the background. As threatened, I combined all the useful data from that night rather than just 4 consecutive images:
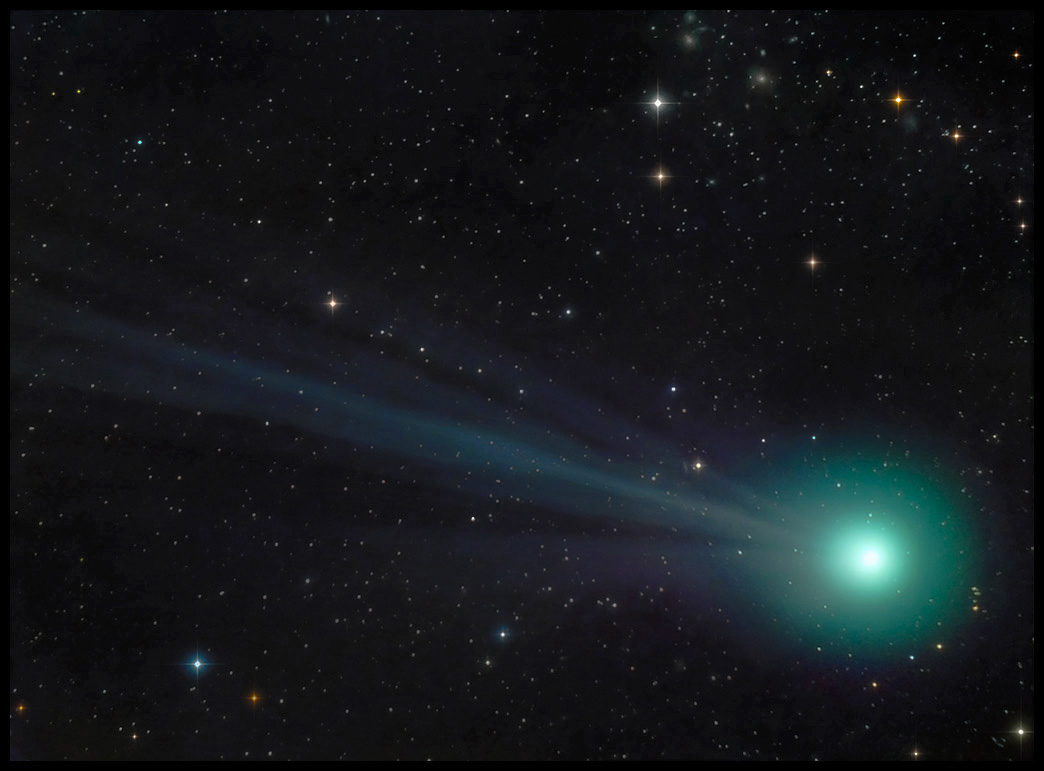
Comet Lovejoy
15x150s (37m30s total)
Canon 6D, ISO 3200
10" F4 Newtonian, MPCC-III
(Click the image for a better view.)
I used PixInsight (with lots of hints from the videos on Harry's Astroshed) to stack all fifteen 150-second exposures aligned on the comet without the starfield. You know the drill: then I stacked the same images, aligned on the starfield and mixed and matched the details. Three gigabytes of work files and half an hour of processor time later, I went off-script to put the comet back into the starfield using assorted layering options in Photoshop rather than pixel math in PixInsight, but it worked out OK. Not perfect, but OK.
Here's a quick link back to the first version.
The tail is smoother, but not really more detailed; the sky less grainy. But the galaxies aren't really much better and the comet's head was better in the shorter stack (so I used it in the new one, too). Lovely tools to know about in PixInsight but not an unambiguously better photo to show for them.
All in all, I'm looking forward to getting into the shop and working on an adapter to put wide lenses on the CCD (the metal and fasteners are here; picked up the drill bits at Lowe's just now). After a few sessions with the CCD and fast glass, these techniques for isolating starfields from nebulae and treating them separately will become routine.
2/1/2015. The first try at the Nikkor to SBIG adapter almost worked! The concept is good; a few things worked out better than I expected. Execution was just that little bit off, though. Nikkor lenses need more clearance behind the flange than I provided. I need to cut away a little more metal, and that changes this and that... Even so, I may be able to whittle some on v0.00 and give it a try under the stars. I'm counting on starting over to get a really satisfactory device, and that's OK. That (and shipping charges) is why you buy more metal than you need to make just one. Meanwhile, I'll spare you the recipe.