| |
When the Moon grows bright and the clouds grow thick, an amateur astronomer's mind turns to the lathe in the basement.
2/02/2015. I've been thinking about a Nikon lens adapter for my SBIG CCD for some time. Since I replaced the Mandel Nikon lens plate that used to live on my 5-slot filter wheel (the CFW-8a) with a Mandel Muscle plate (a thicker, more rigid affair) and especially since replacing the 5-place wheel with an 8-slot model (the CFW-10), I've missed the ability to make really widefield photos using the cooled CCD.
SBIG makes (or made) the "CLA-10" lens adapter to mount Nikon lenses on my current setup, but they charge(d) $257 for it. Now look: it's just a Nikon F lens flange held 13mm in front of the face plate. Period.
Below is an illustrated recipe for my home-brewed CLA-10. Much worked out well, but a few things didn't work as well as I'd like. I'm pulling these notes together late in the day I finally made it, while I still remember most successes and failures and measurements. So it's probably wordy. There are things I would (and will) do differently on serial numbers 002 et seq (today is Groundhog Day, so no one should be surprised by a certain amount of repetitive labor). Also, keep in mind that until I delete this remark, it's untested.
 This is the plan in cross-section. At top is my starting point: a short length of aluminum tube. Down below, the finished piece is sketched roughly to scale (height is exaggerated some). This is the plan in cross-section. At top is my starting point: a short length of aluminum tube. Down below, the finished piece is sketched roughly to scale (height is exaggerated some).
Nikon lenses come to focus 46.5mm behind the front of their mount, and SBIG docs detail the placement of the chip in the ST series of cameras. Add & subract to find that the front of the flange has to be 13.0mm from the CFW-10's faceplate for Nikkor glass to reach infinity focus on the chip.
The black bits are a Nikon F-mount bayonet flange scavanged from a set of extension tubes (eBay). Red is the color of steel in four tiny screws that hold the flange to the adapter and four more that hold the adapter to the faceplate. The screws holding the flange are pan head 0-80 x 1/4 inch. The flange already has countersunk holes for these. The screws holding the adapter to the CFW-10's faceplate are 4-40 x 3/8 inch. That's the size of the four screws that hold an SBIG "D-plate" to the front of the CFW-10.
SBIG's OEM adapter retains the D-plate; mine replaces it. I also sketched (not shown here) a home-shop version that follows SBIG's lead, but this one seems simpler for a novice with a lathe. Note that rather than machining a shoulder inside the tube to support hex nuts for the 0-80 screws and the heads of the 4-40 screws, I've used a drill-press to counter-bore holes.
Click on the drawing and "view image" to see more clearly what I am up to.
|
 The loud bit. Begin by lopping off a ring about 3/4 inch long. The loud bit. Begin by lopping off a ring about 3/4 inch long.
The metal is 6061 Al in the form of a tube 2.25-inches in outside diameter with 0.50" walls.
|
 The hot bit. Don't touch this for a good little while. The hot bit. Don't touch this for a good little while. |
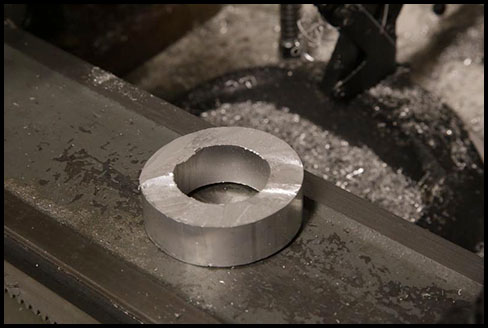
 The fun bit. Face both ends of the ring. Turn a shallow shoulder on one side to guide the placement of the lens flange -- just a mm or so deep, leaving a shoulder around the outside rim to center and help hold the flange in place for center-punching mounting holes. The fun bit. Face both ends of the ring. Turn a shallow shoulder on one side to guide the placement of the lens flange -- just a mm or so deep, leaving a shoulder around the outside rim to center and help hold the flange in place for center-punching mounting holes.
You may eventually have to remove this shoulder to permit lenses to mount. You will have to remove it if you make the notch much more than a scratch.
|
 Admire your work. After this, there are many opportunities to spoil it. Admire your work. After this, there are many opportunities to spoil it. |
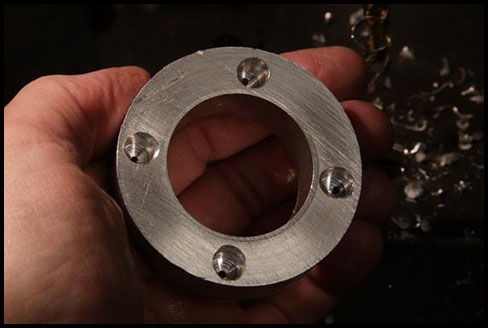
 The tedious bit. Hold the flange in place, and center-punch through the four existing mounting holes. Drill through the work. I used a 5/64ths bit for a little wiggle room over the 1/16th diameter of the 0-80 screws. The tedious bit. Hold the flange in place, and center-punch through the four existing mounting holes. Drill through the work. I used a 5/64ths bit for a little wiggle room over the 1/16th diameter of the 0-80 screws.
First mistake: I thought the paper surface would help hold the work still. Instead, it compressed very slightly under the drill press, and the holes did not go straight through. They splayed outward. Too: Level the drill table. Use a drop of oil. |
 Flip the work and drill bigger holes using the first holes as pilots. The bottoms of these new holes will be the surfaces on which tiny hex nuts rest. Flip the work and drill bigger holes using the first holes as pilots. The bottoms of these new holes will be the surfaces on which tiny hex nuts rest.
|
 Second mistake: those are too big. 5/16ths. I thought they would give me room to work with tweezers or some other prod when placing the hex nuts. Not really. I eventually drilled smaller extensions (5/32) in these to provide tighter quarters for the hex nuts. The big holes complicate machining needed to make room for the tail end of Nikon lenses. Use the smaller bit from the start. Second mistake: those are too big. 5/16ths. I thought they would give me room to work with tweezers or some other prod when placing the hex nuts. Not really. I eventually drilled smaller extensions (5/32) in these to provide tighter quarters for the hex nuts. The big holes complicate machining needed to make room for the tail end of Nikon lenses. Use the smaller bit from the start.
|
 See the next step first! I'm recording what I did here, but I did this out of order. I am deepening the seat for the flange and starting to remove metal behind it. See the next step first! I'm recording what I did here, but I did this out of order. I am deepening the seat for the flange and starting to remove metal behind it.
Third mistake. Don't deepen the seat for the flange. The F-mount needs to sit a little above the metal for the compression springs in the bayonet to work properly. This is one of the nuances of the Nikon bayonet. As for excess metal: remove it from the back side of the lathe with inverted tool (triangular head works well). |
Not shown here (I got excited). Position the D-block over the camera side of the work and center punch where its mounting holes fall. You're not going to use the D-block itself for this adapter, but it's known to fit the filter-wheel and so makes a great template. I put these four holes 90-degrees away from the flange mounting holes, but there's nothing sacred about that. A 1/8 inch bit is a tight fit for the #4-40 screws, so I used the 5/32 to gain a few mils of leeway. Drill these from the camera side, then counterbore from the lens side with a 1/4-inch bit (? measure it) to permit passage of the 4-40 Philips heads. You're going to drop the screws that hold the adapter to the filter wheel through there letting the heads rest against the bottom of the counter bored holes. Look at the drawing. This should all be done before the step shown in the previous picture; doing it later presented an uneven surface when counter boring and invited a mess. That was mistake #4 (or #3 if I had made it in the proper order).
|
 Dry fitting. Put the flange in place, make sure all the holes line up, and measure the distance from the face of the flange to the back of the nascent adapter. Make it a scant 13mm by facing the back side of the adapter. Adjust the depth of the counter bored mounting holes to allow an appropriate length of 4-40 screws to protrude. Drop the 0-80's into the flange mounting holes and adjust their counter-holes, too, to insure that their tiny hex nuts can get a grip. Dry fitting. Put the flange in place, make sure all the holes line up, and measure the distance from the face of the flange to the back of the nascent adapter. Make it a scant 13mm by facing the back side of the adapter. Adjust the depth of the counter bored mounting holes to allow an appropriate length of 4-40 screws to protrude. Drop the 0-80's into the flange mounting holes and adjust their counter-holes, too, to insure that their tiny hex nuts can get a grip. |
 Not quite ready for sky trials. I thought we were, but Nikon lenses wouldn't mount. The flange must stand above the shoulder by some as yet unmeasured distance. Trim too much and lenses are loose; trim too little and lenses won't mount at all. Also, there's still way too much metal behind the flange in this photo. Trim it out, see above. Not quite ready for sky trials. I thought we were, but Nikon lenses wouldn't mount. The flange must stand above the shoulder by some as yet unmeasured distance. Trim too much and lenses are loose; trim too little and lenses won't mount at all. Also, there's still way too much metal behind the flange in this photo. Trim it out, see above.
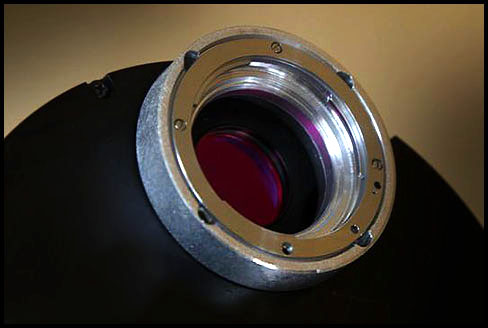
Done and done. Now waiting for a clear sky for a reality check.
|
Front to back distance is a scant 13mm. If the adapter is too thick, lenses won't focus at infinity; if it's fractionally too thin, they'll reach focus but not at the infinity mark, which is fine because in this application, you're never going to rely on the inifnity stop and you care nothing for close focus. So err on the short side, but not by much. And there's nothing subtle going on on the back of the adapter; you can trim it easily enough on the lathe if it needs to be shortened.
Clean it up! The filter wheel's electronics are wide open under that plate and aluminum conducts electricity the way Leopold Stokowsky conducted an orchestra. Any shards, whiskers, or assorted collections of unsupervised aluminum atoms may cause a lot of mischief. Turn relief on sharp corners, file anything suspicious, and think about painting it.
Note that to mount / unmount the adapter on the CCD camera, you must use a small Philips screwdriver to reach under the flange through the gaps provided by the holes counter bored for the 4-40 screw heads. The flange serves as their retaining ring. I really can't decide whether this is an elegant solution or a cheap-ass work around. They're often hard to tell apart.
Neither this device nor the OEM adapter includes a lock pin for the lenses. SBIG says there isn't room, but I think there is. Some subsequent version will likely use the Nikon parts from a Chinese-made Nikon/EOS adapter, several of which are snicked onto the back of my Nikon glass. They have a low-tech lock pin that seems to require very little space. But do I really want to count on that tiny pin to hold my CCD when the lens is carried by the mount and the camera is hanging by my handiwork alone?
Now that mine is done-ish, I checked out Precise Parts ("Your online astro machine shop") and it appears that they could do this (better) for about $150. But where's the sport in that?
2/4/2015. I scored a 12v DC power supply on Astromart, plugged it up, plugged in the camera and the computer and tried it out on the optical bench (the dining room table). Perfect. I fitted the adapter, and it works, too. But the adapter works better when shimmed with electrical tape on the face of the Nikon flange to firm up the lens's committment to not rotating on a whim. My 55mm Micro-Nikkor focusses just a little "beyond" infinity, as expected, and so I am pretty sure all my vintage Nikkor glass will come to focus. I'll give it a try under the stars as is, but I'm betting there's a version 2.0 in my future. Meanwhile, I am imagining all sorts of ways to make the lack of a lock pin immaterial. Mark Scrivener, who sold me the power supply, also machines some of his own parts and asked if I'd taken up anodizing them, as he has. So many things to learn.
Since I can put Nikon glass on the CCD, I thought it time to find one of the all-time classic lenses for widefield astrophotography. One of the least expensive 180mm F2.8's I've seen for a while is a retiree from the Naval Technical Intelligence Center which came with some intriguing mods. Next page...
|
Except where noted, deep-sky photos are made with an SBIG ST2000XM CCD behind a 10-inch Astro-Tech Ritchey-Chretien carried on an Astro-Physics Mach1GTO. The CCD is equipped with Baader wide- and narrow-band filters. The internal guide chip of the CCD most often keeps the OTA pointed in the right direction (I'll let you know when an OAG or guidescope takes its place). Camera control and guiding are handled by Maxim DL 5.12. The stock focuser on the AT10RC has been augmented with Robofocus 3.0.9 using adapters turned on the lathe downstairs. A Canon 6D and a modded 50D find themselves mounted on an Orion 10" F4 Newtonian or carrying widefield glass on an iOptron Skytracker. Beginning in May 2013, PixInsight has taken over more and more of the heavy lifting -- alignment, stacking, gradient removal, noise-reduction, transfer function modification, color calibration, and deconvolution. Photoshop CS4 et seq and the Focus Magic plugin get their licks in, too.
:: top ::
|