Hokus Fokus...
2025/02/03. On AstroMart, someone advertised a 400mm F2.8 Nikkor fitted with a Teleskop Service TeleFokus, a fine-focus rig that looks to be both more effective and more compact than my belt-driven McGiver.
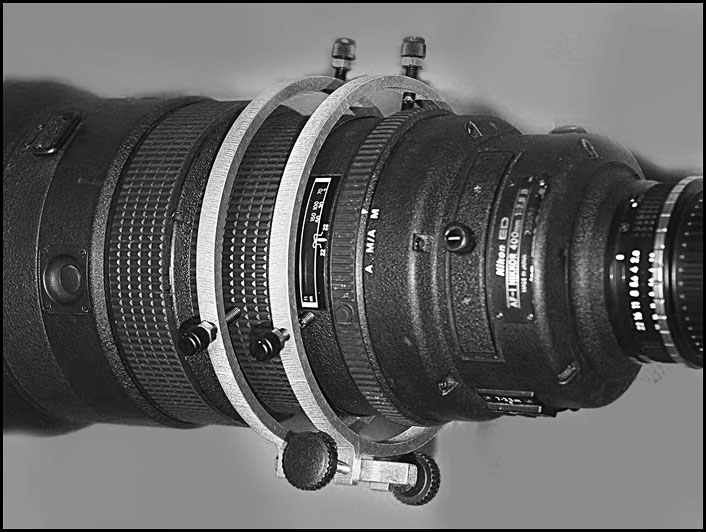
I went shopping and found the product in current production for 89 Euros, less VAT (about 12 Euros), plus shipping (35 Euros) or, y'know, somewhere around $145 delivered. I don't get that many chances to do deep sky stuff, so it wasn't the worst price if it assured good focus (which is a substantial fraction of the whole ballgame with fast glass). But it wasn't "free" either which is the cost of staying with what I have. Here's the commercial product:
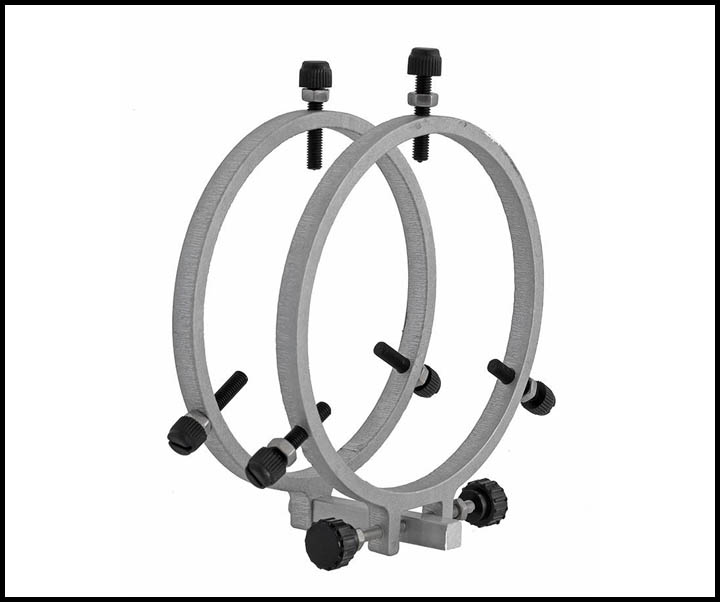
Teleskop Service TeleFokus
I put one in my shopping cart and then looked up reviews on CloudyNights. In user reports going back to about 2017, few seemed more than guardedly happy. The good reviews included phrases like "pot metal," "sloppy," "looks and feels kinda home-made," though most allowed that it did, in fact, mostly, sort of work. In fairness, the Teleskop Service images may suggest that the current product is a bit better than the ones so skeptically reviewed almost a decade ago. I unloaded my shopping cart and set to designing.
Over a few days, my designs grew simpler and easier to build. Because I'm designing for one particular lens and not for whatever big glass a customer might have, I didn't worry about universal fit. For example, mine has a fixed separation between the driving and driven components rather than a casually adjustable one. And since mine will be patently home-made, it didn't matter if it looks the part (hence hose straps rather than collimation rings and JB Weld everywhere).
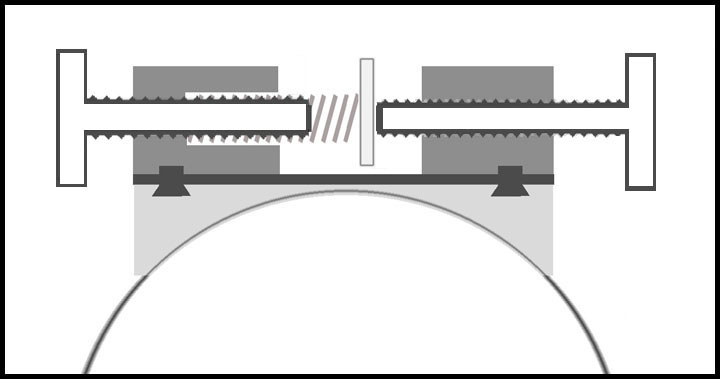
First Sketch.
Brass or aluminum machined, drilled, tapped for two knurled bolts, mounted on a plate
attached to a pipe strap and supported by JB Weld.
When the first bits came from Amazon, the drive and lock bolts were obviously too small. EBay had the answer for that, and by the time I ordered bigger pieces, a simpler, smaller design had come to mind:
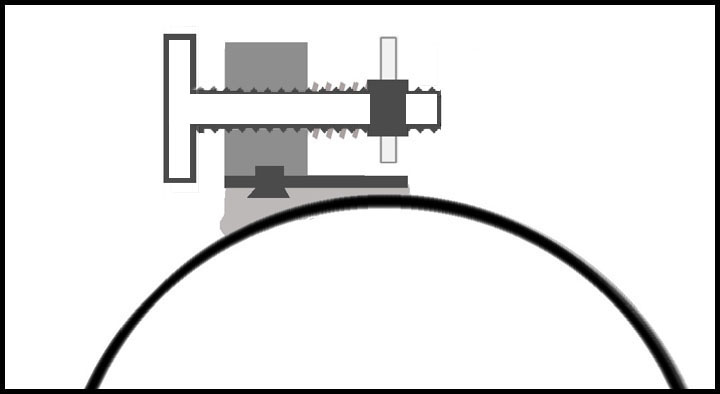
Second Sketch.
A short section of hex stock drilled and tapped for a knurled bolt, a
threaded connection to adjustment tab, spring to take up slack.
Scale is largely fictitious, and only the "active" ring is shown. Another will hold the bar (or captive nut?) that moves the focus ring. In most (but not all) my cogitations, that piece is too simple to worry about. Think of the pieces shown in these drawings as functional symbols rather than as blueprinted components. We'll see how things actually come together later this week.
2025/02/08. I am sure that there are JB Weld artists in this world, but I am not one of them. The as-built design is simpler than the ones shown above. The execution is, eh, adequate? Maybe I should call it a prototype and see how it can be improved. I used a JB Weld "SteelStik" for rapid setting and curing, but the final thing is lumpy and inelegant. I probably only needed half or even a third of the goop I used. Little known fact (to me at least): you can whittle JB Weld after it is set but before it cures which is good for cleaning up and straightening out over-zealous application. Paint will help appearances. Darkness will help more.
I was resigned to using rubber bands in a clearly cobbled up arrangement to avoid the complexities and small tolerances introduced by using both driving and driven threads, but it came to me (while walking Gemma) that one spring would suffice for adjusting the focus both in and out (duh! too simple). This afternoon, I put everything together. Here's my confession showing how it was done:
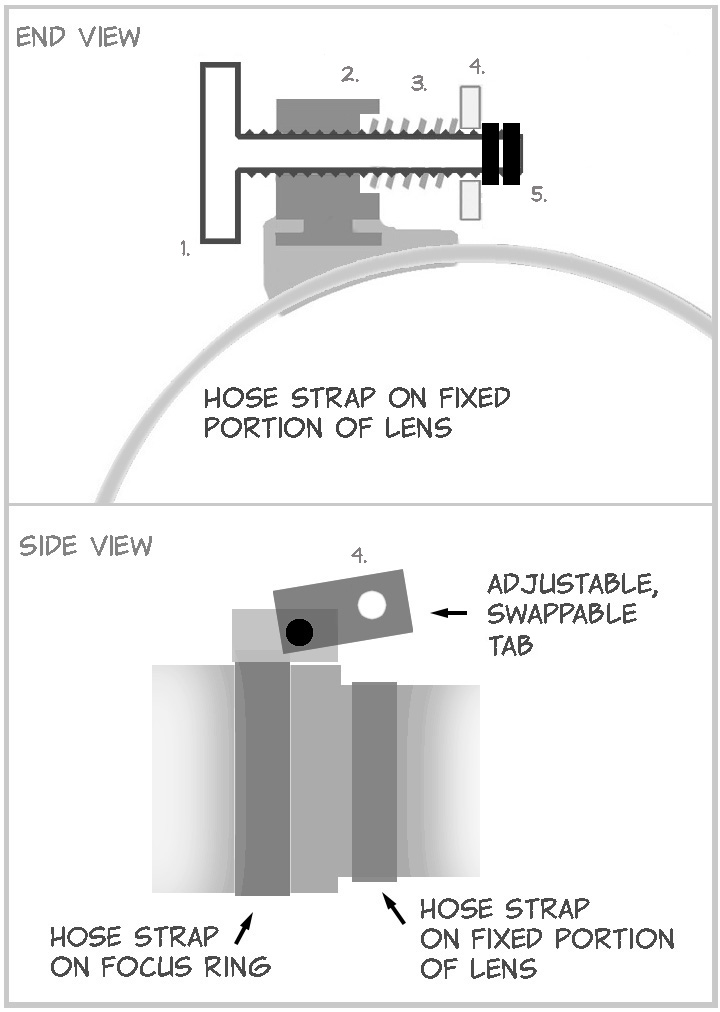
Key:
1. Knurled screw, 1/4x20. eBay.
2. 3/4-inch section of 1.25-inch aluminum hex stock. Holes to allow JB Weld a really good grip (scrap).
3. 3/8 x 1 inch spring. eBay.
4. ~3-inch section of 1x1/8-inch aluminum bar stock. (scrap).
5. Two hex nuts threaded together 'cause I can't find a stop nut tonight. (8 cents)
Not numbered: too much JB Weld "SteelStik" and straps made with a DIY kit. (Amazon)
Note that item (4) is bolted to a similar scrap which is JB Welded to the hose strap on the focus collar.
It took a few days to get from notion to plan but only a couple of hours to go from drawings to metal. OK -- It needs some refinement (not much), but let's be clear: it works. At first I didn't think it did because the motion was almost imperceptible. But that's the point. The full range, several turns of the screw, does not quite span the full infinity symbol on the 400mm barrel. It's only slightly fiddly, and once adjusted it seems very solid. It's not quite as smooth as I wanted. Some use and some lube may fix the smoothness issue, and an actual locknut rather than two hexnuts jammed together will give me a little more working range (which may not be important). Different tabs (item "4" in the confession) and springs of different lengths will allow casual mods.
Some BOTE calcs: One turn of this new fine-focus knob moves a point on the circumferance of the collar 1/20 of an inch. The focus collar is ~4 inches in diameter, so one turn of the fine focus knob produces 1/250 of a full rotation. It's easy to judge fractional turns of the knob, so, for example, a (relatively large) one eighth twist of the fine-focus screw turns the focus collar 1/2000 of a full rotation (1/160 = 0.006 inches). I'm not sure how that compares, numerically, to my previous fine-focus routine --grip the focus nubbin, hold breath, and just think about moving it-- but repeatable adjustments measured in thousandths of an inch have got to be better. As for cost, I'm into this for $40 (including miscues) without a lot of shopping around and with enough bits to make more versions. It wasn't free, but it was fun and about a 75% discount to commercial. It's a clear improvement over my previous belt-drive effort.
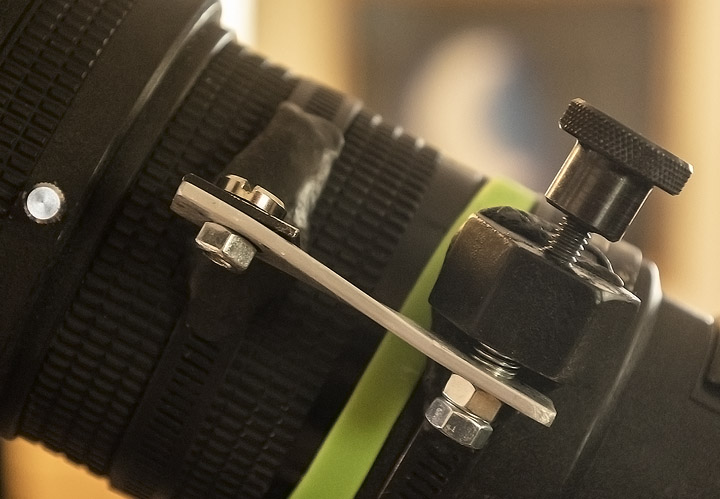
2025/02/09. A quick refinement this morning smoothed things out. Because I'd merely eyeballed the alignment of the pieces, it's no surprise that the components welded to the hose clamps were not precisely aligned to the tangents of the rings. As a result, the tab (item "4") connecting the driving and driven components came out tilted with respect to the drive mechanism, and that allowed the drive screw's threads to catch the edges of the hole through which the screw passes. Item "4" is "swappable" and "adjustable." Just so. I took it off, clamped it in a vise, and "adjusted" it with a compensatory twist (I took hold of the bar in a pair of pliers and put some weight on it). Now the drive screw no longer catches an edge where it passes through the tab, and the hexagonal lock nut's corners no longer come in and out of contact with the "away" side of the tab. As a bonus, the tab now has this rakish swoop when viewed from the side (aesthetics aren't everything in mechanical design, but they're not nothing).
Enough sketching and handwaving. Here's the widget itself, ready for dark:
The green thing is an anti-creep elastic band which adds resistance to the free-turning focus collar -- that might be superfluous in this design, but it can't hurt. The whole shebang is so compact that there's room on the Losmandy D-plate for the 50mm finder I long ago converted to a guidescope. Star trials when the weather wills (it may be a while).
2025/02/10. In late twilight, I got a very quick look as clouds rolled in. Below is Venus through a Bahtinov mask at the inner and outer stops of the available focus travel (about five turns) plus, in the middle, one frame very close to spot on. Pine boughs and needles complicate the pattern, but it comes through. After the middle frame, I turned around and shot the Moon without touching the focus. So, it works on the R6. Given the small range of adjustability, the device may need to be repositioned slightly when used with the ASI1600MC and the usual filters, but that's nothing a screwdriver and a few minutes can't fix.
The masked images of Venus are shown at some indeterminate scale just to make sure the Bahtinov pattern is easily visible. The Moon is 1:1, a simple crop from a RAW image.

Venus through Bahtinov mask (and pine trees) ISO 51200, 1/40s.
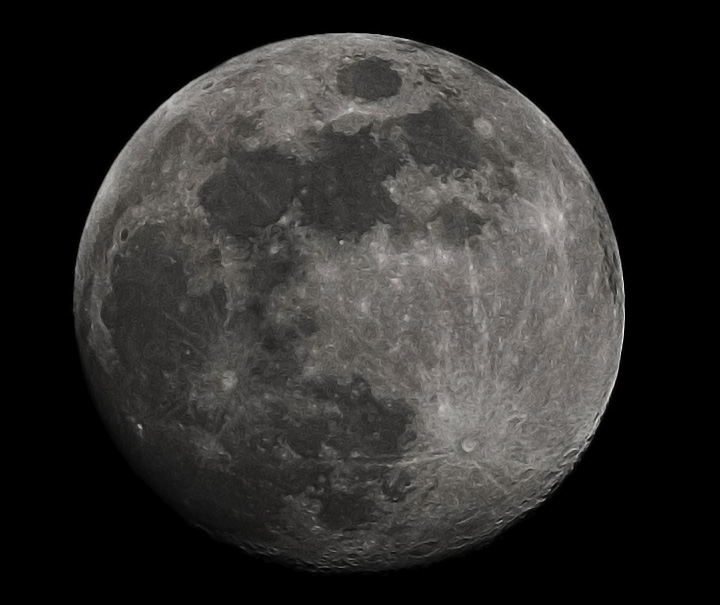
The Moon using the Bahtinov-determined best focus.
1/8000s, ISO 400.
2025/02/22. It's not quite right. I removed the anti-creep band. This may have been a mistake. In the first real trials on AE Aurigae last night (3 hours, 60s, Duoband, etc) this rig made the 400mm easy to focus, but focus almost immediately went to hell and continued to drift throughout the series. This only looks decent because I am showing it to you small, and I have processed the literal bejezuss out of it:

IC 405: AE Aurigae and the Flaming Star Nebula.
400mm F2.8, 170x60s, Duoband
ASI 1600MC, gain 300, -15C, darks but no flats and no guiding.
You can make it a little bigger, but don't expect much.
Maybe it's the spring. Maybe I forced the fine-focus knob beyond its "natural" range. I'm guessing. Also, must try a bit of tape after finding focus -- not a bad idea in any case. It's worth mentioning that I was also distracted trying to get a guide 'scope configured so I can run longer sub-exposures and got that done late in the night. So this morning, I went out to re-assess the focussing situation, and I see no problem with the focussing rig, and I can't imagine how it moved. After several checks of the subs using CCDInspector, it appears that I just blew it from the outset. More soon, probably with guiding to make it all even more sporting.*
* Oh hell, yes. Look at this!
2025/02/24. After using this in the dark for a few nights, I was convinced it needed more range to accommodate all filtration options (UV/IR, Duoband, and none). Despite carefully nailing focus of the Pleiades, an hour-long series shows clearly that the achieved focus was, in fact, off and gradually worsened throughout the session. The spring in the previous iteration, compressed, took up about half the otherwise available range, and I suspect the spring is (somehow) responsible for at least some of the focus creep. I reworked the link between the driving screw and the fixed tab.

(4) is now a pair of hexnuts SuperGlued to the knurled bolt with just a little more space between them than the thickness of tab (3). My expectation is that this will give me more room for focusing and will better hold focus without tape, straps, and such. We'll find out tonight.
2025/2/26. Bingo. This works well, but some brake on focus drift is still needed. I don't know why, but focus will drift a little without taping the focus ring. I've reinstalled the anti-zoom strap as an anti-drift strap; if that suffices, it means I don't need to remember to pack tape for trips to the dark. To adjust the focus range, turn the tangent screw to the middle of its range, loosen only the forward clamp (the one on the moveable focus ring), turn the focus ring to the middle of the range needed, and retighten the clamp. Voila. Next issue: there is some sag in the T2-Canon adapter. Can I find a T2-Nikon adapter and forego the Canon conversion adapter?
:: top :: |