More Moonlit Madness
10/11/2016. Back to the 50D. Tonight is clearer than last night but just a little Moonier. I was surprised to see the Milky Way glowing faintly through all that scattered light. I took aim at the Crescent Nebula (NGC 6888) in central Cygnus. It's bright and in a rewarding and complex field of intricate nebulosity. Also, it's on the meridian at twilight, so I can pick it up just as it clears the limbs of Bird Feeder Tree. I exposed 2h30m in hydrogen-alpha, then changed to doubly-ionized oxygen.
First lesson tonight: The Baader H-a and O-III filters are not parfocal. The data will be usable, but the O-III channel is not nearly as well focused as the H-a. I got 100 minutes of O-III before the field hit the treetops. Here's the H-a data by itself.
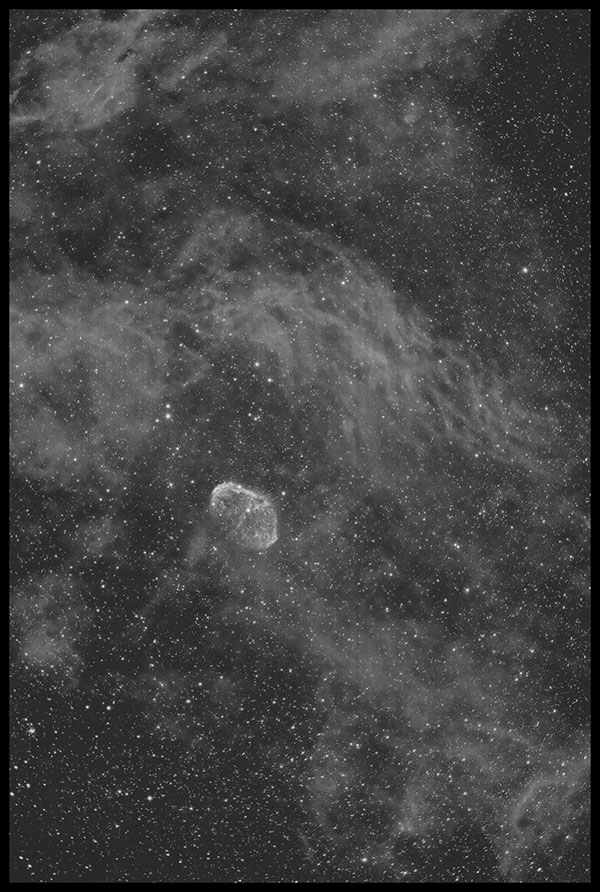
NGC 6888, the Crescent Nebula
15x600s (2h 30m), 7nm H-a
Canon 50D mod, ISO 1600
TMB92SS @ F4.4
Click the image to enlarge.
OK! Sleep is good. I took another cut at the O-III data and used channels in Photoshop to combine the two wavelengths. H-a is mapped to red, O-III to both green and blue. Then I mapped the bicolor image onto the H-a, using H-a as luminosity. I think this worked rather well:

NGC 6888, the Crescent Nebula
15x600s (2h 30m), 7nm H-a +
10x600s (1h 40m), 8.5nm O-III
Canon 50D mod., ISO 1600
TMB92SS @ F4.4
Click the image to enlarge.
Here's another lesson: as long as you have a sharp image to serve as the luminance layer, soft color layers aren't much of a liability. This is something you knew from CCD work but hadn't quite got around for DSLR work. Today's bicolor effort is cropped some owing to the difficulty of replacing the 50D in exactly the same orientation after changing filters. There's an easy fix. In Photoshop, I layed out and divided an orientation ring (0-15-30-90 ... 300-330-360 degrees) and printed it on the LaserJet. I wrapped that around the barrel of the flattener and taped it in place. I scribed a light line on the FT endcap as an index. The orientation scale doesn't need to be exact in any absolute sense (although I've tried to attach it such that 0-90-180-270 aligns the edges of the field with RA and Dec). The point is to be able to replace the camera body the same ("same enough") orientation after changing filters or when continuing an exposure over multiple sessions. For the record: 0 is N/S, 90 is E/W.
 Hardware notes: the stepdown circuity is here, and this morning while researching how to wire it into a battery-substitute, I discovered that I can buy a dummy BP-511 with cord for under $12. Fine. When all is said and done, I should have a 12v adapter for the 50D for about $40. That's well under half the price of a commercial version. Hey, it counts.
[10/17/2016: And it works, too! The multimeter soldered into the step-down amp made it a snap to dial in the same 7.62v a freshly charged BP-511 battery provided. The finished adapter runs the 50D like a charm from the 12v Kendrick. FWIW, the onboard ammeter says that the camera draws about 2ma when doing nothing and when sleeping and about 500ma when holding the shutter open on bulb. Cleaning the sensor takes about the same juice as holding the shutter open. From experience and the claimed capacity of the camera's batteries, that all seems about right. Now make sure the polarity is as expected before using alligator clamps on a bigger battery --actually, I believe the circuit is polarity-proof: it won't work at all with reversed input polarity. Actually, I know that, 'cause I tried it. Accidentally. While checking the output leads with a voltmeter.]
Feathertouch's new owner confirmed that their off-the-shelf adapter will let me swap the TMB92's wonderful 3-inch focuser on and off the AT10RC. It would allow me to use the 0.75x A-P compressor behind the RC and open up a new world of precise focusing both by hand and by motor. Soon, I am sure.
10/12/2016. Deteriorating conditions, but usable just the same. Here are two works in progress. These are hydrogen-alpha images. The first is a dew- and haze-compromised attempt on the complex field around M52 including the Bubble Nebula (NGC 7635) and other extensive nebulae (like Sharpless 157, the Lobster Claw). Next is NGC 7000, the North America Nebula, through a longer, clearer interlude. There's bigger, better, and color to come by and by.
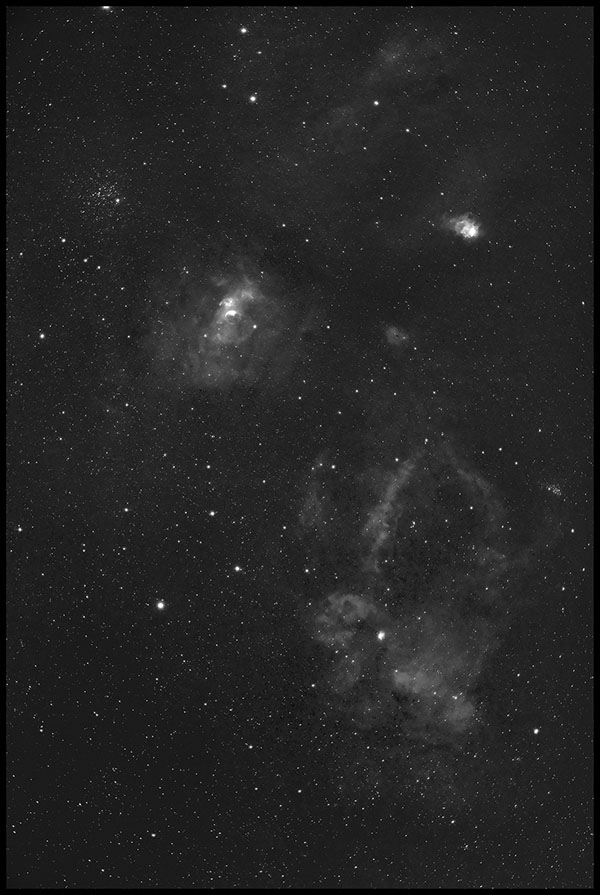
M52 (upper left) and environs
13 x 600s (2h 10m)
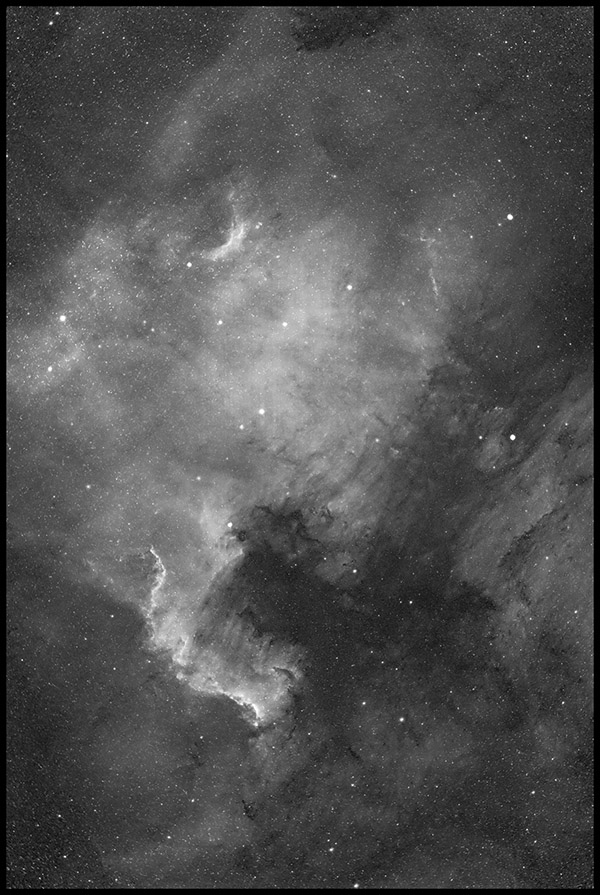
NGC 7000
18 x 600s (3h)
I aligned the camera to the 0° mark on the new orientation scale. On the next clear night, we'll find out whether the scale makes adding O-III easier.
10/17/2016. Easier, but not perfect. Rotational errors of ~3 degrees are common when trying to simply and repeatedly return the camera to the same orientation. Practice may make better. Three degrees looks alarming, but it turns out not to compromise the field appreciably.
Also, note that the O-III filter does not exclude moonlight nearly as effectively as does the H-a filter. Live and learn.
10/18/2016. Back to H-a. There's just enough time after twilight and before Moonrise to slip in a few O-III frames, but I'd rather take hydrogen-alpha to complete a three-panel mosaic of the North America Nebula, the Pelican, and the environs of Deneb (the sky to the right of the field shown above). Next week, weather willing, I'll grab enough O-III to make this a color triptych. Tonight I added 2h10m of the Pelican and 1h around Deneb.
After that, I returned to M52, NGC 7635, and the lobster claw. Compared to my previous attempt, there's still a lot of moonlight but the sky is much clearer. I was hoping for up to 4 hours of good data taken through decent skies, but I lost my nerve after just one hour under all that moonlight and in the absence of stars fainter than 3d magnitude (at best). The frames actually look pretty good despite the lackluster sky.
[next page!]