Into the Night.
2021/05/31.
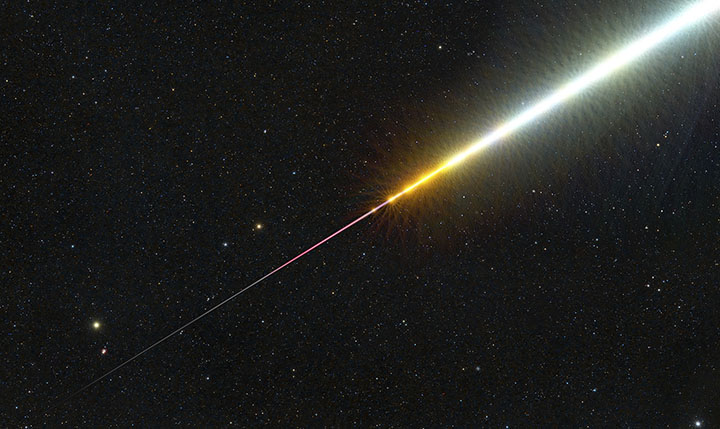
The International Space Station passes into the Shadow of the Earth.
Click the image for a better view.
(Note that the link is always to the latest version of the image. Details down below.)
On May 31, while planning to photograph two trains of Starlink satellites (previous page), I noticed that the ISS would be pass almost directly overhead. Better, just as it came to the zenith, it would enter the Earth's shadow. I thought it would be neat to try to capture the changing colors of sunlight falling on the Station as it sailed into orbital night. I put a 10mm Samyang lens on a Canon 6D for an almost-all-sky photo and mounted a fast 105mm Sigma on a Canon R6 to capture video (uploaded to Vimeo, but it's no great shakes).
The ISS entered the frame at something like magnitude -3, not much reduced from the Venus-like brilliance it carried out of the trees and up the northwestern sky. It faded quickly as it crossed Bootes. Using 14x70 binoculars, I could clearly see it for another minute or more all the way down the eastern sky toward Ophiuchus. At a guess, judging by both the visual impression and star images in the video, it left the frame somewhere around seventh or eighth magnitude which is 10,000 to 20,000 times fainter than when it entered. The Station came on stage as the brightest star in the sky and left as a ghost. I imported the video as layers into Photoshop to see if I could pull something spectacular out of it.
The tech details for those who care: this photo consists of about 350 frames from a 1080p HD video shot at 30 frames per second. The R6 was set to ISO 25,600. Each frame was exposed for 1/40 second. The lens was stopped down to F2.0 for leeway on focus and to avoid a possible central hotspot at F1.4 (turns out that's more of an issue in twilight and would not have been noticeable in the dark). Corner to corner, the frame covers a little more than 20 degrees.

The Path of the ISS on May 31, 2021
from Rutherford College, NC.
Heavens-Above.com
I imported the video into Photoshop (file > import > video frames to layers) but the program didn't want to make more than 500 layers. Instead of working in sections, I imported every other frame.
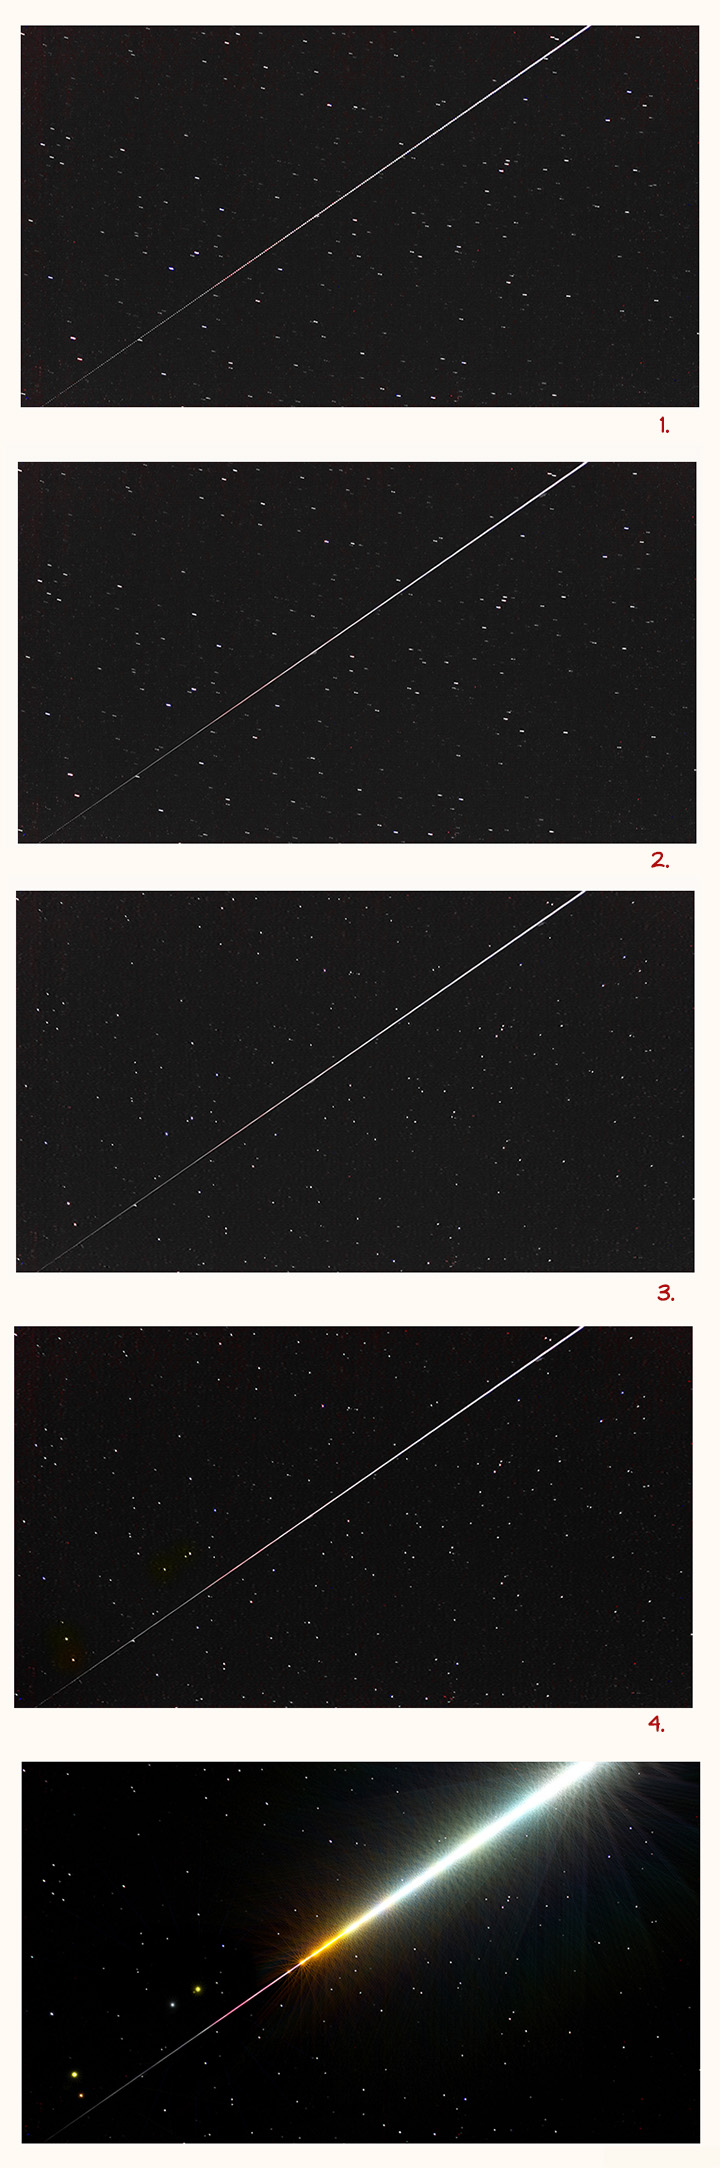
The main steps described here are shown below, though the differences between most aren't particularly clear at this small scale. Numbers in the next paragraph correspond to numbers in the how-it-was-done graphic.
I made the stack into a "smart object" and kept the brightest pixels of each layer then flattened the result [1]. I selected a narrow strip capturing the individual Station images and applied a modest motion blur along the same line to average the images across three exposures [2]. That minimized instantaneous flickering owing to seeing and accidents of pixellation and smoothed out gaps between frames. The camera was on a stationary tripod, so I selected the inverse of that narrow subset of the image and deconvolved the new selection to minimize startrails [3]. Then I jacked the color saturation and saw that the Station's trail displayed a good record of the changing colors of nightfall in low Earth orbit [4]. So far, so good, but does that simple trail suggest that the object leaving it is 20,000 times brighter at upper right than at lower left? No, it does not. The image was misleading in that regard, and it lacked zap.
I applied ProDigital Software's "StarSpikes Pro" to spread out the light of the Station's images in proportion to their brightness (and to bring up the visually prominent stars Izar and its neighbors in Bootes). I messed with primary, secondary, and glow parameters to produce a dramatic presentation in keeping with the changing brilliance of the Station while retaining the colors in the Station's trail. Some of the apparent flickering in the orange nightfall section of the finished image is a threshhold effect, the result of small variations in brightness that fall just above or just below the level at which StarSpikes grabs them.
It's something of an ongoing effort. See below for notes on post post.
Ta-da.
2021/06/04. But wait, I wanted better, cleaner stars to replace the rather messily deconvolved stars in the first version. I thought about reshooting the field in the middle of Bootes and layering it in (and I eventually did; keep reading), but then it occured to me that in the video I had about a thousand frames to stack. They could produce a better, cleaner, starfield from the source material. So I imported the frames into Photoshop again. I loaded them to layers a few hundred at a time and exported them for alignment and integration which I did in PixInsight. I used the stacked starfield in an improved version. 1056 x 0.025 seconds: that's the hard way to make a 26.4 second exposure. I may yet replace the stars with a more conventional exposure.
2021/06/15. I couldn't make it big, for a wall print for example, without better star images. So I used the same lens and camera and shot 5, 20-second exposures at F2.8 and ISO 3200 of the same field. I registered and averaged them in Pixinsight, registered the new starfield with the video-based version, then dropped out the video stars, and that's the photo featured at the top of this page. Notice a small NGC globular in the lower right fourth of the field, and the bright "star" in the lower right corner is actually the huge globular cluster Messier 3, nicely resolved. The image reaches Mv 14.5 or a little deeper.