|
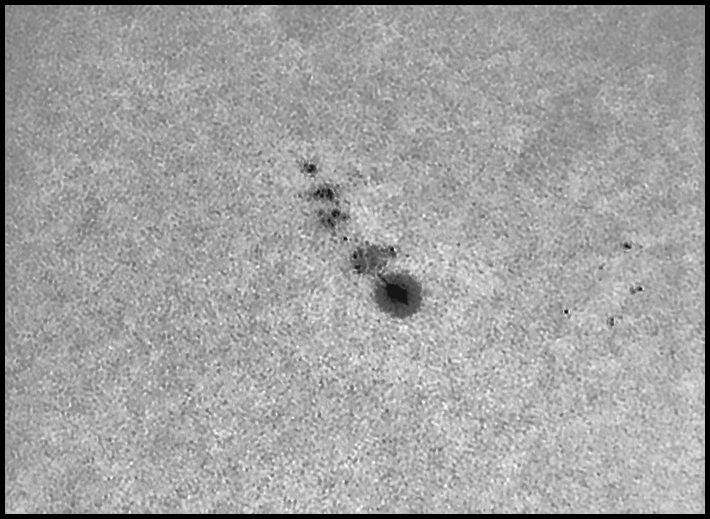
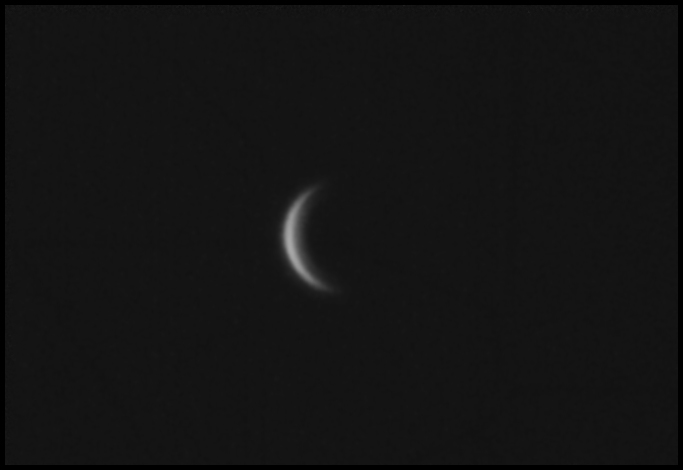
Today's imaging stack is on the A-P 5" F6: a Thousand Oaks solar filter over the objective, a Maxbright diagonal, 2-inch extension, 1.25-inch adapter, Barlow screwed into the Baader continuum filter which is screwed into a 1.25-inch snout attached to the Chameleon video camera. Seeing should be much more easily tamed in a single wavelength than across the entire visible spectrum. Excellent telescopes may focus all wavelengths of light at the same point, but atmospheric turbulence is not so considerate, and this early A-P is not perfect, either. I think the advantage of imaging in nearly monochromatic light has been nicely demonstrated by the H-a images that dominate recent Slow Blog posts. The Baader continuum filter isolates a 10nm band of very boring light: it offers no selective enhancement of faculae, prominences, etc -- nothing to confuse a clean "white light" image. (I keep putting quotes around "white light" because I am not sure how white I can say the light is when I am isolating a 10nm band of lime; "broadband" or "relatively broadband" or in any event "not hydrogen-alpha or calcium" is what is implied.) This filter is said to leak enough IR to cause CCD cameras to fail to realize much of the advantage of its intended bandpass, so I am using it behind an A-P Maxbright diagonal. The dichroic coatings have a sharp cutoff right at 700nm (on the long side of that wavelength, the Maxbright passes less than 1%, it says so right here in a forum post from Roland himself). I was busy enough taking sample images with the filter today that I didn't do any with-and-without comparisons. Maybe next time. As advertised, the Baader filter lets me accentuate solar detail (including thousand-mile convective cells in the solar photosphere), and as expected, it cleaned up Venus, too. This bodes well for improved lunar imaging soon. Today is solar eclipse day Out West; it's the newest of new Moons and I may not remount the 10-inch until after the Venus transit on June 5. So be patient on that score. The white light solar images and Venus were acquired at an image scale of approximately 0.48 seconds of arc per pixel (Venus's image measures 106 pixels in diameter; Guide says the planet subtends 50.8 arc seconds).
Sunspot with solar granules (each granule is always said to be "about the size of Texas")
10ms x 883, 6 db. Best 50% of frames.
Venus, same configuration except Thousand Oaks filter removed.
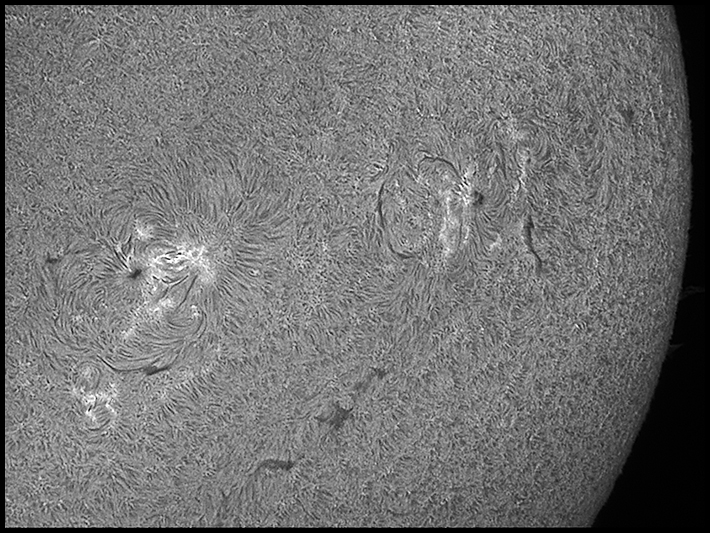
The chromosphere a few thousand miles above the same sunspots in H-a light
The barlow/continuum/snout/PGR Chameleon stack comes to focus on the A-P just inside the 35mm Panoptic behind the Maxbright diagonal and a 2-inch extension. Best focus is 4-5mm inside that point. Center small targets (like Venus) using a 10mm Plossl prior to inserting the camera and you'll save a lot of hunting. For the solar granulation photos, I have neither found nor developed a Registax Wavelets function that does not accentuate electronic noise at the expense of more subtle details. For the granulation images above, I skipped the wavelet step, applied despeckle, and deconvolved with Focus Max. Note that when stacking in AVIStack, you'll need to pick your own reference points for aligning the frames; more detailed alignment selections remain automatic. I placed a premium on low sensor noise for the continuum photographs so set only 0 or 6 db of amplification. For Venus, I experimented with the ROI features of Point Grey's FlyCap software. It would be a piece of cake if I could find a reliable, quick, and easy way to revert to full frame, a step that still causes me some excitement.
Some Notes on filtration: The Thousand Oaks neutral density filter is really just a partially silvered mirror. It reflects most of the light that strikes it. It rejects about 99,999 out of every hundred thousand photons, but it's an equal oppotunity bouncer, admiting ten out of every million photons from all parts of the visible spectrum. The Baader continuum filter admits light only within a 10nm bandwidth, only green light from something like 1/40 of the visible spectrum. It's always used with the Thousand Oaks filter. Compare that to the double-stacked Lunt solar telescope which admits light from only a 0.06nm band deep in the red end of the spectrum -- it passes only about 1/7,000 of the visible spectrum. There's no Thousand Oaks filter involved; light is attenuated by its spectral exclusiviity (an energy rejection filter does screen out IR, however, to keep from cooking the solar telescope's internals). On a 100 yard football field, with the visible spectrum stretching from endzone to endzone, the Baader continuum filter selects light from a 7-yard strip near a 35-yard line. The Lunt admits light from a strip only half an inch wide near the 10-yard line on the other end of the field.
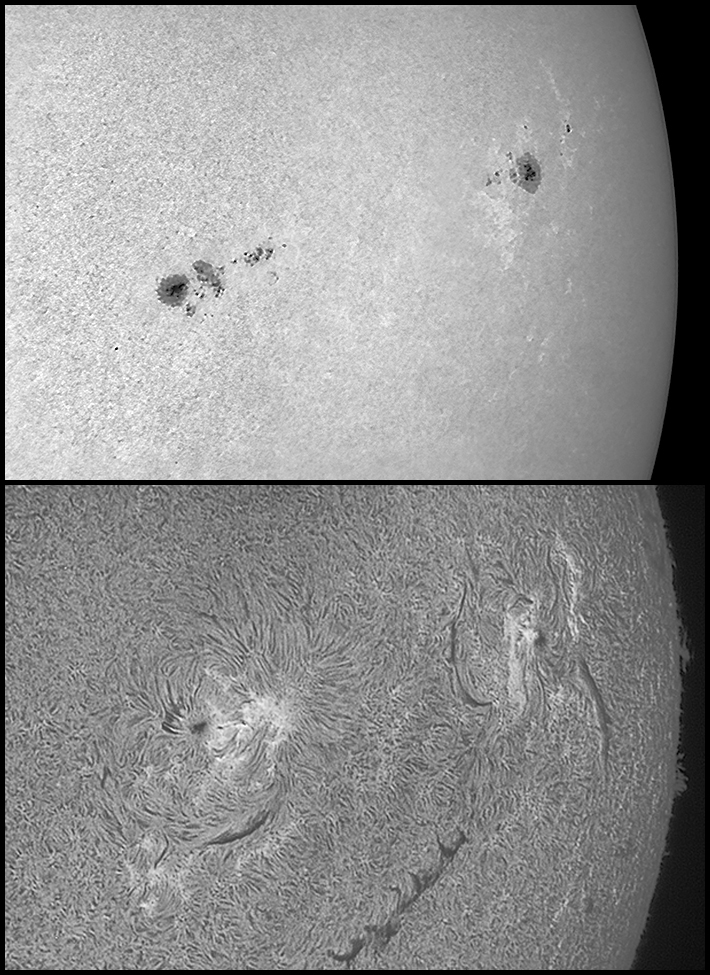
5/21/2012. Here's a two frame mosaic through the A-P with the continuum filter paired with a view of the same active regions through the Lunt in hydrogen-alpha:
Top: A-P 5" F6
Later that same day, experiments with the best 10% of 1,700 hydrogen-alpha frames produced what's probably my best h-a image so far -- tones are improved compared to the full-resolution versions of the images shown above, detail rather less. Likewise, a still interlude in the afternoon let me improve on the "white light" detail shown above. I don't think either downsampled image would look appreciably different from what you already see on this page so I'll save my trouble and your bandwidth and keep them in my pocket. I'll be ready with the techniques when there is something for show and tell. Speaking of which, I brought a storage battery out to try running the kit from DC power in anticipation of good weather on June 5. I've few doubts about anything except plans to use a small inverter to power a second monitor for composition and outreach. More when I know more.
5/22/2012. Using a 12v deep cycle battery, I turned everything on and slewed to an overcast Sun about 11:45. PHD Guide finds the mount and apparently drives it OK (even without a guide camera, I use the manual guide buttons to adjust aim). Robofocus is being a pain ("no response from Robofocus") so either I've knocked something loose or something isn't getting enough juice. D'oh! Robofocus was still being powered by a wallwart on the AC side of the DC power supply. And the DC powered USB hub is still powered from the posts on the DC power supply, so it, too, is dependent on AC power. I'm going to need more cigarette plugs. And maybe another DC widget to get another hole, too. I hate solving the same problem Ten minutes later: bits are on order to solve everything except powering the CCD via battery -- that's another animal entirely and it will likely end up with its own battery and power train. That doesn't need to be solved until I am compelled to try a deepsky road trip. Five hours on: the 17-inch Dell LCD runs very nicely off the inverter (I only ran it for fifteen minutes or so but it behaved well). Even though the Mach1 is still ticking away on the battery and slews as it should, I've brought out the battery tender to top the battery off. Sometime Thursday I'll wire up DC connections for the USB ports and for Robofocus's control box. Then we'll be mobile for the transit, and the wiring will make some sense. An expedition of 500 yards is approximately as much trouble as one of 500 miles, but it's better to try a few of the former first. Speaking of longer travels, I've got clearsky clocks bookmarked on both sides of the Blue Ridge (near here and at ETSU) and on both sides of the Mount Rogers / Iron Mountain Range (near here and Abingdon). If the prospect of clear skies on the evening of June 5 looks dim here and much brighter elsewhere, I can see a road trip in my future.
5/24/2012. I made a new power cable for the Robofocus so that it could use the 12v side of my power supply (either the AC converter or a big battery). But I checked the polarity of the supply cable one time too few, and when I plugged it in and switched the Robofocus controller on I was rewarded with a soft "Pop!" and *that smell.* I was sure I had fried the controller and wrote the makers about repairs. I got a quick, encouraging reply, but not before I had rebuilt the cable -- intending to determine that the box was really most completely dead -- and plugged it up again. I got an LED light, and it responded to its push buttons. So I checked to see if it would respond to the computer and all seemed to work as usual. There must have been more magic smoke in there than I expected. After calming down a bit, I made up a new cable to connect the USB hub as well and went on about imaging as if nothing were wrong. So far, so good.
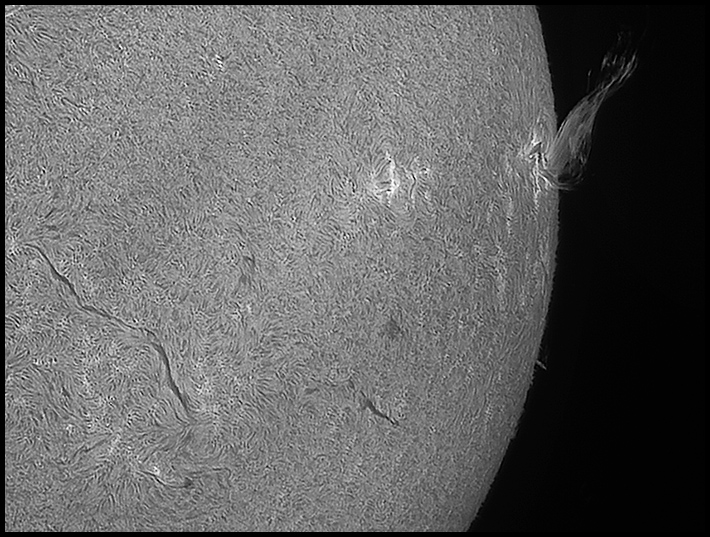
5/25/2012. After yesterday's reverse polarity scare, I took a good look at the cats' cradle of wires, connectors, and slightly flakey adapters that powers my mount, cameras, and accessories, and ordered a Rigrunner kit to take control over power delivery. There are just too many ways for fate to throw intermittent connections and flickering power at ETETR (Equipment Too Expensive Too Replace). Late in the afternoon, the map of active regions on SpaceWeather.com showed a new, as yet unnumbered AR rotating into view along with a note that it was launching frequent C-class flares. Just so:
24ms x 400, 6db gain, best 40%
That's one of my sharpest solar photos yet, and it was made through slight haze into a none-too-steady atmosphere. The lofted plasma changed minute by minute. I took several clips -- though not enough for a time lapse video -- and this is the best I have worked up so far. Note that the limb and surface detail have not been processed differently; flares seen in profile are just that bright. The deep cycle battery has run the kit for 9 hours now. I'm not really doing a rundown test; I just want to know that I'll have plenty of juice for the transit, weather willing. And I keep coming up with schemes to insure that I assemble the powerpole connectors with the correct polarity. If I mark one side of the existing wires then cut the wire in the marked area, test the polarity of the current coming from the old plug, then be sure to solder the marked wire in the connector associated with the measured polarity... that will do it, right? I reversed the shaft coupler that connects the Robofocus motor to the A-P pinion shaft; there's a tight rubber bushing on one side and it used to be on the motor side. That meant that even after I removed the grub screws locking the motor to the shaft, there was a lot of resistance to focusing the A-P by hand. With the rubber gripper on the A-P side, just a slight loosening of the grub screws on the motor side makes manual focusing a breeze. (Occurs to me now that I could have left the coupler in the same orientation and loosened the other set of screws instead to let the A-P pinion turn freely inside the shaft coupler; if I had understood what the problem was I would not have had to disassemble the bracketry, reverse the coupler, and reassemble everything. Of course, if I had understood what the problem was, I wouldn't have had it in the first place.) OK, that was probably incomprehensible without pictures and it's not worth the bandwidth to show and tell. It'll make sense if you're facing the same problem. And if you're not, well, move along and count your blessings.
:: top ::
|
© 2011, David Cortner

