|
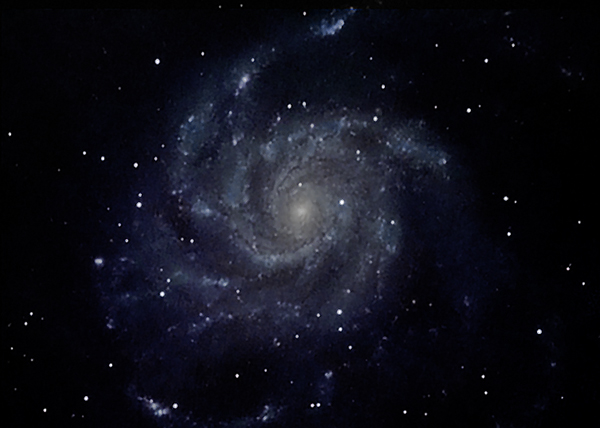
6/16/2011. Under a full Moon, I tried out a new means of making flats. 1 hour of luminance data of M101, 10 minutes each in RG and B:
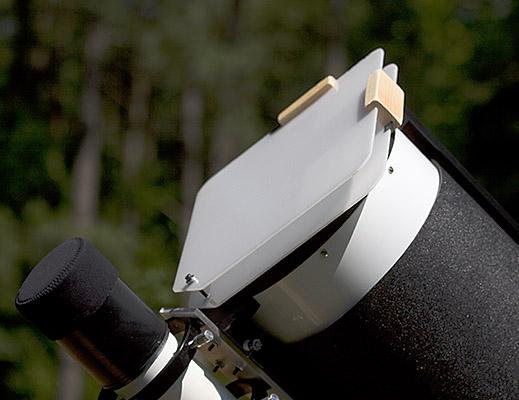
M101, a spiral galaxy in Ursa Major On our nightly walk prior to opening the shutter, stars were sparkling like mad, so it was no surprise that a tight focus was impossible (stars came out 3.7 - 4 arcseconds FWHM). I binned all frames 2x2 in honor of the lousy seeing, and I decided to go after a big target rather than anything small and faint. Nor did there seem much chance of improving M51, so I opted for something new to this 'scope. Once again, the initial slew was whack. I eventually found Arcturus, then M3, then M51, then M101. I'll dial in Arcturus next time, then do a sync rather than a recalibrate to be sure the mount knows where it is pointing. I verified that polar alignment is better than merely plausible. I mounted an Orion 9x50 right-angle finder on the AT10RC and aligned all three glasses on Arcturus. That should make finding the first stepping stone for future Goto-hopping much less traumatic if, heaven forbid, that nonsense can't be avoided altogether. And once again, the imaging scope and the guider disagree over where to point. The guider insisted that it was holding stars well, but the imaging OTA was walking farther and farther from the initial composition. The guide camera must be moving with respect to the AT10RC. Tomorrow, we'll see if the mail lady brings a solution when I lock the guide scope down more securely [maybe Saturday then, the d-plate mounting clamp was not in Friday's mail]. Then there's the imaging chain on the guider to de-flex. I made flats tonight by hanging a translucent piece of acrylic over the aperture and then a) shining a flashlight out the window at the scope, b) waving a flashlight beam around near the diffuser, and c) aiming at the side of the house where the flashlight beam was concentrated. I averaged all of the above into one flat and used the result. This flat box is just a 12x12 sheet of acrylic with two "bumpers" made from plywood pressed onto two sides. I cut kerfs in the plywood with the table saw, shimmed the acrylic with electrical tape, and pressed the plywood into place. Hang the diffuser via the plywood "bumpers" over the open tube and take flats all you like. Voila, sort of. 6/17/2011. That worked so well that I thought there was room to make it more complicated and still not ruin it. I made a 2-stage diffuser: two sheets of translucent acrylic held about 1 inch apart in twin kerfs in 2-inch strips of plywood. A 10-24 bolt maintains the separation at the bottom. Why don't I use a third wooden bumper at the bottom? Because I couldn't before I flatted that corner to clear the guidescope, and I didn't change gears and think of that until I just now saw the photo. That's why not.
The photo above shows a dry-fitting of the 2-level diffuser to be sure it's ready for sky trials. The AstroZap dewshield is wrapped around the main tube of the AT10RC because a) it's a good place to store it, b) it needs to be reshaped to its naturally circular outline after living as a square inside a truss tubed 10-inch SN, c) it keeps the AT10RC's tube pristine so it will be easier someday to trade up to an AT16, and d) don't you think it looks kinda cool and vaguely "TEC-ish"? Ladies and gentlemens of the intertubez, I am honored to accept this award... no, I present to you, "Diffusion #809" on loan from the collection of...
No, wait. It's just the rebuilt 2-stage diffuser waiting amidst knicks, knacks, and objects d'art for a chance to go to work.
6/18/2011. The guidescope is mounted solidly. A second D-clamp (this one was made by Astro-Tech) arrived in this morning's mail and is bolted to the aluminum plate that holds the guidescope rings. The whole shebang is locked to the lower rail of the Ritchey. While I was at it, I cinched down all the set screws between the 2-inch focuser and the guide camera. Some pretty robust nudging and tugging did not reveal any opportunities for independent motion. It all looks solid and seems ready for business. I'm not crazy about Astro-Tech's choice of clamping nuts and hardware, but if that's the biggest problem this rig has, then I should be delighted. Besides, improving the nut is a good excuse to play with machine tools.
6/19/2011. While hoping for clear air, and since I'm going to have to re-sync the mount to the sky anyway, I backed the clutches off all the way and rebalanced the telescope. It was a little nose-heavy in dec, but R.A. was pretty close. I slid the AT a smidgen tailward in the Mach1's saddle. Swinging the tube around and adjusting the position of the guidescope as needed, the diagonal that feeds the guider clears the dec motor by about a quarter-inch in the worst possible orientation. Later that same night: 600s exposures are still badly trailed. I spent some hours researching off-axis guiders, from the Teleskop-Services 9mm to the Baader to the Celestron Radial Guider to the Atik to the Lumicon to the Taurus and finally to the Orion Deluxe OAG. I ordered the Orion model from Opt in Oceanside, California (same price as Orion / Amazon, but free shipping hence $10 less). It will use virtually all my backfocus, so things should be nice and cozy. Expect some blue language here until I get this thing working; experience on the net seems strongly divided. Either it works exactly as expected or it's a royal pain to tease into service. I synched on Arcturus using the 9x50 finder to put the star on the imaging chip and then did effortless slews to and from M3. The cluster was not dead-center, so something may still be out of spec, but it is close enough for tonight. I only managed to make a couple of 600s exposures of M3 before clouds shut down the night; the guider reported flawless tracking, but the CCD showed trailed stars. I don't see signs of field rotation, so it's not that the guidestar was too far from the cluster. Seems that it must be differential flexure or drooping tubes or something along those lines. I did not try the on-camera guide chip because I remember what a pain it was to lose the guide star behind filters and because Maxim is so much more of a handful to operate than Nebulosity. All in all, the modest expense of an OAG seems the lighter burden and promises the most complete solution (he said, prior to any attempts to fiddle one into play).
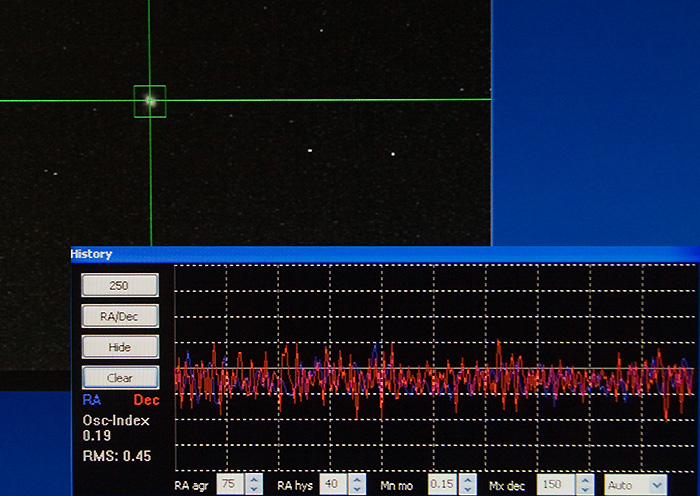
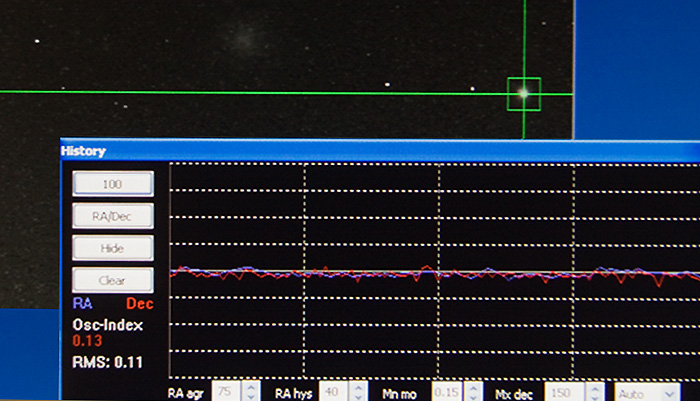
6/20/2011. Clear skies tonight but I'm not trying to image. I'm just dialing things in (about time, huh?). So far, the best guiding seems to be with PHD Guide set to very low RA aggressiveness and high hysteresis. 50% and 50, for example. That makes sense because the Mach1GTO should be damn near perfect in RA and require only slow, steady adjustments. The rest is defaulted (0.15 minimum motion, 150 max dec, resist dec switching, auto... etc). Odd, though, that exposures are not as well-guided as they were some nights ago. What's different? What could be different except polar alignment? So, despite previous dismissals... maybe it is field rotation after all. Staring at 400% enlargements of the 4 corners of this latest 120s frame, maybe so. Try a 900s frame and examine the trailing closely, and then an 1800s frame. And the result is.... there may be some field rotation involved, but if so it's far from the main source of drift. Look:
100 seconds of guiding.
06/21/2011. UPS says the off-axis guider will be delivered on Friday. I still want to know what's not right about the guidescope arrangement, because there will doubtless be times I'd rather use it (with a DSLR, for example). I moved the guider to the top of the tube and took advantage of the extra clearance there to banish the diagonal. The rig is heavy to the west, but short of adding another counterweight (which I will do by and by), there is little to be done about that. It's not grossly out of balance, and both the manual and my experience suggest that the A-P motors can handle the load. I set the mount in park 1 using an iPod Touch to level the counterweight bar and the OTA; slewed to Venus in the noon sky, centered Venus in the finder (it was off by about a third of the field, a degree or so), and recalibrated. We'll see if these changes improve guiding tonight. I put phelanges and metatarsels at risk and removed the toe-saver from the extended counterweight bar. Then I moved the 18 pound weight so that half of it hangs out beyond the end of the bar; I slid the 10 pounder all the way out against it. That is the extreme extension of these two weights and will do on a temporary basis. If I decide to use the guider up top routinely, then I will have to buy another counterweight. In the deep twilight, I lined up on M3 and began a 2 minute exposure with the red filter in place to combat skylight. Guiding looks good (rms 0.09 pixel = about 0.4 arc sec). And how does the image look...? Stars are oblong but not literally trailed. But it's just 2 minutes. Let's try 15. While waiting for results, note that without the diagonal ahead of the guide camera, the focuser is almost fully extended. I might need to arrange for support of the camera out there on that long cantilevered tube. Complexity increases; at some point the OAG becomes both more dependable and simpler. And at 15 minutes... Much better than last night, but still not good enough. How about a 30m image for direct comparison?
Clouds interupted that one 57% of the way through, so this is not truly a before and after comparison, but the image is obviously a vast improvement. It's not as good as it looks here (what you're seeing is about 35% of the original scale). The guide plot looks almost identical to the one shown above, so I think it's plain that the complicated light path in the guider's ota was the big issue. I'll see about finding some support for the camera tomorrow and hope for another trial. From a close inspection of the full-scale file, I think some of the remaining problem is field rotation due to imperfect polar alignment.
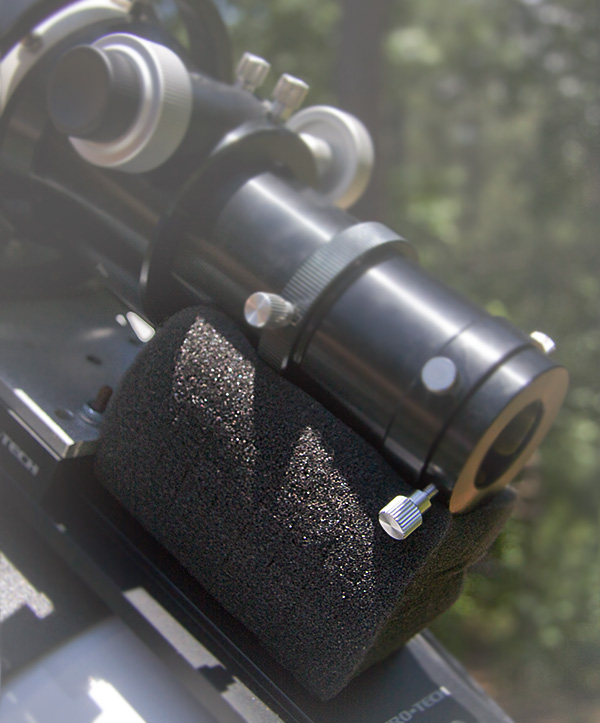
6/22/2011. You know those blocks of diced foam we all remove from camera cases and such and think, wow, that's a big block of foam, I ought to save that, and then we never find anything to do with them? Well, I saved those things for years. Had a ton. I finally realized it was just carefully stored trash and cleaned out the corner where it lived. Did that a couple of months ago. Of course I did. Well, here's what it's good for: supporting guide cameras under sagging focusers. I found enough old foam hiding here and there to cram plenty under the camera. If this seems to work, I'll immortalize the arrangement with a picture, if not, not. Did I mention there's an off-axis guider on the way?
6/24/2011. It is here. I measured the distance from the front of the CFW-8a to the back of the telescope; removed the A-P 2-inch prime focus adapter from the CFW-8a, threaded the Orion Deluxe OAG in in its place, removed one 1-inch extension from the back of the telescope, and voila! the imaging chip is now the same disance, or close enough to it to be within range of the 3-inch Crayford focuser, from the back of the telescope. Now, about the guide camera. First, and I might be wrong, but why do I doubt that anyone at Orion ever actually used one of these things? I wonder because things that need to be adjusted once per installation have thumb-screws while things that need to be adjusted every now and again, in the dark, require the service of a 1/16-inch allen wrench. I'm just sayin'. The tilt mechanism of the pick-off mirror seems to not qo quite as far as it should: I cannot quite get a full prism of incoming light at maximum deflection thataway. Maybe there's something subtle about the geometry that means it's all set up as it needs to be. We'll see. And I'm not sure I can get the Meade DSI Pro close enough to the OAG body to come to focus. Squinting and measuring with a yardstick (literally) suggest I'm going to need a little more in-travel. Maybe there's a way to mix and match the extension tubes that I've overlooked, or maybe there's no problem. What I need is some clear weather (and maybe the Moon) since I don't have a distant daytime target to use here in this tree-lined 19th fairway of an accidental back yard. Anyway, I want to try a shot with the guide camera on the foam-braced guide-scope and the imaging camera behind the OAG body to make sure the OAG body is solid. No sense diagnosing OAG-related problems until it's known to be solidly mounted, right? But I would like to know if I need to be thinking about helping the guide camera to reach focus. Mumble, mumble, mumble. Let's experiment instead of dithering about what works and what doesn't. Starlight. Need starlight. Star-trials. The Orion Deluxe OAG may be the least thoughtfully designed piece of gear I own. Screws that need to be adjusted frequently require a tiny allen wrench; screws that I'd expect to be set and forget are toolless, knurled thumbscrews. The pick-off mirror lets me use half the aperture of the telescope at best. Some notes. I'll photograph the outfit in detail tomorrow. To maneuver a star onto the guide chip from the main camera in the current orientation: move it to the left, outer circle in "frame and focus" mode then move it down to the edge of the frame, then move it that far again or maybe just a little more, and it should be in the guide field. This is with the pickoff mirror rotated as far counterclockwise as it will go. The guide camera (Meade DSI Pro) is inserted all the way into the 1.25-inch adapter which is supported by two extension rings (measure them). The bottom of the moveable focus assembly is flush with the stalk on which it rides.
Once satisfied that I can recreate the spacing involved, I'll go back to using the guide scope until these issues are resolved. Fact is, with a good guide star, it works nicely enough (I'm using RA agr 75, Hys 40 and getting RMS 0.4 - 0.5 guiding which is about 0.6 arc seconds although there are occasional sudden divergences in dec of 2-4 seconds that may be somehow associated with changes in transparency -- I'm guessing here). Did I mention that it's basically cloudy tonight? I'm using 4s exposures to guide on a 6th magnitude star, which seems pretty desperate. Is the DSI working properly? All right; I have 300, 900, and 1800s exposures of a nothing-special starfield to fume over while getting all this worked out.
The guiding pickoff is slightly further offset from the imaging chip than the ST2000XM's guide chip is. On a clearer night than this, work out the field and offset of the off-axis guider and build a fresh CCD record for it in Guide 8 so that guide-stars can be anticipated. I returned the guide camera to the ST80. Since M3 was about to drop below the treeline, I slewed to M13 and tried a 600s exposure. The guide camera seems to be working fine. I'm guiding on the brighter of the two guardian stars of M13 with 3s exposures. It really is a cloudy night. The 600s frame looks great. I sneaked in an 1800s frame before the sky closed down completely (when I covered the telescope, I could see Vega, just, and yet the guider was hanging in there on a 6th magnitude star). Star images are slightly egg-shaped on that one (more foam, please) but useful just the same (if I shot 30 min H-a frames with this setup, I'd expect good results, and I can't think any other reason I'd want subs longer than 10 minutes).
Same, but Meade DSI Pro behind ST80 guide scope.
M13, 30 minutes, a single sub, through clouds.
It's been a frustrating night, but it probably shouldn't be seen as such. Not everything worked out of the box, but tonight I've found that the guider body holds the ST2000XM solidly; the foam-assisted guidescope does appear to be a thing of beauty (more foam would be even prettier); the OAG port allows a DSI Pro to focus; and the OAG does calibrate and guide with my preferred software suite. The OAG needs work to perform well and conveniently. My experience with it so far mimics others'. The price is right but expect to do at least some re-engineering on it. I bookmarked some notes by a fellow who had the same problem I do with the prism. One of the pins that control it needs to be filed or shimmed. That fix deserves a page of its own so others can find it. Don't think of it as an OAG; think of it as an OAG Kit. You'll be much happier that way.
|
:: top ::
© 2011, David Cortner
