7/21/2011. This is not a test.... I've spent a month adjusting, fixing, replacing, and experimenting with this and that. Nothing big, really, just straightening up. And there's more of that to go. After a 19-day starless period, tonight my intent isn't to find out what works or how it could work better. If I learn something along those lines, it'll be an accident a bonus. I just want to make a nice picture.
What'll it be? Abell 39 (a faint planetary in Hercules, much-loved all of a sudden by the A-P crowd)? NGC 3817 (a distorted spiral galaxy under the bowl of the Dipper)? M27 (a bright planetary with a wealth of detail and less-often-imaged outer shells)? The Crescent is getting a lot of renewed interest after a spectacular H-a/O-III/synthetic green image from Jim Janusz. So what's it going to be?
The sky is not particularly clear, but it is steady. I slewed to M27 just as it emerged from bird-feeder pine and took 120s in R, G, and B, then refocused in hydrogen-alpha and made a series of 900s (15 minute) exposures until the Sun began to rise:

M27, a planetary nebula in Vulpecula
AT10RC, ST2000XM
1x120s RGB, 14x900s H-a used as L
Off-axis guiding: 2s intervals
That wasn't what I expected! I was trying for the outer shells, and they're visible in the raw, stacked image if I stretch it like mad. The night was too hot (81°F) to get the CCD down to its summer-normal temperatrure of -20°C and a deep shot will have to wait until noise is less of a problem. Instead of trying to pull the faintest features up out of the "shadows," I've made the most of the sharpness available in the brighter regions. The FWHM of stars in the individual 900s H-a images ranges from 1.9 - 2.2 arcseconds The dark was shot at -12°C as I shut down the kit, lens cap and TeleGizmos 365 cover in place (an earlier attempt at -17°C to match the deep exposures failed owing to light leaks).
Accidental discoveries. 1) Yes, you do have to refocus the guide camera when you focus the imaging chip in H-a. Otherwise, the guide star images are elongated and 2s guiding integrations tend to chase seeing. Even in good seeing, this effect bloated stars to the bad side of 4" FWHM. And 2) at least when it's this hot, taking a dark makes a world of difference to the DSI Pro guide camera when using the OAG.
Here's an inverted and stretched-without-mercy presentation of the 14x900s (3h30m) hydrogen-alpha data showing the outer shell(s), remnants of a previous epoch of shell-ejection from the same star:

Told you it was too noisy. I'll try that again when the night is cooler and the sky is clearer. Also, I kinda missed it low there.
And now, more incremental improvements:
A shutter for the guide camera (no more throwing towels over the telescope),
computer-controlled focusing for the Ritchey via Robofocus,
and (maybe) computer-assisted polar alignment.
7/22/2011. Three thunderstorms today, highs in the middle 90's. The sky cleared toward sunset, but I had no confidence that predicted fog wouldn't settle in or that the phenomenal amount of moisture in the air wouldn't settle out all over the telescope, so I brought the camera inside and worked on making dark frames easier to capture for the guide camera. Last night I threw a towel over the objective, later thought I should stash an umbrella in the utility box beside the 'scope, and finally thought, no, just dig up the DSI Pro's filter slide and insert something in one filter hole to make that position opaque:

I inserted a disk cut from Protostar flocking board into the number 2 or 3 opening. Any other clickstop position yields an open optical path; that one should be plenty black enough for making routine dark frames for the guide chip. You (or at least I) just have to enjoy instrument mods that require the scissors from the drawer in the kitchen, the sharp knife that usually lives with my camping gear, and whatever tube of SuperGlue is handy.
7/24/2011. Newly impressed with the importance of perfect damn good focus, I first shopped up parts from Moonlite to put a more robust, stepper-controlled motor behind the Ritchey. I could save a bundle by reusing the Robofocus controller I once got to work, sort of, behind the refractor, so I dug out the Robofocus parts and laid them out on the galleria table. I think the kit is complete enough that I do not need to get Moonlite involved at all, so remote- (and maybe auto-) focus should be basically free. The stepper on the focuser shaft should provide plenty of torque and will not allow slippage under gravity. If I'm wrong, I'll at least have the computer control issues sorted out before placing a larger bet on Moonlite. I updated my ASCOM drivers, installed FocusMax and the Robofocus native software. I went looking for drivers for my USB-dual serial connection and finally found some that gave me COM3 and 4 ports. Alas, neither port would connect and recognize the Robofocus controller. Watching the traffic, I saw much going out from the computer but nothing coming in.
Robofocus can be picky about this link in its digital chain, so I have spent a little money on a known-to-be-compatible USB-serial converter from Keyspan. It should be here on Wednesday. I have also identified an industrial 12v USB hub to help centralize all the control lines under the telescope mount. Perhaps I could have only one cable running to the control table. I haven't ordered the 12v hub yet, but if it looks as if I'll be able to get focusing and mount control added to my remote-control options, I surely will.
The high temperature was 98° today with high humidity. I'm dreaming of a white Christmas, with sparkling clusters and ghostly nebulae shining overhead, and no reason to slog to and from the telescope when changing filters, finding targets, refining composition, adjusting focus, and parking the mount. Wouldn't that be loverly? Of course, I'd still have to go out there to pull the cover off and on, and to soak up the grandeur of it all.
 7/25/2011. I tried to snag a Meade DSI Pro II for improved guiding off Astromart, but I was too late (no surprise, it was offered at a giveaway price and the 4 hour time delay for cheapskate access to the flea market probably doomed me). I thought about bidding for one on eBay, but it was running a little high with a couple of days to go. So I looked at the high-end guide camera from Starlight Express (the Lodestar) but it really was higher-end than I wanted to go, especially when there is every chance that my existing guide camera is plenty good enough. Why am I having such trouble finding guidestars lately?
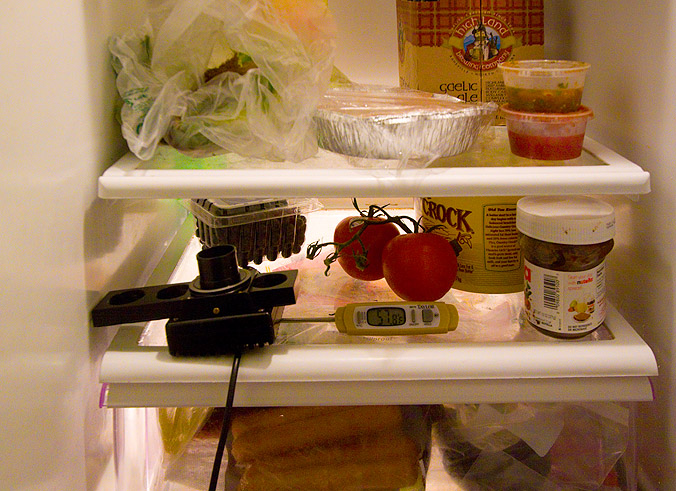
It finally dawned on me that the advent of the trouble I've been having with my DSI Pro (I) coincides with the advent of ludicrous infraAugust summer heat. So I did what any right-thinking amateur astronomer would do: I put the guide camera in the refrigerator and took dark frames while it cooled to see just how much of the noise in its images is due to simple summertime. Of course, I did.
I took darks at 82°F, 72°F, and 58°F. Then I moved the guide camera to the freezer. Interestingly enough, it wouldn't cool below 58° in the 'fridge; the rest of the contents were down around 42°. Does the Meade really put out that much heat? In the freezer (ambient 17°), the DSI stayed 9F° warmer.
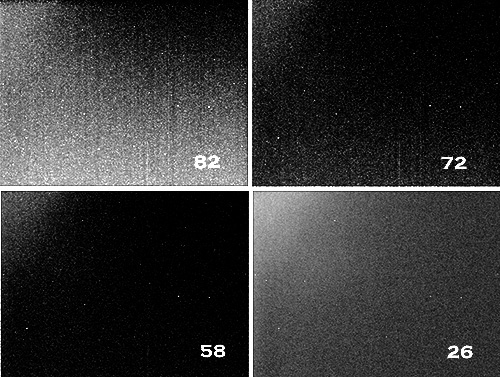
While I was at it, I also took a series of exposures with the dark-frame slide open. Yes, the refrigerator light does go out when you shut the door. Amplifier glow increases with time (as evidenced by the rising average pixel value) and emerges from random noise as temperature falls (as evidenced by the pictures), and it dominates at the coldest exposures. I didn't expect total energy and minimum pixel value to keep rising, but there you go. Obviously, the SD drops like a stone with temperature, but since I've never saved star images from this camera, I don't know what a typical signal strength is for a typical guide star. That is, I can see that the SD plummets, but I have no idea how low it needs to be let stars of a given brightness emerge from the static. Also, I don't know how good a signal PHD Guide needs for a secure lock. Oh, goody: measurements to make! In the meantime, at a glance, noise appears to double / halve with every rise / fall of about 24°F, 14°C. Considering that nights have been running in the high 70's and low 80's, even moderately cooler weather should make the DSI's guide star signal twice as useful, and the camera should work several times better in winter. I just need to muddle through until the weather breaks and see what its guide images look like in the autumn. If this is a problem that really needs to be solved, then something like the ATIK 16IC with Peltier cooling might be the way to go.
Here's a statistical summary of 2 second exposures at different temperatures (5 dark frames averaged in Maxim before each measurement):
Temp |
StDev |
Total
Energy |
Avg Pixel |
Max |
Min |
82 |
288 |
6.19e8 |
1947 |
57632 |
1637 |
72 |
229 |
5.91e8 |
1861 |
51657 |
1683 |
58 |
146 |
5.83e8 |
1834 |
51628 |
1708 |
26 |
48 |
6.04e8 |
1899 |
18338 |
1798 |
Here are thumbnailes of the measured frames, identically scaled:


What's in your refrigerator?
7/26/2011. Any fool can do it once; the trick is making it routine. In this case, "it" being deep exposures with long subs guided through the off-axis guider. So far, so good. Here's M57, a smaller, brighter planetary (just about the brightest there is) in Lyra. It, too, has a faint outer shell and a wealth of detail. It is much smaller than M27 and 2000mm isn't enough focal length to bring it out in all its glory. I did not try the narrowband mix this time. The outer shell is just captured in 3h30m of luminosity data, shown first with 15 minutes each of RGB, then inverted, by itself:


M57, a planetary nebula in Lyra
(I know it's overstretched, but I want to see what's in that image!)
14x900s L, 1x900s RGB
T10RC, ST2000XM, DSI used as OAG Guider
2s guide exposures (0.29 pixel RMS)
A-P Mach1GTO
The use of dark frames with the DSI guide camera helped tremendously. Chilling the guider before taking it out into an 80° evening may have helped, too, but any benefit from the refrigeration quickly seeped away. The guide camera was a bear to focus, but once focused, it happily locked onto my choice of seveal stars near M57. I found none at all near M51 and M3, so shooting in a Milky Way-rich starfield is perhaps the best "technique." I stored a guide frame to take apart statistically when the spirit moves me to see how signal and noise relate to guiding requirements. Darks, flats, and lights tonight were all shot at -15°C because that was just about as cool as the ST2000XM would go without water cooling.
I am royally tired of having to adjust polar alignment. What's moving? I'm wondering if the wooden blocks that hold the trailer up off its wheels are shrinking, expanding, and migrating in the extreme heat, humidity, and occasional rain.
Later that afternoon: the Keyspan USB - Serial adapter works just fine with Robofocus. It works through a hub as well. I need to verify that GPUSB works through the same hub. I'll leave the imaging and guide cameras on their own ports for now. The latter needs power, and the former may be vulnerable to interference. Eventually, I'll try them all out on a single hub and see if that sort of simplicity is really within reach. The trailer is now supported on stone blocks (Lowe's retaining wall stones) and feels (literally) rock solid. The mount will need to be realigned next time out and perhaps not again for some time. Please.
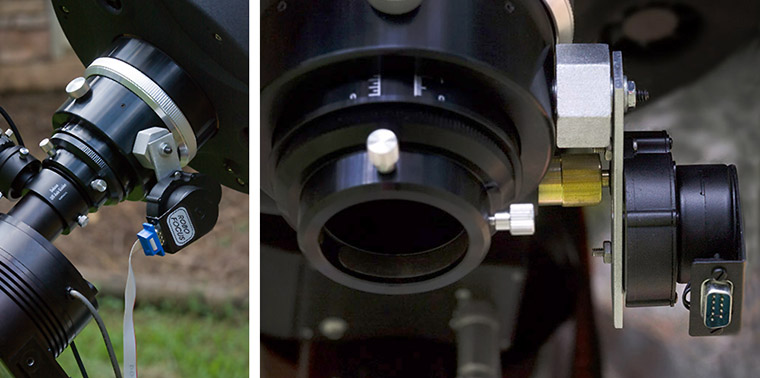
I disassembled the AT10RC's focuser and installed a 1.5-inch 10-24 machine screw extending out to the right parallel with the focusing axle (that is, the hole through which it passes is 90 degrees away from the focusing track). Then I machined a spacer from aluminum hex stock and turned a new shaft coupler from brass rod to mate a RoboFocus motor to the small shaft of the AT10RC's focuser. A simple aluminum plate (likely the first of several while I tweak positioning) completed the installation.
Think of the aluminum bits as prototypes: astronomical paraphrenalia ought to be done in brass. Just because. Anyway: Voila! A motorized focuser for the Ritchey. When I put the focuser back together, I turned the focus block around so that the fine focus control is on the left and removed the knob on the opposite side so the shaft could be coupled to the motor. I wanted the RoboFocus motor on the right side of the focuser so that "in" and "out" controller commands would correspond to the actual motion of the focuser (there's probably a way to reverse the convention in the software, but I don't know it). I wanted to preserve the fine-focus knob for manual use. If manual control is needed, it's just a matter of loosening either of the set screws on the shaft coupler.

v0.00: mounting bracketry for a Robofocus motor on an Astro-Tech RC10.
It works like a charm in response to the controller's push buttons, but after putting it all together I couldn't get it to work with the computer at all ("No response from Robofocus" then "Port closed" over and over again). I reconnected everything several times, tried loading various programs and finally just plunged ahead and reinstalled the focusing package on the Ritchey. At least I have electric focus, even if not any degree of computer controlled focus. Later, a second Robofocus motor worked exactly as the first motor worked earlier today: perfectly. I reproduced the error messages by disconnecting the RJ11 cable, so look for a bad connection in that area if the problem recurs or persists. I intentionally did not document the entire installation because I don't want to encourage anyone who's uncomfortable disassembling the focuser to try it. Just go slowly, think ahead, and don't lose the little pieces. One word to the wise: be aware of the tiny ball bearings in the linear track of the focuser. Knock the little tracks around too much and "they run everywhere." One could do a quicker (and messier) installation that does not require disassembling the focuser by wrapping hose clamps around the focuser body.
After all that, I don't have another night of testing and aggravation and bugs and sweat in me. Let's call it a good day's work and look forward to a good night's work soon.
7/28/2011. Robofocus either works perfectly or is not seen at all, nothing in between. I am more and more convinced it's a physical RJ11 connection issue rather than a software configuration problem or anything subtle. I've fired it up several times on the dining room table; sometimes it's fine, sometimes it's dead. A different cable would make a lot of sense if this iffy state endures.
I took part of the kit out to the telescope this afternoon and plugged it up. The manual buttons on the Robofocus controller worked great. I added the ST2000XM and OAG with DSI. The Robofocus-equipped Crayford handled the weight without fuss or slippage (it's worth noting that I'm in Park 3 at latitude 36° so this test applied only about half the dead weight to the focuser that will occur with the telescope aimed near the zenith). Then I added the computer to the mix, and the usual debate about the existence of RoboFocus ensued. The usual gambit (unplug and firmly reseat the RJ11 connections on both ends) ended it. Commands via the Robofocus application to move the ST2000XM and DSI guider in and out worked perfectly. I ran the drawtube almost all the way to its inward stop, then commanded a move of 10,000 units out. The scale on the drawtube says that those 10,000 units corresponded to 3.7cm: therefore, one unit of Robofocus motion is 3.7 microns. I added the GPUSB to the same hub, and PHD Guide connected to the mount routinely. So far, so good.
When it is cooler and I can work with the telescope without sweat or mosquitoes, I'll see if I can get FocusMax to automate focusing. For right now, this seems boon enough.
As for future boons: it's tiime to order a second Keyspan connector so that I could opt to control the mount from indoors. And then we can start messing with a DC-powered USB hub to make the entire power supply easily switchable between 12v DC and 110v AC power.
Later that same night: back from an evening visit with Jerry & Kathy, I aligned the newly rock-mounted telescope on the pole; calibrated the mount on Arcturus, slewed to M13, took a dark frame for the guider, and came inside. There I selected a guide star, calibrated the guide software, focused the main optics at leisure (first in 50 unit steps, then 20, then 5, which is to say that I finished in increments of under 20 microns), and began a series of 10 minute subs.

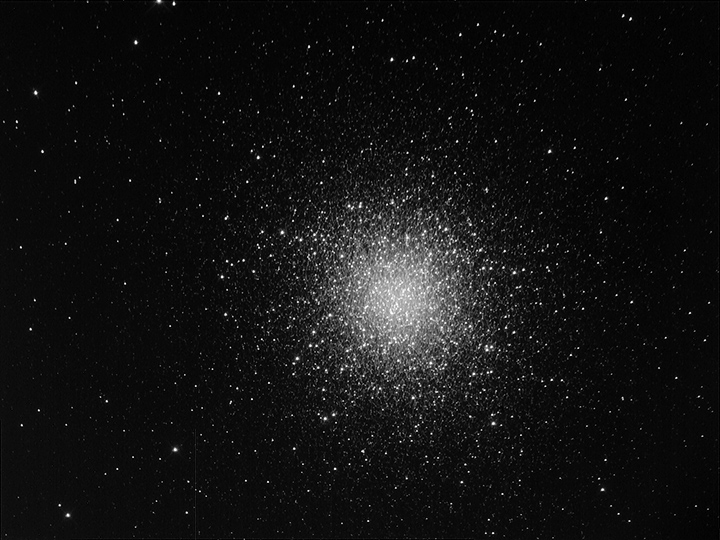
M13, a globular cluster in Hercules
2x600s, 4x150s L AT10RC, ST2000XM
A-P Mach1GTO
This may be the first properly focused astrophotograph made with my AT10RC. Star images range as small as 1.6 arcseconds. The two 10 minute subs, however, are too long: the core burns out. I have averaged in the first four, 150s subs to hold core detail. It is a work in progress; scroll down for the full take. Polar alignment is a little off and the tilt in the focuser will begin to bug me enough to work on it soon. The combined effect is to make stars at the top of the frame roughly twice the size of stars at the bottom.
When I finished an hour's worth of 150s subs, I took 150 and 600s darks. During the latter, I refined the 'scope's polar alignment, then took 600s RGB exposures. I'll work them up in the morning. The DSI behind the OAG reports maximum corrections of less than one pixel; the guiding RMS was 0.23 pixels. (One pixel of the guide camera behind the 2,000mm Ritchey is about 0.8 arc seconds.)
The Baader LRGB filters are supposed to be parfocal, and the all-reflective OTA shouldn't introduce any chromatic displacements. And so it seems. I refocused for R and arrived at a point only 10 RFU's (RoboFocus Units) different from the best L point (in other words, maybe I'm imagining that I needed to refocus). When I returned to L, I focused again and the final point of best focus was only 5 RFU away from the original setting. Parfocal filters and a solid mechanical chain is what that suggests. Hurray!
In The New CCD Astronomy, Ron Wodaski provides a formula for calculating the zone of best focus for telescopes of any given F-ratio (essentially, the distance along the optical axis where all the light from a stellar image falls within the Airy disk, I think). The formula is t = F^2 * 2.2, where t is the tolerance along the optical axis in microns. For my F8 Ritchey, the zone of good focus works out to about 140 microns, or about 40 Robofocus units. Best focus is +/-20 units. Get within 20 of best focus and you're good to go; get within 10 and you needn't have second thoughts.
I aimed the telescope at M27 for the rest of the night. It will acquire 600s luminance frames until dawn. My intent is to mix these white-light frames with the H-a frames from the previous M27 session shown (far) above. Soon. Eventually. In the meantime, here's the finished M13:

M13, properly focused and righteously guided at last
24 x 150s (1hr) L, 1x600s (10m) RGB