|
6/25/2011. Fixing the Orion Deluxe Off-Axis Guider. There are at least a couple of issues to address. I figure to use this page to keep up with what I've done to mine and provide photos for my and others' reference as they seem useful. 1) The 1.25-inch adapter for an eyepiece or a guide camera with a simple 1.25-inch snout has two set screws. One requires a tiny metric Allen wrench, the other is a thumbscrew. The thumbscrew cinches the threads of the adapter to the extension tubes; the tiny set screw is the one you need to loosen and tighten to take the guide camera on and off, to rotate it, and to move the snout slightly in or out to adjust focus beyond the range of the OAG's own sliding "focuser." Dreadful design -- surely the more frequently adjusted screw should be the one that requires no tools, especially when its intended use is in the dark. I've already dropped and lost the supplied hex wrench. Fortunately, the two screws share the same threads. You can swap them. But it's not quite that easy: the thumbscrew is not long enough in the alternate position. The knurled head comes into contact with the rim of the adapter before the threaded portion extends inward far enough to grip a 1.25-inch snout or eyepiece. I used a bench grinder and a Dremel tool to flatten a chord on the outer ring so that the thumbscrew could be inserted farther. I think that constitutes a full fix for that problem, or it would if the snout I'm using on my Meade DSI Pro were well made (it's much too small in diameter; I don't remember where I got that particular piece, which is just as well). Absent a good snout for my Meade DSI Pro, I decided to try threading everything together with the T-threads and extensions and forget the snout entirely. We'll see if things can be focused this way tonight (they could not, see below). If not, a better snout will be easy to order. Building a better 1.25-inch adapter for the OAG would be the better, permanent fix. I'd rather not do that much basement engineering. (Agena Astro to the rescue on both counts.) 2) The more serious problem with the OAG is that the prism in mine would not tilt far enough for the guide camera to look straight up the optical path. At best, 50% of the aperture could be used. Adjusting the tilt only made things worse. Backing off the tilt-adjustment screw moved the prism in the direction needed, but turning it to its limit left the prism tilted insufficiently. What I find particularly irksome about this is that it's a fault that was obvious under the most cursory inspection. Ten seconds in the factory in Portugal would have saved hours of time for users to discover the issue, look for a fix, think it through, and set it right. Repeat for a decade of customers worldwide. How many man-years has the omission of this simple reality-check cost? Maybe this lost productivity is the single root cause of worldwide recession. I said "maybe." One nice thing about buying popular crap is that someone, somewhere, has fixed it before. In my case, thanks go to CloudyNights member Martin Meupelenberg, an electrician with a passion for astronomy (and samurai swords) in Victoria, Australia. Martin described my OAG's problem and a fix for it last summer. I read about it, wondered exactly what I would find inside the OAG, and plunged ahead. Here's the fix, with pictures I made along the way:
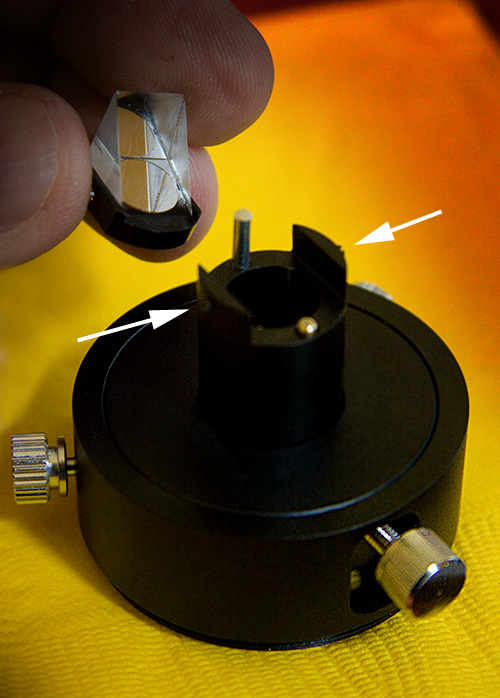
Begin by backing these two set screws off just a bit. That will release the prism on its stalk along with its adjustment mechanism. That's the only part you need to mess with to fix this problem.
I'm holding the pick off prism which is mounted on a small aluminum tray. The tray has two holes in either side (one is visible just under my thumb). Two tiny set screws (arrowed) fit into these two holes and constitute an axle. The holes in the tray are not threaded; the screws thread through the "arms" at the top of the stalk and provide an axle for the tilting tray. The prism tilt adjustment screw is at lower right in this picture; its tapered tip extends under the brass rod visible at the top of the stalk. When you back out the arrowed screws at the top of the stalk to release the prism and its holder, be aware that there is a spring loaded piston under the "back" side of the tray. It's the silver rod extending up from the stalk in this photo. That rod pushes the back of the tray to tilt the prism "forward." The brass-colored rod (it is brass) pushes up on the front of the tray. This rod extends down to the adjusting screw. The adjusting screw has a tapered tip. Screw it in and the thicker part of its shaft pushes up against the bottom of the brass rod and raises the front of the prism. As the mounting tray tips, it is resisted by the spring-loaded steel rod. Screw the adjusting screw out and the thinner part of its shaft lowers the brass rod which lets the spring-loaded steel rod rise higher and continue pressing against the back of the prism to keep everything under compression. Pretty neat, actually.
Brass is soft, and you don't want to remove much. I spent 10-20 seconds at a whack filing it with some vigor, then checking the limits of the prism's adjustability after each session by reassembling the stalk. Reassembling and disassembling this mechanism got to be a quick and painless chore. Be sure you have a small flat-blade screwdriver, nice and sharp, so as not to bung up the set screws that comprise the axle. The brass rod in my OAG was 0.788 inches long; I reduced it to 0.745 inches. That was more shortening than strictly necessary. The best alignment point is now well within the range of adjustment, not against either motion limit. As far as I can tell, that completely resolves the tilt-alignment problem. Put it all back together. Make sure that the prism is facing the right way. Visually align everything before tightening down all the set screws. You're done. Except you can count on having to clean the glass. Later that night... so how does it work? Don't know, can't tell. The threaded couplings don't quite reach focus with the available extensions, and it's futile to use the undersized 1.25-inch snout to get a little more distance. I'll replace the snout, maybe buy (or find in my junk drawer) some different extension rings, then try it again (Baader makes just the thing). I did at least see some guide stars this time while poking around getting things aligned. Gimme a week or so. In the meantime, back to guidescope-ville. And now that's being a pain, too. At the beginning of the night I had doubled images from tube currents, a defect I at first chalked up to serious guiding issues (pssst, those three fans in the rear cell are there for a reason). I've cinched down the guidescope rings, returned to yesterday's foam, made sure the cables aren't binding, and tweaked polar alignment (which helped a great deal). Even so, stars at 600s are imperfect. Tonight's 600s subs are useable, which is an improvement over anything prior to this week, but they are not things of beauty. I had the Ritchey shoot M13 overnight. While buttoning up for the day, I found dew on the primary and used the onboard fans to remove it (took 10-12 minutes). I think the use of the extension tubes from the OAG on the guidescope (to simplify swapping the DSI between the two guide arrangements) allowed some droop. So it's back to the full-on, rigid as possible guidescope configuration. On the way from Agena Astro are a Baader focusing adapter for eyepieces (T2 to 1.25-inch) and a better 1.25-inch snout. The former will take the place of extension tubes on the off-axis guider port, allow me to focus critically, and provide a better grip for the guider; the latter is a better grippee. I'm officially suspending OAG experiments until these focusing, gripping, extending parts arrive; I'd just have to redo everything afterwards if I keep at it now. [update, 9/12: the Baader helical focuser works fine, but iin this application, it required fitting a set-screw to keep it from rotating freely; that was a saga in itself, and as it happens I always use it fully racked in, so it was overkill; just a decent T2 - 1.25" holder would have sufficed; or go to the other extreme and use the fancier Baader ClickLock version, but that costs as much as the OAG.] Against all odds, clear weather is mentioned in the five-day forecast. Here's tonight's haul.
You know the guiding was a little off because I present these so small. They're not so bad considering things kept drifting and that seeing was atrocious. I never saw Nebulosity report a fine-focus HFR (half flux radius) under 3 pixels. If I'm thinking about it right, that implies 6 pixels FWHM, and at an image scale of 0.76" per pixel, my point spreads were in the 4.5" range. First: deconvolution works wonders with smeared data. Second: the air will sometimes be much better. And third: soon I'll have the instrument dialed in. So consider these images promises of better to come.
10/4/2011. After using the OAG for a few months, weaknesses remained. The collar through which the prism stalk is inserted and by which it is secured by the two grub screws shown in the first photo far above developed a lethal side to side wobble. I couldn't find anything to tighten down or screw more tightly together to stop it until I took the guider body apart and found another grub screw in the end of the rotating portion of the OAG. It was hidden between the 2-inch adapter barrel that inserts into the telescope focuser and that rotating ring. When I reassembled the guider, I reversed the rotating ring so that this grub screw is more easily accessed. Cinching that set screw down seems to have banished the wobble I was chasing.
|

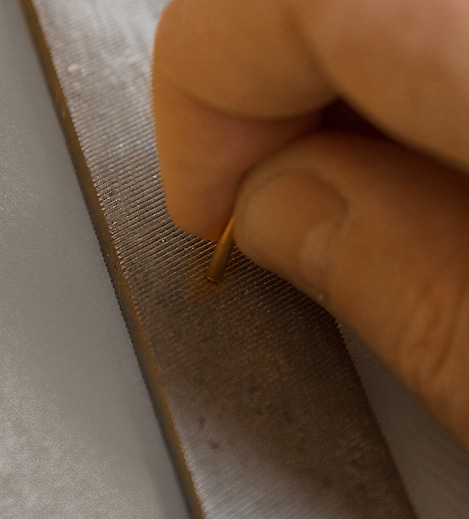 In my case (and apparently in others'), the brass rod was too long. That is, even if one backs off the adjusting screw to its limit and the very thinnest portion of its shaft is pressing up under the rod, the prism still cannot tilt far enough forward. The fix is simple enough: remove the brass rod and file it to make it shorter. Just a little shorter! A regular old rat-tail file will do fine. (Note, if you have the opposite problem, you could cut the brass rod into two pieces and replace one with a slightly longer piece of brazing rod. Wait... what am I thinking? Just cut and use a suitable piece of rod after insuring that its ends are smooth and at least approximately square.)
:: top ::
© 2011, David Cortner