11/11/2011. Seeking Amalthea! Last night was clear, cold, and reasonably steady but it was filled to overflowing with light from the full Moon. I started by applying recent lessons in making the most of the relatively narrow-band Baader 7nm H-a filter (longer sub-exposures compared to the Schuler 10nm filter, use multiple darks) to an already-visitted subject (NGC 6888, the Crescent Nebula):
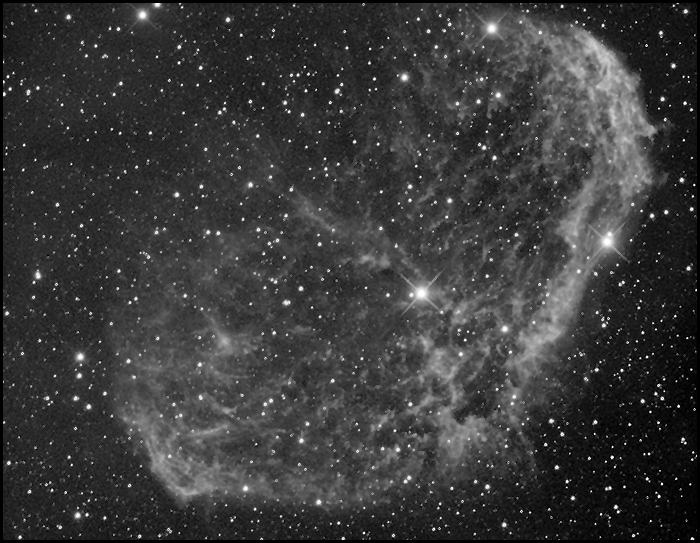
NGC 6888
6x1800s 7nm H-a
I'd set the camera to make 8 frames of this nebula, a shell blown around a Wolf-Rayet star in Cygnus, but when I got out of bed about 11:30, I saw that the field had sunk behind the house during the 7th frame. I ended the sequence early and went out into the backyard in my bathrobe (at a balmy 28°F) to chose a different target for the rest of the night. The sky seemed slightly hazier and the Moon, which was higher, even brighter. I had thought to aim at random into NGC 1499, the California Nebula, to take a look for whatever fine detail might be there. But the Moon was sitting very near by. So I instead aimed the telescope at Jupiter, just in case the geometry might favor another try for Amalthea. I hurried back inside to check a planetarium program and to refine aim and focus.
Guide 8.0 indicated that Amalthea was just off the eastern limb of the planet, moving farther away quickly. There were a couple of nearby field stars to provide good reference points. All in all, if I were willing to wait an hour or two, this looked like a good night to give it a try. I dropped the CCD to -40° (for next to no noise) and took one series immediately. I thought I might use this first set as a kind of dark frame to subtract Jupiter's glare from later images (this is still worth trying, but that's not how it worked out). It helps to know that 5 seconds through the L-filter is plenty of exposure to record 14th magnitude stars.
I took 8, 5-second exposures at midnight, 12:30, 1:00, and 1:25. After I saw the results at 1:25, I double-checked focus on an eleventh magnitude field star and took another set at 1:35. I tried an 8-second sequence through the red filter also, since Amalthea is said to be one of the reddest objects in the solar system, but without notable success. I think the best result came from the 1:25 series. Here's the finished image, first unlabelled, then wth three moons labelled, and finally inverted:
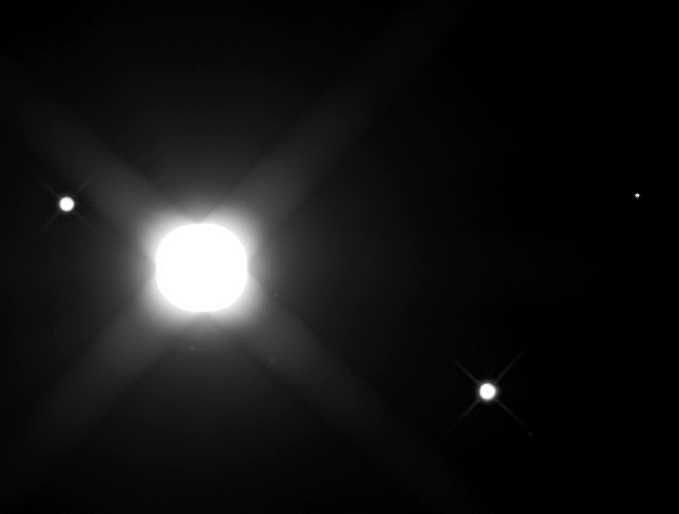
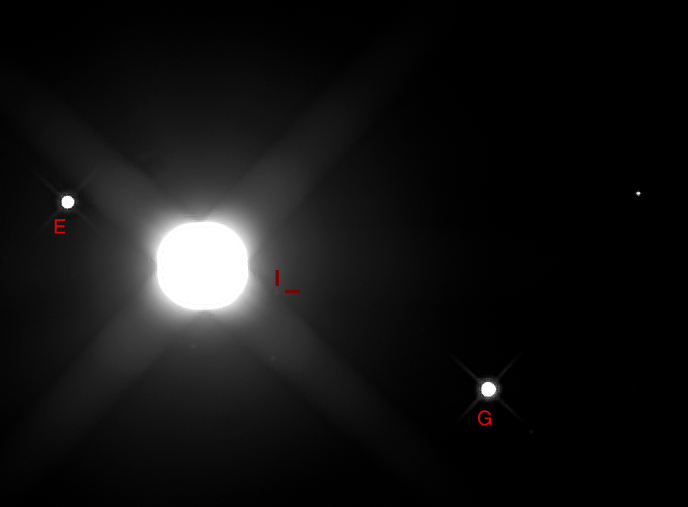
Amalthea (marked) the Fifth Moon of Jupiter
The last visually discovered moon in the solar system
(Edward Emerson Barnard, 1892, using the
36-inch Clark refractor at Lick Observatory)
8x5s L
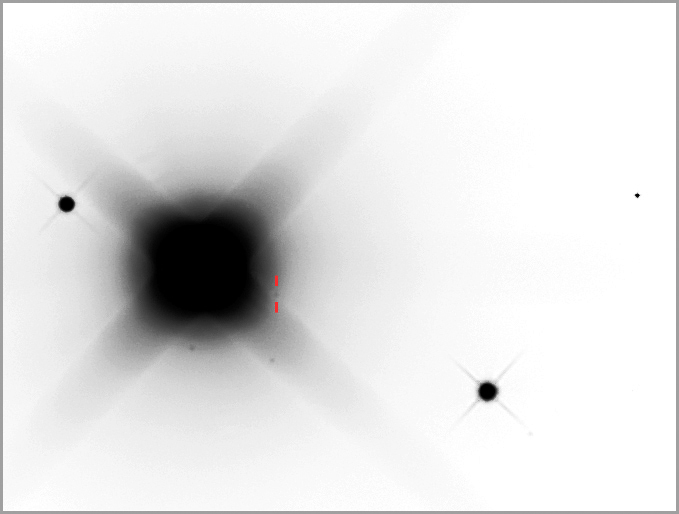
Same data, inverted.
Why do we see weak signals so much more readily when presented as negatives?
Did our distant ancestors live in darkrooms?
There, finally! "E" is for Europa, and "G" is for Ganymede. Tick marks intersect on Amalthea. The star at far right is my focus and alignment marker; it's 10.9 magnitude. Below Jupiter, at about 6 o'clock and 5 o'clock, are two sanity checks and reference points: stars of 12.7 and 12.9 magnitude.
PSF's were not particularly tight -- fine focus would not drop below 2.9 pixels (about 2.2 arc seconds) -- and transparency was suffering by the time I got this frame, probably because Jupiter had dropped a little down the western sky, but this is the first frame in which Amalthea was fully clear of the bright diffraction spike coming off Jupiter. On a very steady night with excellent focus and no haze at all, 5s should show the little moon (magnitude 13.9) with less aggressive processing (tonight: stack and average, manually aligned on the 10.9 magnitude field star at right; then PS levels, middle slider to 3.4; unsharp mask 100% / 6.4 / 0; deconvolve using FocusMagic and radius 6; adjust curves to show the 12.9 and 12.7 field stars below Jupiter -- do this and Amalthea comes up out of the glare with the field stars).
An animation of these frames is surely in the offing, but not right away.
11/12/2011: A lovely autumn morning in North Carolina. Here's yours truly tightening the shaft coupler between RoboFocus and the AT 10-inch RC:

The November woods: Backyard observatory,
backyard observer, Bird Feeder Tree in background.
Look at me! Look at me! I'm dressed like Gumby! Somebody ought to stop me before I go outside like that.
11/13/2011. Housekeeping. On the Astro-Physics users group, I ran across a discussion of using guide telescopes for long exposure photographs. The consensus seemed well summed up by a formulation offered by Drew Sullivan, jocularly called "Drew's Law." Pixel scale x 400 = exposure in seconds before differential flexure will result in elongated stars. Obviously, a ton of engineering detail is elided in any such formula, but it seems usefully descriptive of my experience (and suggests the fault is in the general scheme of using a guidescope for long exposures, not in my implementation of it). For example:
0.77 arc seconds / pixel x 400 = ~300
Round stars at 300s and not much more matches my experience very nicely. Roland chimed in on the discussion to note that any Cassegrainian instrument will almost certainly have some flexure within the optical system that will not be matched by a guide telescope no matter how it is attached to the imaging OTA. Shorter: differential flex is inevitable. OK then.
I need to bolster my darks library witih 300s frames so that I'll be ready to try some telecompressed imagery guided by the external guide scope -- that will save me the trouble of getting the OAG to work with a telecompressor. With the compressor, I could probably extend my externally guided sub-exposures out toward 500s, so make a set of darks with that possibility in mind, too.
Also, while pressing on one of the cooling fans in the back of the Ritchey to get it to stop howling the other night, I pressed too hard and snapped off the plastic mounting hardware. I removed the fan and plastic debris using needle-nosed pliers. New 40mm fans are on order off eBay. My notion is to make an adapter so that I can have a removeable and reversable fan to plug into the now empty hole. I am giving some thought to putting a small fan inside the tube to move air across the mirror to break up any lingering boundary layer, too, as careful inspection of stars during focusing runs seem to show some kind of variable aberation deep into the night. More when I see the fans.
And oh, wait! Remember a few nights back when I found a solid point of focus for the Chameleon video camera behind the RC? The real significance of that finally sank in. That means I can use MetaGuide to really, truly nail down the telescope's collimation. I may wait until the new azimuth adjuster arrives from Astro-Physics and then geek out fine tuning both optical and mechanical alignment. Do that before messing with the dec gear mesh so as not to turn too many knobs at once.
11/14/2011. Two tiny case fans arrived today. These are the two high-volume "server" fans. Two less powerful fans should be along by and by. Still thinking how best to adapt one of the fans in hand to the vacant cooling hole --that is, I know how I want to do it, but I haven't quite decided how to make the pieces [11/16 parts on order: machine the needed bits from 3-inch aluminum stock]. Also, I think I'll mount a fan on some sort of "wand" that I can slip into the open tube, something just long enough to hold the fan down beside the primary mirror and allow it to direct airflow across the mirror's surface. I actually have some high hopes for this. If a boundary layer exists, and how could it not, and if it is compromising resolution, as well it might be, then I don't think it will take much in the way of moving air to make a difference in achieved PSF. Worth the try anyway. No hurry.
11/16/2011. The smaller fans are here, and they move far less air. Maybe enough, maybe not, nice to have some choices. I'm playing with them with a 9v battery, so they're running slower than spec'd. Still... There's a good bit of literature out there about using small fans like these to control or disrupt boundary layers, but it seems to dwell on large dobs and high magnification applications (planetary viewing). Thing is, I think I am seeing clear evidence of boundary layer effects in focusing runs; whether they influence image quality at the plate scales I am using is another matter.
One thing mentioned in one authoritative piece was that front mounted fans must be vibrationally isolated from the telescope structure. Some form of flexible membrane is suggested. I've got the brain spins with multiple designs bouncing around in my head and am in some danger of either over- or under-thinking this one. Right now, I'm thinking of a wand with a cloth- neoprene- rubber- suspended-fan. If the prototype shows any promise, then put a variable pot on its power line to find a sweet spot balancing adequate cfm and an absence of vibration. I am [was?] also thinking of running a tube down the OTA (rubber? PVC? copper?) and keeping the fan well away from any rigid structures. (Wild hair: compressed air? Forget the fan?) Note that I am fairly settled that the new rear fan must be set up to be reversible, so that I can mess with pulling air out of that hole while pushing it in through the other two. That might make a significant difference in cooling the mirror.
Let's define success now: if I can reduce PSF's by 10% -- i.e. from 2.2" to 2.0" in 900s subs -- or more, this will be a howling success. I confess that part of me hopes to win the lottery and knock them down into the 1.5 second regime. Hope springs eternal.
Nearly perfect collimation, nearly perfect polar alignment, proper gear mesh, and decent thermal control. Each should help a little and all together they may help a lot. Working on it.
Except where noted, deep-sky photos are made with an SBIG ST2000XM CCD behind a 10-inch Astro-Tech Ritchey-Chretien carried on an Astro-Physics Mach1GTO. The CCD is equipped with Baader LRGB and 7nm H-a filters. A Meade DSI Pro monochrome camera looking through a modified Orion off-axis guider keeps the OTA pointed in the right direction. The imaging camera is controlled via Nebulosity 2; the guide camera is operated by PHD Guide 1.13, both by Stark Labs. The stock focuser on the AT10RC has been augmented with Robofocus 3.0.9 using adapters turned on the lathe downstairs. Maxim DL5.12 performs image calibration, alignment, and stacking; Photoshop CS4 and FocusMagic 3.0.2 take it from there. Gradient Xterminator by Russell Croman and Astronomy Tools by Noel Carboni see their share of work, too.
:: top ::