10/31/2011. I thought the Iris Nebula could use a little more signal, a little less noise, so I gathered another two hours of luminance and layered it into Saturday's image. Then I opted to try NGC 891, a medium-sized galaxy in Andromeda with a prominent dark lane. But it was still in the trees when I slewed to its location. Rather than do another M31 / V1 frame while waiting for NGC 891 to "rise," I decided to take some frames of M33 for future reference. The first frames knocked my socks off, and I decided to stay in the Triangulum for the rest of the night.
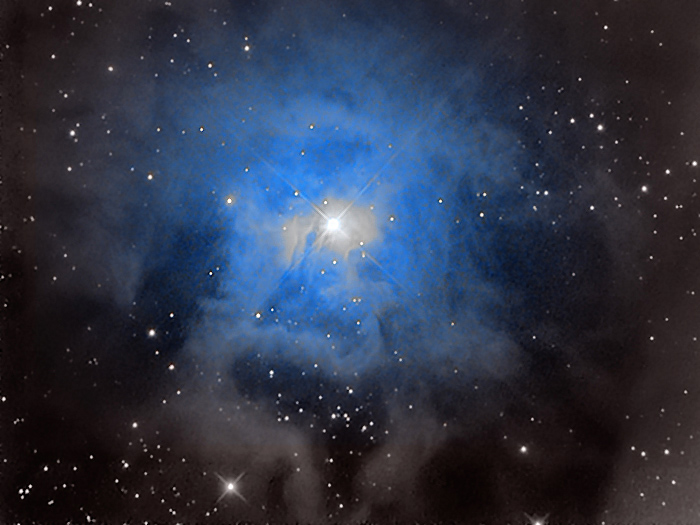
NGC 7023, the Iris Nebula
21x900s L, 1x900s RGB
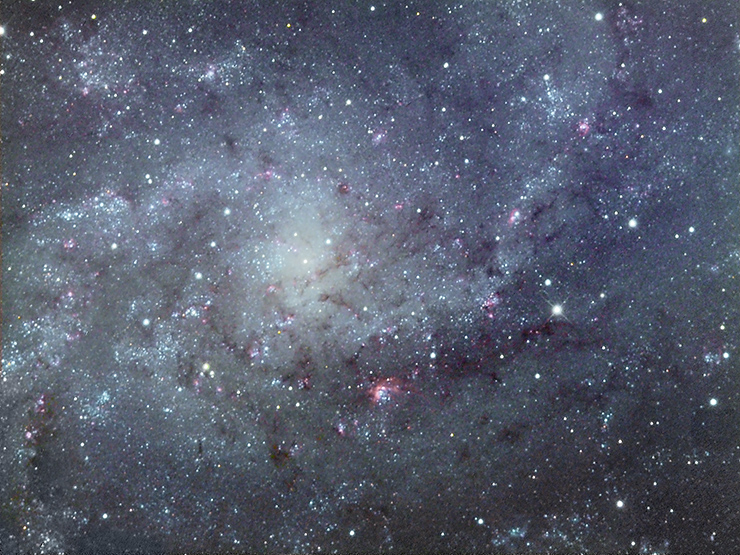
M33, the Pinwheel Galaxy, in Triangulum
16x900s L, 1x900s RGB
PSF's expanded from 2.4 arc seconds to 3.4 over the course of the night. Seeing? Focus shift? Dew? In any event, the first hour's data are clearly better than the last two hours'. I'll collect more and sharper luminance by and by. The composition is a bit of an accident; I found an excellent guide star and was reluctant to mess too much with it. It worked out well, leaving room for the long spiral arm to the right and just including the arc at lower left.
11/01/2011: I started with a series of narrow-band images of the Bubble Nebula but really wanted to take advantage of very good seeing for a sharper M33. When the galaxy cleared Bird Feeder Tree, I found PSFs as small as I have seen here. Fine-focus PSF's measured 1.3 - 1.5 arc seconds. The Clear Sky Chart for Colby, NC, has been spot on in every aspect of its forecasts, including seeing.
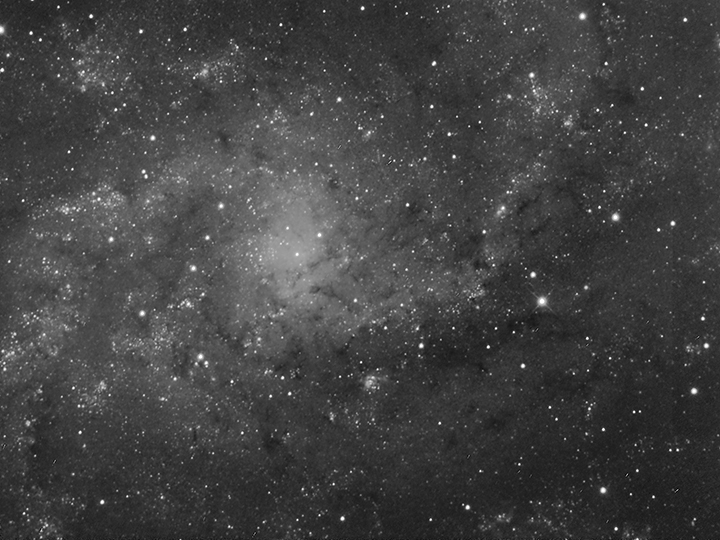
M33
29x900s L
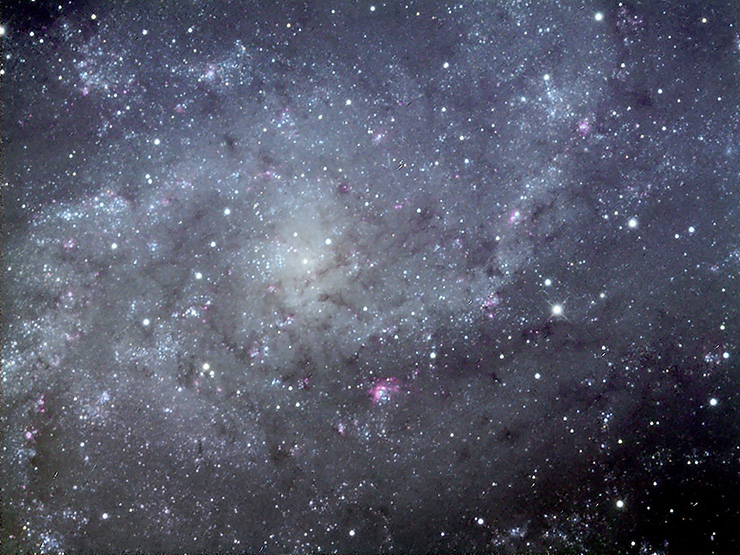
Above is the better data from last night and tonight, 29 frames totalling 7h15m of exposure. It doesn't really seem much sharper than the previous image; the difference is measurable but barely perceptible at this scale. Interesting. But note that the color "takes" better when you don't have to press the luminance layer so hard:
M33
29x900s L, 1x900s RGB
(Click the image for full-size.)
There. That's the way you do it. I'm not sure these differences show up well on the web-sized images, but they're gratifying to work with at full scale. This is the inverse of "show 'em small and they look better because the faults are hidden." These look better large. Even so, the background remains a little noisy. More exposure? Less stretching? Better processing? Much to learn.
Almost an afterthought, here's the Bubble Nebula from early in the evening. I've had to mung around with it too much to get rid of a streaky background. Stars are . . . odd. I'm still having trouble getting the Baader filter to perform as well as I am sure it can. Even more to learn. (See "stop the presses" down below; this one needs to be reprocessed during the next cloudy (or daylight) spell.)
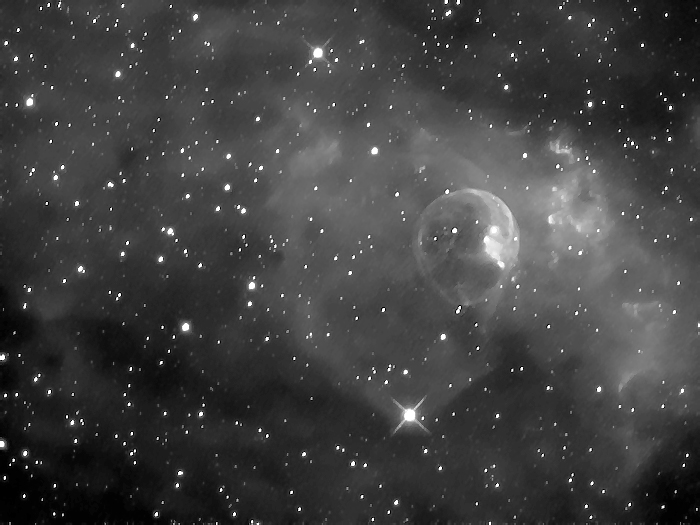
NGC 7635
The Bubble Nebula in Cassiopeia
12x900s 7nm Baader H-a filter
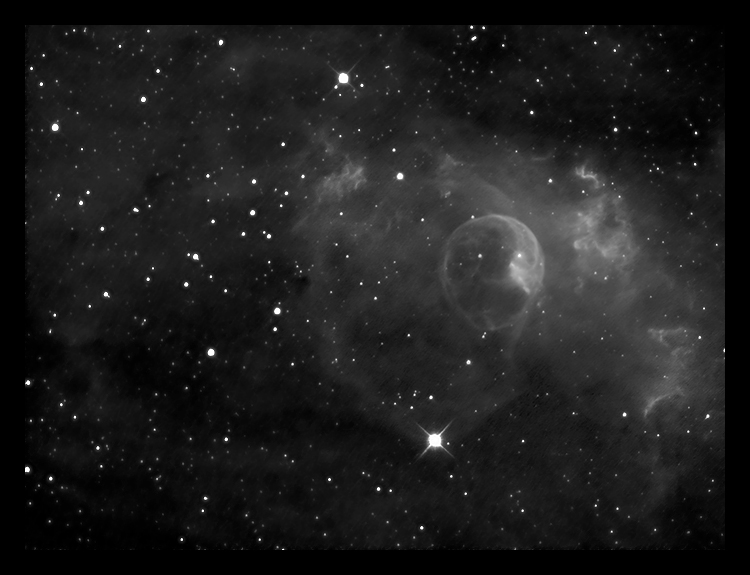
The Bubble Nebula with improved darks
(see "Stop the presses" below)
11/2/2011: Just piling up some photons, experimenting with the H-a filter, taking more V1 data, and maybe finishing with a potshot at NGC 891...

NGC 7000 (small part)
12x900s 7nm Baader H-a filter
3 darks (see "stop the presses" below)
This is part of "the wall," in Cygnus, an ionization front in NGC 7000, the North America Nebula. This is somewhere in "central Mexico." I need to work out the exact RA and Dec of the field so I can return to it for color data by and by. I found it by slewing to the catalogued position of NGC 7000 and then wandering a little south and a little west. [I can't get Pinpoint Astrometry to solve it for anything, but manual comparison to Guide 8 charts puts the center very near 21 00 42 / +43 50 58]
Then an hour of M31 and V1 (the field looks just like it did the last time), and on to NGC 891, a galaxy I've always found difficult visually, but which I expect the Ritchey and CCD to render with ease.
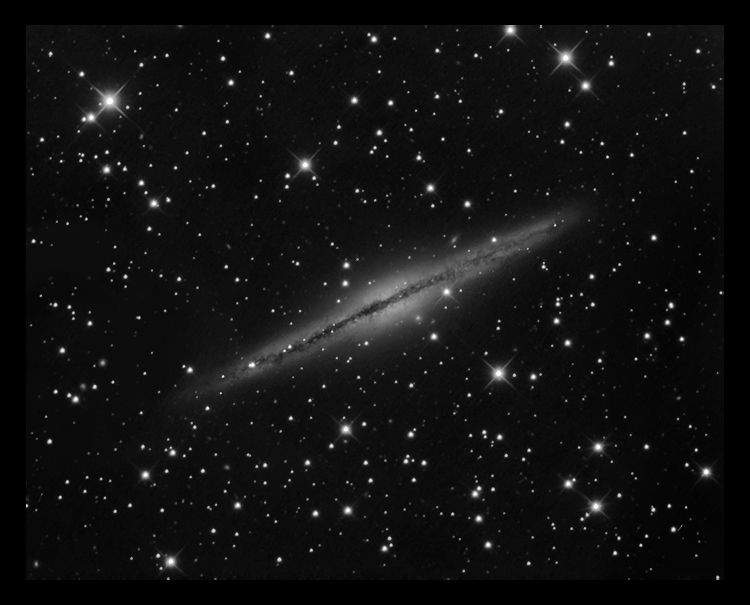
NGC 891, an edge-on galaxy in Andromeda
22x900s L
The sky during the overnight imaging session of NGC 891 was middling transparent but offered some of the best seeing yet: PSFs during focus checks were in the 1.3 arc second range; achieved PSFs in 900s subframes were 1.9 - 2.0 arc seconds, and the final 22-exposure (5h30m) stack retains 2.1 arc second stars. Look at the detail in the dust lane, the tendrils extending above and below the galactic plane. I wanted RGB data, too, but I didn't want to use any part of a night of such good seeing to collect data I can gather practically any time.
Y'know, the color data can be so much thinner than the luminance data, I wondered if I could borrow RGB from an image I made last year at a much different scale. See the original on slowblog page 35, here. That image was made with a 5-inch A-P refractor, working at 542mm EFL. I layered the RGB data into the luminance frame made with a 2000mm FL Ritchey-Chretien. Line 'em up in Photoshop and... Voila!
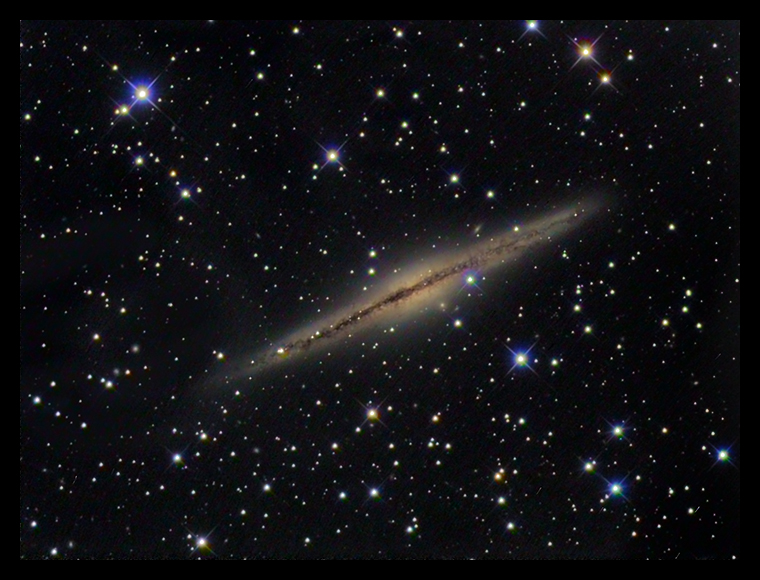
NGC 891, an edge-on galaxy in Andromeda
22x900s L 10-inch R-C
8x900s L, 900s RGB, 5-inch APO (12/13/2010)
11/3/2011: Stop the presses! The noisy, streaky H-a backgrounds I've been straining to fix are caused, predictably enough, by issues with the dark frames. Actually, they arise from the use of a dark frame. Make more than one. I shot three fresh darks around sunrise this morning, did a median combine, and used the result to reprocess the NGC 7000 data. I did the prcocessing side by side, using identical settings. The stack using the 3-frame dark was clearly superior, clearly quieter. That's understated: the result was incomparably better. Make more darks! A calculator on the web (CCDWare site) suggests that 24 darks would be about right based on the sky background in my H-a ST2000XM frames. I've reprocessed the Bubble Nebula photo and show my best efforts with 1 and 3 darks above. As you can see, far less aggressive smoothing was requried to get rid of noise. That means the best balance between noise and both detail and sensitivity can show more detail and a more subtle presentation of tones. There's more and fainter detail left to see when I don't have to work so hard to remove objectionable noise.
On the next night with clouds and no actual rain (tonight?), collect a slew of darks to found a calibration library. Start with -30° and -40° sets, keep making new ones and use as many of the most recent images as needed to make master darks.
BTW, plate solving some of tonight's images using Pinpoint Astrometry in Maxim shows the R-C's focal length to be 1989mm, just shy of the 2000mm expected.
11/4/2011. In the afternoon, I began a library of calibration frames — sets of dark and bias frames at various temperatures — with the idea that I will admit new darks from tiime to time and eventually age the older ones out of the library. By morning, I had enjoyed a very successful night though I never opened the shutter once. I had captured 63 dark and 64 bias frames:
chip temp °C: |
-20 |
-25 |
-30 |
-35 |
-40 |
Bias frames: |
16 |
|
16 |
16 |
16 |
300s darks: |
|
|
9 |
|
|
900s darks |
|
12 |
31 |
4 |
8 |
From this we can learn certain things: that bias frames are quick and easy, so you can take a lot; that I had to wait until very late / very early for the ambient temperature to drop low enough to take data at -40 (the camera can cool the chip a little more than 40 degrees Celsius without resorting to water cooling); that I expect to image at -30 or below for the rest of autumn, all of winter, and into spring, and that 900s subs are my favorites, so I took particular care to get calibration images for that regime. I don't see any particular reason to fill in the left side of the table since I doubt I will be imaging at warmer chip temperatures for some months to come, by which time darks taken now will be too old to use anyway. And there should be plenty of opportunities before winter to make more calibration frames at -35 and -40.
From examining the FITS headers of the frames, we learn why more than one dark frame is needed. The temperature of the chip varies by half a degree C up or down from frame to frame. From examining the frames themselves, it's easy to see that while most of the hot pixels stay put from frame to frame, a myriad of fainter pixels do not seem quite so steady. Also, it's entirely possible that "hot" pixels are not full on 65,000-level hot; they too may vary from frame to frame. All in all, after this exercise, it's a wonder things have worked as well as they have.
There are lots of rules of thumb: at least three dark frames, as many darks as lights. And there are complex, statistical and engineering models to determine the optimal number of darks. For the moment, I want "at least three, preferably ten, and ideally however many the model says" for future images.
:: top ::
| 