1/4/2012. Horrendous seeing, bright moonlight, and thin clouds... I do not prefer a challenge, but I do prefer imaging to not imaging.
I wanted to get started on NGC 660, a polar ring galaxy in Pisces, superbly rendered by Dietmar Hager (in 40+ hours with a 9-inch refractor). All I got for a couple of hours of exposure was confidence that the polar extensions are within easy reach, very large stars, and a reminder that a proper flat field is a thing of beauty (because an improper one makes a terrible mess).
For a lark, I aimed at Rigel, through the pines, and collected lots of frames in RG and B. Maybe I can make a lavalamp out of them sometime. (No, they do not reveal the companion, no matter how I stretch and mix them.)
In all this moonlight, I figured I could shoot objects bright in H-a or just bright, so I spent a little time with everybody's favorite winter "star:" M42, which is both. Surprise! I had trouble finding a guidestar, so rather that waste a lot of time looking for one, I decided to shoot a lot of short frames, the better not to blow out the trapezium anyway.

M42, an emission nebula in Orion (detail)
30x30s H-a, 5x30s RGB
(H-a used as luminance)
Unguided
It's easy to see why people go nuts with color saturation in that field. I wanted to keep the "mackeral sky" appearance around the trap with suggestions of the blue-green light that pervades the view in small scopes. Some friends report seeing pale reds in my 16-inch dob, but I only see blue-green and grey. So I tried to keep things in check when mixing this one. And even at this scale, the stars are fuzzballs.
I got big stars (5, 6, 7 arc seconds in the finished images --owing to seeing, I think, not lack of guiding), but enough data to play with.
I finished the night with brief RGB (useless, even for star colors!) and long H-a of the Cone Nebula south of star cluster NGC 2264 in Monoceros (even more big stars). I found some passable guide stars (cotton balls on the screen) and made the best of them with long integrations. Even so, guiding was no better than 1 arc second (0.77"/pixel x 1.4 RMS). Either something is wrong witih the hardware, or the seeing was simply that bad. I think the seeing was simply that bad.
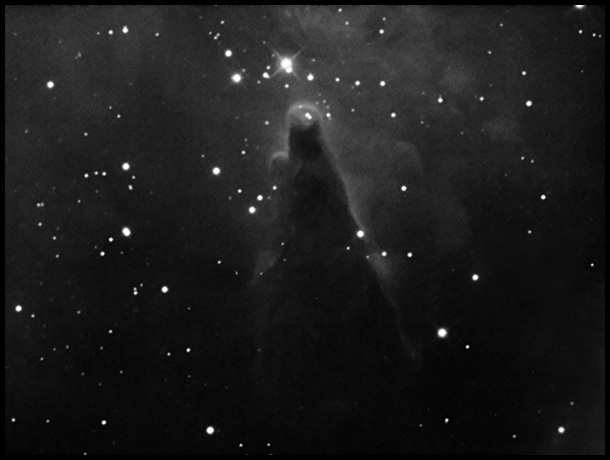
The Cone Nebula (near NGC 2264) in Monoceros
6x1800s H-a
(Maybe not even a good start on this one.)
1/6/2012. In The New CCD Astronomy (a superb book; I have no idea why it is out of print), Ron Wodaski warns that there'll be nights like these. At 2,000mm and above, seeing dominates sharpness even if everything else is well-set-up. After using a 2000mm Ritchey for several months, I have yet to really internalize that. Things go to hell and I never truly believe that it might "just be the seeing." Something, part of me is convinced, has to be broken. Listen: sometimes it's just the seeing. I lined up in deep twlight on M15, and saw 3 arcsecond PSF's while focusing, big divergences while guiding, and got 4 arc second stars on 300s images. Combining with sigma clip tightens them up some.
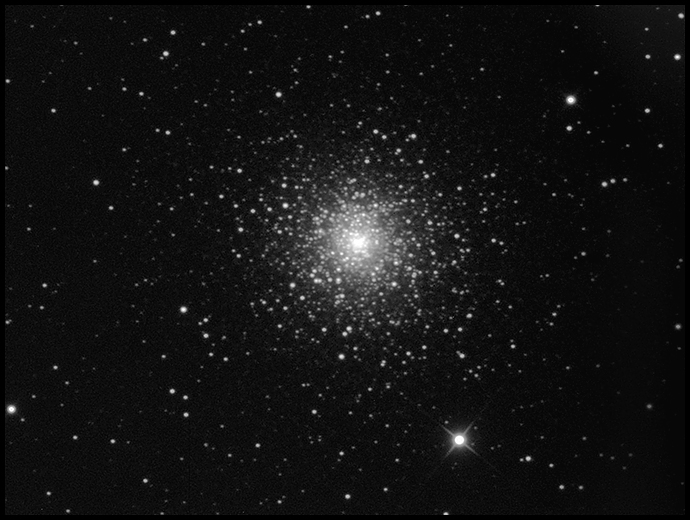
M15, a globular cluster in Pegasus
6x300s. Reality check: things work.
Then I slewed to NGC 660 near the meridian (just as it emerged from the Greenwich pine) and guiding settled down into the 0.5 arc-second regime. Images sharpened up (into the 2.5" - 3" range which is too furry to brag about but worlds better than >4). The sky could be better, but nothing's broken.
My second try on NGC 660 (the previous effort didn't produce anything worth keeping) also features high haze, a few clouds, lots of moonlight and poor (but not atrocious) seeing. 150 minutes of exposure gives me this.
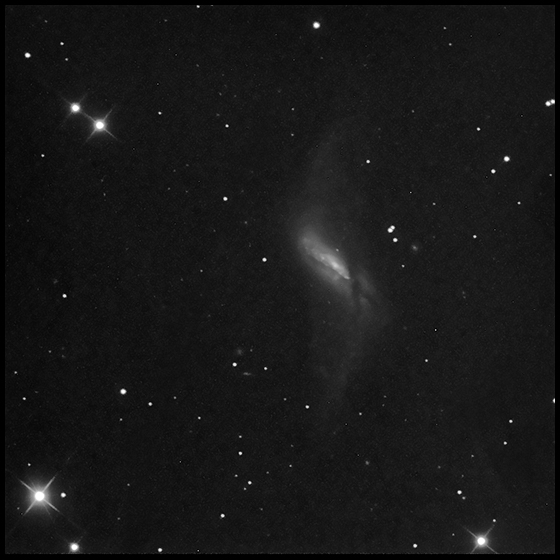
NGC 660
a polar ring galaxy in Pegasus
overweening ambition
10x900s L
I'm at least willing to call that "a start." I made the ten 15-minute exposures while NGC 660 passed through a gap in the pine tops to the southwest. That's about all I can get on any given night. I think this one is going to be a project until the seasons carry it into evening twilight (too soon). I'll try not to waste your bandwidth with intermediate results. One clear, steady, dark night would get me a long way towards a tolerable image. The odd crop is because I can't seem to get an adequate flatfield for this image and the (hidden) right side is a mess of light and dark donuts. The frame demands a very good flat: much of the interesting stuff is crowded into only 200 grey-levels out of 64,000.
1/9/2012: Clouds. Lots. So I am brooding on what works and doesn't work. The second OAG, this one by Celestron, is on its way and should arrive tomorrow. I bought it used off another amateur on AstroMart. With this one in hand, I can stop looking at the Orion OAG with modifications in mind. That one works very nicely for guiding the CCD at the Ritchey's native FL. Leave it alone.
Project One: Remember that the sole purpose of the second OAG is to be modified or to provide parts to help put a telecompressor between the Ritchey and the CCD. Nevermind getting an OAG between a Canon and the Ritchey: exposures are so short with DSLR's that the separate guide telescope works well enough. Hold this solidly in mind: the first challenge is to put a telecompressor ahead of the CCD and still do off-axis guiding. When sketching and whittling metal, don't get drawn off into other avenues. [Yuck! What a lousy day in the shop! I dry fitted, measured, turned and trimmed PVC shims from PVC pipe -- that part worked great -- but also destroyed the main guider body of the new-to-me Celestron OAG. The metal is much harder to machine than I expected; when I torqued down the chuck, I distorted the guider body and the CCD attachment threads. Then I finished it off with the chop saw which threw a lot of chips and ended up gnawing rather than cutting the flange off. Set it aside; eventually use the pickoff prism assembly to build an OAG or two or three from scratch. I have ideas which I will do the favor of not trying to implement today.]
Project Two: the better I can get the guidescope working, the happier I will be. So on that front, I measured the Ritchey's focuser to see about ridding it of sag. The focuser body is 2.5 inches long, and the drawtube lies 0.35 inches (+/- 0.01) inside the inner surface of the focuser body. If I were to cut some Teflon rods to that length and turn them to that diameter, could I not fix them inside the focuser body to keep the drawtube from tilting as the telescope moves?
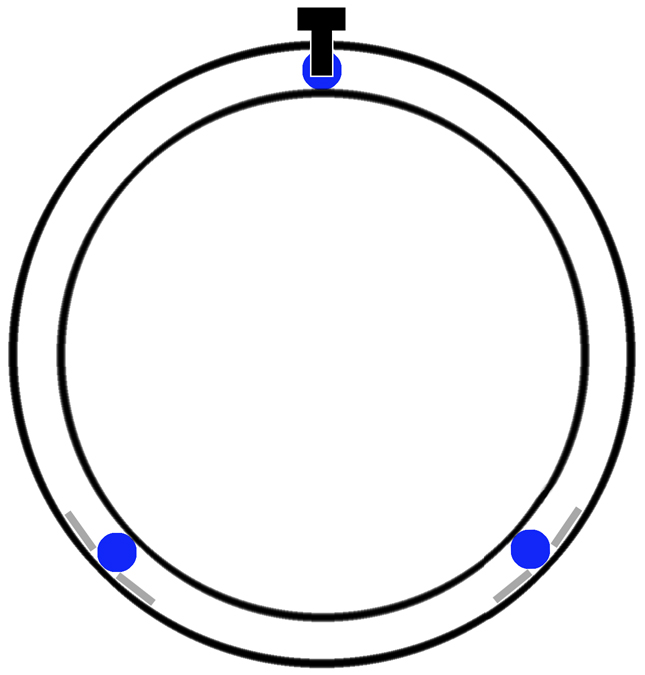
cross-section of focuser body:
Teflon rods shown in blue,
silicon-gluable / boltable metal guides in grey,
drawtube and outer focuser body in black.
Enough Teflon (3, 12-inch rods 0.375" diameter) is on the way that I can mess some up refining this notion. Very few (if any) adhesives stick well to Teflon, so I am thinking that the easiest way to keep the rods in place will involve set screws and / or metal rails. Set screws will give me additional tolerance when turning the Teflon rods to size and could also be used to adjust the fit and preset drag on the drawtube. The lock bolt either gets a teflon cap, or it becomes the first set screw. If you can't glue Teflon, you can always glue or bolt metal guides alongside it.
And Project Three: the more I can reduce the scale of a wide, usefully illuminated field, the more successful the guide telescope will be and the broader the field I can take with the R-C. So turn an adapter to put the Canon 5D behind the A-P 2.7-inch 0.75x telecompressor and fit that to the AT's focuser. Even if I only knock the 10" down to 1600mm, several compelling compositions become feasible. That's wider than the 50D or 20D is behind the 0.67x compressor.
After a very bad day in the shop...
1/11/2012. JUST STOP. You may proceed with project (2), but otherwise just stop obsessing over OAG issues. You own a dual chip camera and Maxim DL5. Will you just (re)learn to use them? Do you see how many of these problems will just go away if you do that? Stop cutting metal, spending hours drawing and measuring and thinking and just learn to drive the camera with the fancy software and that's that. Even H-a should be fine: the Mach1 is a very stable mount. If you need 10s guiding subs, use them. One of the next pretty pictures I post here is going to be guided with the second chip behind the CCDT67 compressor at F5.6 or faster. Period.
1/12/2012. Teflon in place. Note that 3/8-inch Teflon rods cut easily with a sharp knife. They're too flexible to chuck even short pieces in the lathe to turn to size, so I clamped them in a vice and used a sander to flatten one side to produce the needed 0.35 - 0.36-inch "diameter." The rod shown at the top of the drawing is fixed by the stock focussing lock bolt; the others, for now, are just slipped into place. If this works to reduce focuser sag, then consider ways to hold them in place (much simpler means than the ones sketched and maundered about above have come to mind). Incidentally: while installing these, I checked the clearance between the drawtube and the outer focuser body. Depending on whether the lock bolt was cinched down or loose, I think I was seeing changes of about 0.015". If I wasn't misreading the micrometer -- always possible -- this confirms the potential for the focuser to sag by an appreciable amount. With the Teflon in place, I should be able to apply a wide range of force in compression without handicapping RoboFocus's ability to move the focuser to and fro. I'm thinking I may have gotten rid of a huge source of movement. Star trials (not "trails") to come.
1/13/2012. Shezam! You can slice yourself on the threads and internal baffles of the extension tubes on the AT. Be careful when they are very cold and slightly stubborn. And get a strap wrench from Wally's filling station.
As promised, here's the next pretty picture, acquired behind the 0.67x telecompressor and tracked through the imaging OTA using the self-guiding chip in the SBIG CCD:

M1, a supernova remnant in Taurus
L 900s x 7
AT10RC @ F5.6
Self-guided with ST2000XM
using Maxim DL 5.12
Listen: finding and setting all the guiding and camera control parms just about drove me around the bend. There are "settings" and there are "options" and within each there are more options (or settings, who can tell?). The northern edge of a 150mph jet stream is curling back to the north overhead tonight, and that is not helping anything: guiding without chasing seeing is a trick. Get the settings wrong, and self-guiding is useless. A good calibration run is essential; stiction on; proper aggressiveness settings; small minimum moves. Learning to tune Maxim's guiding for conditions is going to be an art unto itself. How do you get round stars? Practice, mister, practice.
Next, I wanted to get more comfortable with the autosave dialog. When the background count took a dramatic leap upward because the Moon had risen far enough to interfere, I changed to the Ha filter for maximum contrast, set up a new Exposure Preset for it (1800s x 3), took a new guide frame and selected the brightest star in the field. (Note that for some reason I still had to select "single exposure" to move the filter wheel, then return to the autosave routine.) With 10 second guide exposures, I had a solid lock on a good guidestar. But while I watched, the guide star dimmed and brightened again a few times. I stepped outside to see if some clouds were blowing through -- and saw a pretty fair overcast. If I can guide H-a through this, I think there is no reason to doubt the sensitivity of the guide chip and its ability to guide behind the H-a filter. Having a stable mount means I can collect light for about as long as it takes to get a guide star. Or so I think tonight.
Guiding with the ST80 is still not quite right; neither is it hopeless. It deserves a closer look before I speculate about further changes. In the meantime, here's M33, a sigma-combined stack of short and long(ish) exposures, guided using the separate guidescope. Not as good as it looks: 300s subs were deconvolved to reduce trailing before stacking.

M33
6x60s + 6x300s L
AT10RC @ F5.6
Except where noted, deep-sky photos are made with an SBIG ST2000XM CCD behind a 10-inch Astro-Tech Ritchey-Chretien carried on an Astro-Physics Mach1GTO. The CCD is equipped with Baader LRGB and 7nm H-a filters. A Meade DSI Pro monochrome camera looking through a modified Orion off-axis guider keeps the OTA pointed in the right direction. The imaging camera is controlled via Nebulosity 2; the guide camera is operated by PHD Guide 1.13, both by Stark Labs. The stock focuser on the AT10RC has been augmented with Robofocus 3.0.9 using adapters turned on the lathe downstairs. Maxim DL5.12 performs image calibration, alignment, and stacking; Photoshop CS4 and FocusMagic 3.0.2 take it from there. Gradient Xterminator by Russell Croman and Astronomy Tools by Noel Carboni see their share of work, too.
:: top ::