7/30/2011. I started remaking the Robofocus attachment hardware in brass. Told you I would. And because it would be purest vanity to simply remake it in a prettier metal, I'm taking care to make it better at the same time. What I can't remake right away in brass, I'm painting black (because, all is vanity). To be continued, surely.
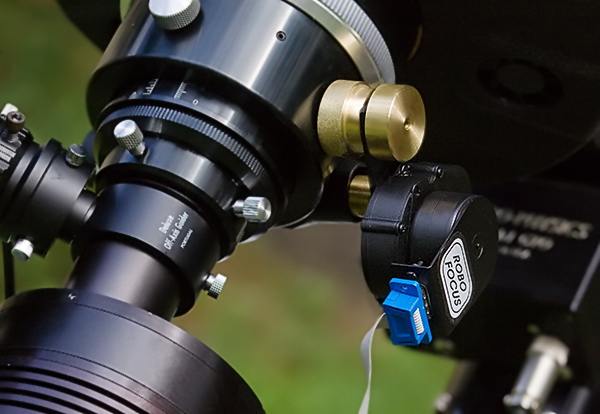
Robofocus bracketry v0.5
Aluminum spacer and steel nut replaced by brass
My other bugaboo, besides focus (which should now be solved), is near perfect polar alignment. That could probably be addressed with the alignment routines Roland describes and which the hand-control facilitates. But this looks like it might be simpler: wcs.ruthner.at/index-en.php. The link goes to a page offering "WCS" software to do computer-assisted polar alignment based on drift detected with a Meade DSI (or Toucam, or DMK, or...). Worth a try.
7/31/2011. Son of Incremental Progress under the clouds. I cable-tied some of the data and power cables that run to the CCD, guide camera, and Robofocus into one fat bundle so that I can more easily keep them from catching on the tripod legs, various bits of the OTA, etc while the telescope moves. It may not sound like much, but it may very well prevent dragging during long imaging runs, and it will certainly make tripping over, stepping on, and otherwise getting wrapped up in them less likely. On the horizon for cable management: tuck into the power box below the tripod a hub for as many of the USB devices as possible. Start with all the independently powered items (i.e., everything except the DSI) and if all goes well, add a DC-powered hub.
8/01/2011. I neatified the Robofocus attachments by filing and painting the aluminum plate (see the corner of the black aluminum sticking out in the photo above? no more), and gave WCS v2.02 a couple of trials under marginal skies.
The polar alignment program works very nicely, but it takes a little getting used to because the first language English isn't of the programmer. It's easy to stumble along and get ahead of where you need to be (if that happens, there's apparently no going back; just start again). Still: calibrate the camera (determine how close to EW/NS its axes are; the closer the better), do a 5 minute drift, follow the on-screen instructions to set azimuth and set altitude. After my first try, the mount was close. After the second, it is aligned well enough that I don't see field rotation in 10 minute OAG guided subs. There are some very nice touches that convince me that the programmer has actually used the code. Well done, Wolfgang Ruthner.
Tonight's sky was far from transparent. That stars would not come to a definitive, tight focus suggests that the seeing was pretty dismal also. The night was certainly good enough to try out the WCS alignment software:
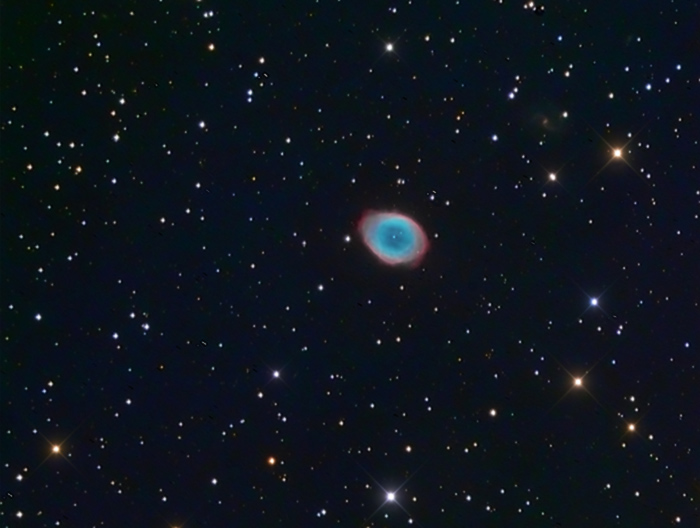
M57 under hazy skies
23x600L + 1x600RGB
(color data from a previous night)
Robofocus connected routinely tonight, so I sat here and watched the photons pile up while refining focus from time to time. Those elongated stars on one side of the frame — how can that be a focus issue? And yet, it appears to be, because when focus was nailed, that defect virtually disappeared.
8/02/2011: Down to two wires. I keep expecting to run into problems with hubs, but so far not so. I'm down to two wires: one to the DSI, and one to everything else (ST2000XM, RoboFocus, guide port on Mach1GTO). I had to reinstall some SBIG drivers, but that's routine. I'm thinking that with a powered hub and one more USB-Serial adapter, I should be able to control everything that can be controlled (camera, guide-camera, focuser, guide port, and mount) with a single USB cable to the netbook. Right now, the cats' cradle of wiring is sequestered in a red, plastic toolbox. Needs to be taken apart and wires coiled and wrapped appropriately. Tomorrow.
I started the night with twilit exposures of M101. Note: they're a mess. They call it "astronomical twilight" for a reason, and starting when the sky is still much brighter saves nothing when the target is faint, faintish, or easily hidden in gradients. There's nothing much to show for that hour of data collection. I slewed to the Hercules galaxy cluster, Abell 2151 (does the A-P hand control show this in Serpens? I thought it did, so I verified the NGC number of one of the brighter members and slewed to that, which resulted in an almost imperceptible movement of the telescope). I took almost 4 hours of good data and have a good photo of about half the cluster. That was not my intent, but it does set up the opportunity for an impressive mosaic. Lemons and lemonade, eh? Finally, I got up and went outside to shut things down about 3 AM and found a pretty good sky overhead. So instead of closing the shop, I slewed to Stephan's Quintet and took 2:00 of luminance (and a total of 15 minutes of color -- uselessly thin). The last two "useful" frames were noisy (twilight, haze, or dew -- it doesn't matter), so I've discarded them from the mix.
Stephan's Quintet
interacting galaxies in Pegasus
6x900s L
Here they are! You might know them best as those wacky talking galaxies from "It's a Wonderful Life." Archangels or island universes, please give a big hand to Stephan's Quintet, still glowing after all these decades.
 I've framed this one in black to reduce the competing glare of the computer screen. So much of the good stuff lives down in the "shadows." There's a ring galaxy (NGC 7320c) east of the Quintet (call it "Clarence") which deserves a closer (longer) look. There's a tidal streamer within the Quintet that shows up surprisingly well in just an hour and a half of exposure (it's much clearer in the inverted image at right).
The flat for tonight's photos was made by sweeping a flashlight across the two-stage diffuser mounted over the dewshield and averaging the best three frames. Lesson from processing these images: the quality of dark frames really (no, really) matters; get good ones.
All in all it's been a good week: combining USB control cables through a hub works fine; Robofocus is solid; WCS-aided polar alignment seems spot on (long slews landed every target near the center of the chip), and I found guide stars in the OAG everywhere I wanted them (taking dark frames for the guide camera with the modified filter slide helps greatly). I wanted 900s subframes with seeing-limited PSF's, and what you see above are examples of exactly that. The DC-powered hub and a second USB-serial converter are on the way. A powered hub will let me consolidate the guide camera with the rest of the "hub'ed" cables and get me down to a single wire running from computer to telescope. The fact that it is DC powered will let me take power for everything from either the AC / DC power supply or a deep cycle battery as available. The second USB-serial connector will let me direct the mount from indoors. Even if I don't want to send it halfway across the sky without being there to watch for cable snags and pier collisions, I'd like to be able to nudge it a bit now and then. (You might notice that motorized field rotators and automated flat panels have not figured in any of this, and I don't think they will as long as I and my telescope live at the same address).
8/05/2011: You can always tell when it's cloudy, 'cause I'm back in the basement shop working on something or other. This afternoon, I moved a third collimating ring to the guide scope from the 200mm telephoto bracketry. This one should provide the last word in rigid support for the extended focuser and guide camera.

The slightly-more-than 2-inch diameter focuser extension (shown here in blue) was too small to be gripped by the collimating screws in the Losmandy 3-pt ring (shown in black), so I made an adapter (shown in grey). I used the miter saw to cut a 1-inch long, 3-inch diameter ring from thick-walled aluminum tubing and faced it on the lathe. Then I drilled and tapped holes for four set screws and secured the ring to the focuser extension of the guide scope. (Four set screws? Yes: there are two at the bottom, spaced toward the edges of the ring; the other two are centered in the ring; that keeps the adapter from pivoting.) The 3-inch adapter ring is securely gripped by the clamp screws of the third Losmandy collimating ring. Taken all together, this should hold the guide camera more securely than either the unsupported focuser or the foam-block-supported focuser ever could.
Why bother to set up the guide scope when the OAG is working so well? Because I want the option to use a second OTA for guiding long-exposure images when, for example, I use the 2-inch Baader H-a filter or a telecompressor on the imaging camera, or a Canon body for a wider field, or the Schuler H-a filter without having to refocus the OAG. The third ring is made, mounted, and in place waiting for sky trials.
8/06/2011. One wire to rule them all... I put the 12v DC powered hub into the mix and rearranged the USB cables. One wire now leads from the computer to a red plastic tool box under the mount. I've exchanged several long USB cables for much shorter ones, though a few (the run to the SBIG camera, for one) are still much longer than they need to be. Likewise, the serial wires to the guide port and the Robofocus controller are far longer than needed. Where there are not short wires, there are at least neat coils of wire. Where once was a bird's nest, now there is one red box. Today's is a good step in the right direction, but we're not there yet.
PC -----> DLink Hub
1-(s)-> Robofocus controller (self-powered)
2-----> GPUSB -(s)-> A-P mount guide port (self-powered)
3-----> ST2000XM / CFW8a (self-powered)
4-----> CoolStuff hub (nominal 12v in, 7-24v min/max; 5v USB out)
1-----> Meade DSI (bus powered)
2-----> (planned: ~A-P mount control) (self-powered)
3-----> (available)
4-----> (available)
(s) serial connection, otherwise USB
I had to reinstall drivers for the SBIG and Meade cameras, as expected. Robofocus and the Shoestring GPUSB guide connection hooked up just fine, as not expected. The Pyramid power supply is feeding the CoolStuff hub via a simple two-conductor cord from the Pyramid's front-panel posts, an arrangement which will not readily adapt to 12v battery power. The SBIG has a 12v DC power supply (with inconvenient clamps) ready to incorporate; I have a universal DC adapter that I've tested with the notebook; I think I will need to build a 12v cable for the Robofocus controller. I need to buy a supply of plugs and start soldering in order to reach the ideal of being able to swap from AC to DC power by moving a single plug from Pyramid power supply to deep-cycle battery. But before going too much farther along this line, I want to look into higher-quality DC connections like the ones used in ham radio. If I'm having to spend time building a lot of pieces, there's no particular reason to build mediocre ones.
Later that same evening: under vaguely clear skies with lightning on the horizon, I could usually see Arcturus. It seemed good enough to try out the new guidescope ring and make sure the electronics are all speaking to the computer (and vice versa). At least I can get the finder, guidescope, and imaging tubes to agree on where they are pointing in anticipation of better skies to come. There was an astonishing amount of play in the guidescope focuser: put the guidestar anywhere on the chip and that third ring can move it anywhere at all. That amount of movement used to be subject to gravity. Seeing (best focus is about 2.7"), tube currents (I set up very late), too-bright guide stars (the better to see through clouds), etc., will make whatever tests I slip in tonight not much more than plausibility checks. When used for real, we'll see whether the new bracketry controls the slop. Indeed: 900s exposures of Arcturus and M13 are not especially encouraging, but I put much of the trouble down to interruptions by clouds, poor seeing, and possibly poor polar alignment (maybe I bumped something, but slews were reasonably accurate). Anyway, the better the sky, the fewer the interruptions, the better the guiding, so all may yet be well. In summary: the electronics worked great, and it's hard to imagine where flex could be creeping in. And yet, it probably is. (Horrible thought for the day: is the flex in the AT10RC focuser chain? Give some thought to how to make it more rigid, just in case.)
8/07/2011. One thing that would simplify my night life considerably is a parfocal H-a filter. I'm going to try swapping the 10nm Schuler for a 7nm Baader in hopes that the latter is at least approximately parfocal with the Baader LRGB filter set. At the very least, I get a narrower H-a filter with better reflection control; at best, it will be close enough to parfocal that I won't need to modify the focus of the off-axis guider when I switch from wide-band to narrow-band imaging. That means I wouldn't need to depend on the external guidescope for long-exposure narrow-band imaging. All my filters could then be guided alike. Found one on sale with free shipping from AgenaAstro.com -- one of my all time favorite vendors.
8/09/2011. Not so many years ago, there were no planets known outside the solar system. Tonight, thirteen extra-solar planets will transit their suns as seen from my backyard. All but three should be readily observable (or would be if it weren't for the pines); two of the remaining three would be challenging, and one, a super-Earth, is simply beyond the pale (transit depth 0.0002 mag). If the sky remains clear, I might very well pick one.
I uncovered the OTA to let things dry out completely and discovered that the collimation of the R-C had somehow slipped a bit. I tweakd it with a laser collimator, then by eyeball, then by laser again, and reached what looks like an excellent compromise between two nearby ideals (ha! see below). I want to start with an imaging run, and I want to quantify the L to Ha offset of the Schuler filter to compare it to the Baader when it arrives. But mostly I'd like it to stop being crystal clear and stupid-hot all day only to cloud over at night.
