11/29/2011. They're gonna get you one way or the other. Thoroughly impressed with the ability to tweak focus remotely, I decided to put a spare RoboFocus motor on the A-P refractor. The control circuitry is already in place on the mount, the imaging computer is already configured to use it, and the motor from an old "Mandel setup" was waiting in the hardware drawer. Robofocus makes an inexpensive bracket specific to A-P focusers which I ordered in lieu of whittling on brass or aluminum downstairs. I was a little surprised that it didn't fit flush with the bottom of the focuser when the shaft coupler was connected. There was about 1/4 inch of air between the focuser and the bracket. This is obviously how it is supposed to work, so I cut a couple of 1x1 inch aluminum spacers, drilled two holes in them for the mounting screws, and voila, everything fits as solidly as hoped. It was just a little less plug and play than expected.
Except now the telescope won't fit in its case. If I rotate the tube so that the motor is down, it almost fits. I just need to carve out a hollow in the floor of the case for the motor. Recall that I got excited and put 3/4-inch plywood down there to hold the telesccope in place with its ring-cage mounted on a Losmandy D-plate. I tried using Forstner bits to cut out the needed space, but the drill press has insufficient reach to cut wood on the "far" side of the case. A Dremel tool with sandpaper drums can't remove as much wood as I need it to remove before the sandpaper wears out. Absent a router, I needed a plan C or D or E... Aha! Use a chisel!
I ordered some inexpensive but well-reviewed wood chisels from Amazon and also, by the way, two desiccant packs (one for the camera between uses, one for something else, maybe the computer in its overnight case although the heating pad should make that superfluous).
Another cut at vdB 141: horizontal composition. Three hours luminance, 45 minutes color. Needs a lot more than that (see below!). And the color gradients are real trouble. That may come from stretching the data hard, but the fact that the target is low-ish in the NW, over Lenoir and some development along the Connelly Springs Road does not help.
On to the Pleiades. What can I do with a long focus instrument and a great big, nebulae-wreathed cluster? Two things. Here are two presentations of the same overnight data:
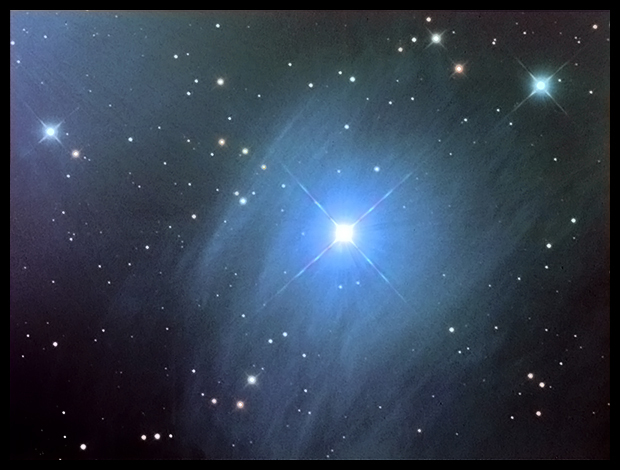

Merope, the 5th brightest star of the Pleiades and associated nebulosity
14x900s L, 1x300s RGB.
Top frame: processed to emphasize the extended envelope of gas and dust
Bottom frame: processed to highlight tiny IC 349, E. E. Barnard's Merope Nebula
OK, neither image is any great shakes. With seeing in the 3 arc second range, I didn't expect much more than a plausibility check. That tiny nebula tucked up under Merope near the 7 o'clock position is only 3600 AU from the star, and the star is about six magnitudes brighter than the Sun. Merope must be quite a sight from there. Check my numbers: deduct 12 magntiudes from the apparent brilliance of the Sun for being almost 4000x further away, then add 6 back for Merope's greater intrinsic brightness, which means that Merope would shine at magnitude -16 or -17 in the sky of an observer near that nebula; not quite halfway between the full Moon and the Sun as seen in our sky. All that gas and dust around the Pleiades -- Tennyson's silver braid -- is an accidental association. The cluster and the nebula are merely passing each other in the night. So as that little knot of dust approaches Merope, light from the star slows the small particles while the larger ones continue on their way. A closeup from the HST makes this luminous sifting plain (Google it, or I'll find it and put the image here soon enough). I think we're talking about light pressure only at this point, because I doubt the stellar wind from Merope extends that far from the star (could be wrong about that). Anyway. I'm just delighted that I can not only detect the nebula but capture some large-scale structure in it.
12/1/2011: I turned an adapter to allow casual changes to the airflow on the back of the R-C. The stock fans blow air into the tube. This adapter will let me mount a fan to pull air out. Rather than belabor the process and design, just skim a few photos. Start with a block of aluminum, 3" in diameter and 1.5" long; put a 1.25" hole through it. Turn a snout on one end to insert into the empty fan-hole on the back of the Ritchey. Carve out room for the fan on the other end. Don't sketch anything. Just move metal around until everything fits. The rubber bands are a temporary measure. I think. The finished adapter is a snug fit in the hole left when the internal bracketry of one of the R-C's fans snapped off when I pressed on it too hard while trying to get it to stop squealing. The new one needs its electrical connections decided on. Here's a little freehand machining on an 1890's lathe:

The chisels and desiccant are here, too. And Astro-Physics billed my card for the second 50% of the high-precision azimuth adjuster for the Mach1GTO, so it should be along shortly. I see some happy hours of fine-tuning in my not-too-distant future.
12/01/2011: Later that same day. Clear tonight, better seeing. I thought I'd add some exposure to vdB141 and hope more luminance data would smooth it out. If so, I'll take more (and, please, better) RGB data to go with it. Yes sir, yesterday's 12x900s subs and tonight's 5x1800s subs and a better flat (flashlight, double diffuser, 6x10s) combine to produce this, which shows real promise:
van den Bergh 141
aka, "Ghosts of the Cepheus Flare"
12x900s L, 5x1800s L
The ghost figures remain a little dim, appropriately enough, but they are emerging nicely from the noise. They're directly above the bright double star, at the edge of the nebula, standing up into the darker space beyond. The short, horned one is waving at you; the taller one has both arms flung back over its head is yelling, "Boo." Or something. Ah hell, nevermind: if you see them, you see them. If not, this blather is not helping.
I remember seeing lots of detail in the inner reaches of M31, the great Andromeda galaxy, but it had always been accidental, something caught out the corner of my eye while looking for V1 or trying to resolve star clusters in an outer arm. Tonight I decided to see what I could find right in the center of things.
I swear, I was trying to make a pretty picture and accidentally discovered something. Did you know that many of the dust clouds near the center of M31 are out of the plane of the galaxy? Not just an isolated cloud or two or three -- the dust there takes the form of a distinct spiral angled at 60 - 70 degrees from the plane of the galaxy. Like as if it might be remnants of a disrupted and assimilated smaller galaxy, or maybe dust stripped out of of M32 or M110 on their long, looping orbits. Oh, I'm sure this is old news in the professional literature (yes it is, e.g. ApJ 1985 290.136J, Jacoby, Ford and Ciardulo; and there is an excellent amateur image in 2009 by Paul Beskeen here, who provided the citation), but it's completely new to me, and that counts.
Here's what I did. I took a long luminance frame, 900s. Too long, burned out the core. So I dropped back to 300s, but I started with an RGB sequence so I could play with the 900s image while I collected the shorter luminance data. I looked for a way to save the over-exposed 900s frame. I overlayed the RGB on the L frame and flattened all the layers. Then I opened the channels dialog and, on a whim, darkened the red channel. I was thinking that since dust reddens starlight, darkening the red channel might better show otherwise overwhelmed dust clouds near the center. I figured that the R data might "tag" the dust clouds in the inner spiral so I could selectively darken them. Well. When I darkened that channel, inner detail popped out like nobody's business. I went back and did it again using the "convert to black and white" dialog, so that I didn't have to deal with a cyan cast. The effect is striking, but relying on a single 300s red exposure to do the tagging makes for a very noisy image. I'm taking lots more red data while making these notes. Here's a cropped and resampled section of my "discovery" image:
M31, dust near the core
highly processed: red detail darkened
It looks to me as if that nearest inward-spiraling streak dives behind the nucleus, is hidden as it passes behind the stars near the center, and re-emerges half an orbit later. The almost-star-like core is 3.5 arc seconds FWHM in this image. Star images are round to within about 5% while the core is elongated 30%, so we're getting at some pretty fine detail here. I don't know if the larger, sharp-edged bright oval surrounding the nucleus is real or is an artifact of the over-exposed 900s luminance frame. The shorter ones will tell the tale. In the full image, the difference between the planes of this spiral structure (the lit refers to it as the "nuclear spiral") and the grand spiral structure of M31 is immediately apparent. Maybe by tomorrow I'll have the data to show that to better effect. And I'll produce a pretty picture, too.
The morning after: It's not the pretty picture of M31 I had in mind. Stay tuned. When I went outside to select an overnight target, I saw that Orion's belt was going to skim the tops of the pines. I lined up on B33 and tried to photograph a horse in the woods.

Barnard 33, the Horsehead Nebula
a dark nebula in Orion
Best 10 of 30x300s L, 1x300s RGB
The first couple of frames looked promising, so I left the telescope tracking overnight. I had a bright guide star so I hoped it would hang in there through some thin treetops. It did. Only about one out of three frames was useful owing to the interference of the pines, but that's enough to stack up an hour's worth of decent data. The hydrogen-alpha frames that would provide real contrast in IC434, the bright curtain behind the horse, are yet to be made, but now that I know the field is accessible, I'll plan to collect matching narrow-band frames some moony night.
Except where noted, deep-sky photos are made with an SBIG ST2000XM CCD behind a 10-inch Astro-Tech Ritchey-Chretien carried on an Astro-Physics Mach1GTO. The CCD is equipped with Baader LRGB and 7nm H-a filters. A Meade DSI Pro monochrome camera looking through a modified Orion off-axis guider keeps the OTA pointed in the right direction. The imaging camera is controlled via Nebulosity 2; the guide camera is operated by PHD Guide 1.13, both by Stark Labs. The stock focuser on the AT10RC has been augmented with Robofocus 3.0.9 using adapters turned on the lathe downstairs. Maxim DL5.12 performs image calibration, alignment, and stacking; Photoshop CS4 and FocusMagic 3.0.2 take it from there. Gradient Xterminator by Russell Croman and Astronomy Tools by Noel Carboni see their share of work, too.
:: top ::